Home Blog Page 54

Is Hummus Fattening? Let’s Have An Insight

0

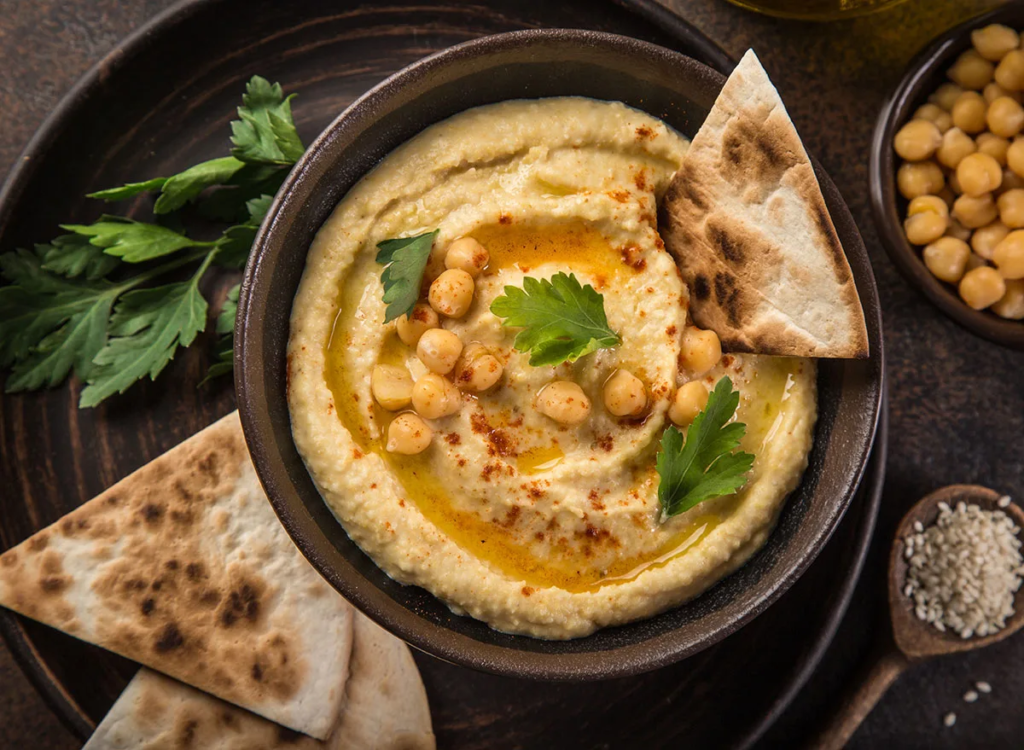
Hummus is a mix of chickpeas, sesame paste, olive oil lemon, cumin, and other seasonings. It is a fusion of fat, high protein, and fibers.

Now, the question arises, is hummus fattening?

No, hummus is not fattening itself. If you keep hummus as a balanced food in your diet, then hummus fat will help. Hummus fat helps us to lose weight, especially belly fat. But sometimes we start eating hummus too much. That’s not healthy either.

Want to learn a little extra about it. A whole article is waiting for yo. Just keep on reading.

Is Hummus Fattening?

No. Hummus isn’t fattening. Moreover, hummus helps us to lose weight so much. All you have to do is, consume hummus with balance. A balanced diet of hummus will help you with losing belly fat.

Is Hummus Fattening?

Now, hummus definitely contains a little amount of fat in it. But that doesn’t make hummus fattening. You might think that can you gain weight from eating hummus. Yes. You can gain weight if you consume hummus without a balanced diet.

Just make it a part of your regular food but balanced. With the balanced consumption of hummus, you’ll be able to achieve the benefits.

Types of Fats

There are a few types of fats. And some of them are good fats and some are bad. We’re going to discuss four types of fats. Those are:

Saturated Fats

Saturated fats are considered one of the bad ones. These fats are most of the time solid at room temperature. Foods that have saturated fat inside are:

  • Butter
  • Cakes
  • Biscuits
  • Coconut oil
  • Sausage and so on

Saturated fats increase LDL cholesterol which is called bad cholesterol. The increased LDL cholesterol can be harmful. This might cause heart disease and brain stroke as well.

Trans Fats

Trans fats are the worst type of fats out there. Trans fats also level up LDL cholesterol. These cause different issues in our hearts and nervous system. 

We can get trans fats in:

  • Microwave popcorn
  • Pizza
  • Fried food
  • Coffee creamer, and so on.

In addition, trans fats also lead our bodies to two types of diabetes. So, undoubtedly it is the worst fat.

Monounsaturated Fats

Monounsaturated Fats are one of the good types. These fats help us to stay healthy. Monounsaturated fats might help us with weight loss too. They also help with heart diseases if taken with a balanced diet.

We can find monounsaturated fats in:

  • Olive oil, peanut oil, canola oil
  • Avocado
  • Almonds, pecan, hazelnuts
  • Pumpkin, sunflower, and sesame seeds

Polyunsaturated Fats

Polyunsaturated Fats are also good fats. These help to lower the cholesterol levels in our blood. Our body cells are developed and maintained by this fat.

Polyunsaturated fats are easily found in:

  • Sunflower and soya oil
  • Flaxseeds
  • Fish

Hummus Fat: Good or Bad?

Hummus contains monounsaturated and polyunsaturated fats both. These two are the good ones from fats.

Because of the good fats, it’s not harmful to consume hummus. Moreover, hummus helps with cardiovascular diseases. It decreases LDL cholesterol and increases HDL cholesterol. Your nervous system will be cleaned as well.

So, the fats contained in hummus are good ones.

Is Hummus Nutritious?

Yes, hummus is very nutritious. Hummus contains a lot of important nutrients which are important for human health.

Sometimes you might think Is it okay to eat hummus every day? Yes. It is completely okay to have hummus every day. All you have to do is make your consumption wrapped up in a balanced routine.

Is Hummus Nutritious?

The nutrient chart of 100gm hummus is:

NutrientsAmount/Percentage
Calories214 gm
Protein10.71 gm
Fat8.93 gm
Carbohydrates28.57 gm
Fiber7.1 gm
Sugar3.57 gm
Calcium71 mg
Iron2.57 gm
Sodium607 mg

We hope that you’ll select the perfect amount of hummus for your diet.

Core Benefits of Consuming Hummus

Hummus is an essential source of vitamins and minerals. It contains a lot of benefits. The core benefits of consuming hummus are:

Benefit 1: Helps to Fight Inflammation

Inflammation is a process where the body is protected from infections, injury, and so on.

Sometimes inflammation crosses its limits in our bodies. Too much inflammation leads to chronic inflammation. It isn’t good for the health.

Hummus helps our bodies to fight chronic inflammation. Hummus has olive oil inside. Olive oil carries a lot of antioxidants. Antioxidants fight inflammation. Besides, chickpeas also help with inflammation.

Benefit 2: Helps With Digestive Procedures

Hummus is filled with good sources of fibers. Fibers are very important for our digestive systems.

Now, this is most of our concern does hummus make you poop? Yes. Hummus helps us to make poop regularly.

With fiber, you can keep your digestion process smooth and clean. Your body will digest food quickly. And you’ll definitely have a clean stomach.

Benefit 3: Maintains Blood Sugar Levels

Hummus maintains our blood sugar levels. The Chickpeas from hummus are low in glycemic index. The glycemic index is a scale to measure blood sugar levels.

Foods which contain a high glycemic index are easily digested and absorbed. And they also lower the level of blood sugar noticeably.

But foods which are low in glycemic index, are slowly digested and absorbed. And they keep blood sugar levels balanced.
Maintains Blood Sugar Levels

Benefit 4: Reduces Heart Diseases

Hummus helps to reduce heart diseases. It is filled with soluble fibers. These fibers help to lower LDL cholesterol which lowers heart diseases.

Chickpeas are one of the main components of hummus. They prevent heart diseases from happening due to fibers.

Traditional hummus recipes are made with olive oil. Olive oil increases HDL cholesterol. HDL cholesterol helps the heart healthy and smooth.

Benefit 5: Helps In Weight Management

Now, we all have this question in mind, is hummus good for losing weight? Yes. Hummus is very good for weight loss.

Hummus puts an impact on weight loss and weight management. Hummus is high in protein. High protein helps us to maintain weight easily. This will also lower the BMI level.

You might also think how much hummus can I eat a day? You can eat two tablespoons of hummus a day. That’ll make your diet proper and healthy.

Also, hummus will prevent us from overeating and extra cravings from food. The high fibres will stop overeating which will help to lose weight. Hummus makes sure that the sugar level of blood is balanced as well.

Benefit 6: Prevents Anaemia

Hummus also helps in the prevention of anaemia.

Hummus is high in iron. Iron helps our red blood cells be healthy. The haemoglobin level of our blood stays perfect. So, the chances of getting anaemia get lower.

Benefit 7: Makes Bones and Muscles Stronger

Hummus is contained high protein and fibers. High protein and fibers are important for our bodies. These help our muscles to grow and strengthen the muscles.

However, hummus has some minerals as well, which keep our bones stronger. The minerals are:

  • Calcium
  • Zinc
  • Copper
  • Phosphorus
  • Magnesium
  • Solium 

Benefit 8: Prevents Cancer 

Hummus helps in the prevention of cancer. Foods which contain high fibers and folate helps to prevent cancer. High fibers and folate help the cell division to be healthy and systematic.

Hummus also contains phytic acid and saponins. These components prevent cancerous cell growth.

These all are the core benefits of consuming hummus. Hummus can be very healthy. You can have hummus regularly with a healthy amount in your diet.

Hummus for Pregnant Women

Hummus is totally safe for pregnant women. Hummus has a lot of health benefits we’ve already discussed. Hummus is also contained folic acid. Folic acid is required for pregnant women. 

Hummus

Folic acid makes sure that the baby in the womb is healthy. And the baby doesn’t develop any kind of diseases related to spinal cords or brains.

So, pregnant women should include a healthy amount of hummus in their diet.

FAQs

Does Hummus Go Bad In the Fridge?

No, hummus doesn’t go bad in the fridge. But obviously, you can’t store hummus like forever. Homemade hummus will last for like 3-4 days maximum. And if you buy hummus from stored, they’ll last for a maximum of a week. Hummus is required to store in cool places as well.

What Is the Healthiest Thing to Eat With Hummus?

Hummus is a nutritious dip for carrots, fresh cucumbers, and bell peppers, as you probably know. But some other healthy things you can choose are

Can Diabetics Eat Hummus?

Yes, diabetics can eat hummus. One of the greatest diabetic snacks available is hummus. Additionally, hummus is a rich source of protein, monounsaturated fats, vitamins, and minerals. But still, hummus has a very low glycemic index.

Conclusion

We hope that you’ve got your answer on is hummus fattening. Hummus can be a healthy part of your everyday diet.

Hummus is efficient for people with  cholesterol, diabetes, cardiovascular diseases, and so on. You can even try different yummy recipes with hummus.

We really hope that this article helped you and your knowledge about hummus. Have a healthy life and make hummus a part of your daily diet!

Is Tea Acidic or Alkaline? Unlock The Truth

0

Do you like to start your day with a sip of very strong tea? A cup of tea helps to keep you cheerful and active all day long. But your stomach can’t take it if you drink without considering your health issues!

Due to some acidic components, many of you have a concern: is tea acidic?

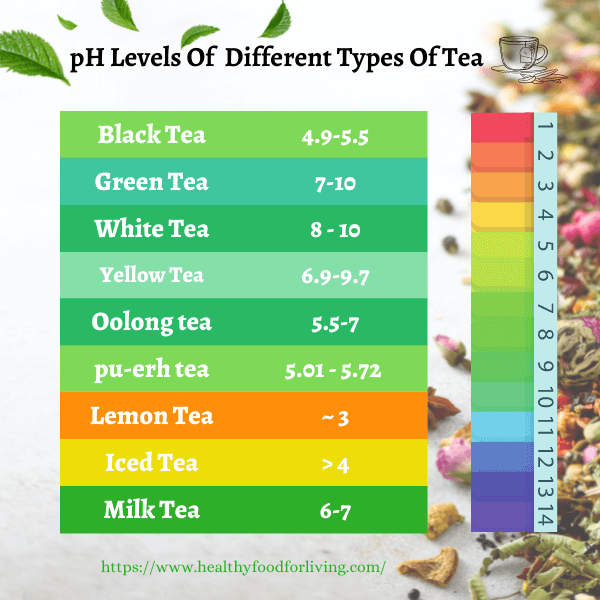
Mostly, teas are mildly acidic. Black tea has a pH level of 4.9-5.5 which is moderately acidic and lemon tea is nearly 3 which is considered strongly acidic. Again, green tea and white tea are slightly alkaline with a pH level of 7-10. Overall, the pH range of tea is between around 3 to 10.

However, the acidity of tea depends on the tea types, brewing temperature, time, mixing ingredients, etc. Keep reading to learn more details about the acidity of tea.

Is Tea Acidic or Alkaline?

Teas are a little bit acidic. Besides, several teas have mild alkaline properties too. Typically the pH level of teas varies from 3 to 10. So, tea can be acidic and alkaline too. Whether tea is acidic or alkaline which totally depends on the tea types, leaf types, making duration, heat, herbs, etc.

Most of the common teas are acidic. For example, the black tea which is acidic for the 4.9-5.5 pH level, Oolong tea has 5.5 – 7, lemon tea is nearly 3, and pu-erh tea has pH of 5.01-5.72. So, now the question is why do teas have acidic properties mostly?

Well, tea contains multiple organic acids such as tartaric acid, oxalic, malic, citric, tannic acid, and five more acid components. These play the vital role in making teas acidic.

To understand the acidic level or alkaline genre, you must know about the pH scale. Where a pH level less than 7 is considered acidic. And, more than 7 is regarded as alkaline(basic) nature.

pH Of Acidic Components of Tea

pH of Tea : Defines Acidity and Alkalinity

Typically, there are 6 types of tea based on the tea leaf processing system such as black tea, green tea, white tea, yellow tea, Oolong tea, and last but not least pu-erh tea. The acidic property also varies from type to type too.

Here depicting the pH levels for different types of tea in the below table.

TypespHAcidic/Alkaline
Black Tea4.9-5.5Slightly Acidic 
Green Tea7-10Neutral To Alkaline
White Tea8 – 10Neutral To Alkaline
Yellow Tea6.9-9.7Neutral To Alkaline
Oolong tea5.5-7Slightly acidic to neutral
pu-erh tea5.01 – 5.72 (source)Slightly acidic
Table 1 – pH Levels Of 6 Different Types Of Tea

In addition, you may have your preference in adding other ingredients like milk, spice, herbs, honey/sugar, etc.

pH of different types of tea

So, the pH level is also dependent on the other ingredients you mix when making a cup of tea. For instance, black tea is not that much acidic, it will become highly acidic after adding lemon juice in it. Because lemon juice contains a high amount of acidic properties.

Now, presenting a chart of pH level when you add different ingredients along with tea. Take a look-

Ingredients pHTea Type 
Lemon Tea~ 3Strongly Acidic
Lemongrass Tea5.8 – 6.3Slightly Acidic 
Tea with Honey6.84 approx.Slightly Acidic 
Ginger Tea7-7.4Neutral
Chamomile Tea6 – 7Slightly Acidic  to neutral
Hibiscus Tea6.5 – 6.8Slightly Acidic 
Cinnamon Tea8-10Basic/alkaline 
Mint Tea6 – 7Slightly Acidic to neutral
Rooibos Tea6 – 7Slightly Acidic to neutral
Fruit Tea (Berries, Raspberry)6.2 to 7.4Slightly Acidic to alkaline 
Iced Tea> 4Acidic
Milk Tea6-7Slightly Acidic
Table 2 – pH Level After Mixing Ingredients with Black Tea

People Also Read:

Is Kombucha Acidic? Is It Good For Acid Reflux?

Why Should You Know The pH Level of Tea?

The above discussion is about the nature of different types of tea. Now you may ask why you should know which tea is acidic and which is alkaline. Because you may face digestion problems, and acid reflux, as well as your teeth, can be damaged if you drink high acidic tea regularly. Not only that, but you may also experience heartburn if they are too acidic. 

On the other hand, less acidic teas are good for curing cold coughs, and headaches. For instance, green tea can work as an agent of anti-inflammatory.

Again, excessive alkaline tea can cause diarrhea, vomiting, etc. So, it’s beyond description why you should be concerned about the acidic nature of tea.

In one line, to keep yourself active, joyful, and fresh without any health issues.

Related Article:

Are Apples Acidic and Good for Acid Reflux? [pH-wise]

5 Factors Affecting Acidic Property of Tea

We already mentioned several factors that affect the pH level of tea. When you add acidic ingredients it will make your tea more acidic.

Again, when you add alkaline content to your tea, that can reduce the acidic properties. In addition, the pH level is also dependent on the water, tea types, amount, temperature, and making duration. So, if you can balance these factors, you can make less acidic tea easily. Have a look-

1. Water

The water is neutral, its pH is 7. Though hard waters are alkaline, on the other hand, soft water is regarded as acidic.

So, while you are making tea, make sure it’s in contrast with the water. That means, when you make acidic tea like lemon tea, pu-erh tea, or oolong tea, you should use hard water to make a proper balance. Similarly, when you make white tea or use cinnamon, the water should be soft.

But make sure your water is not too soft, nor too hard while making tea.

2. Packaging Type

Using loose tea or tea bags is also a game changer. The loose teas are less acidic than the tea bags. Because the tea bag contains crushed tea leaves. They can release flavor so easily and quickly. But the loose tea leaves need more time to let out. For this reason, those tend to be more acidic than the loose, full grainers.

3. Leaf amount

It’s simple if you use more leaves, that will make tea highly acidic. For example, you use 4 teaspoons of tea leaves for 1 cup of water. That will definitely be highly acidic.

So keep the amount moderate to taste better as well as make it healthy.

Different types of Tea

4. Brewing time

Mostly, you need 2 to 5 minutes to make a perfect cup of tea. Though it depends on the amount, taste buds, and other ingredients also. In general, extended brewing time is also responsible for increasing the acidic nature.

5. Temperature 

Like the brewing time, high temperature is also responsible for increasing the acidic nature of tea. For various types of tea, the temperature also varies. Usually, you can make tea at 150ºF to 180ºF. In this circumstance, if you use a high temperature for an extended period, tea will be more acidic.

Have a look at the below table to know more specifically – 

TypeTemperature (F/C)
Black Tea210ºF/100ºC
Green Tea165-175 ºF / 75-80ºC
Oolong Tea175-185 ºF / 80-85 ºC
Herbal Tea210ºF/100ºC
White Tea150-155 ºF/65-70 ºC
Pu-Erh Tea~195°f /90°c 
Milk Tea170-185 ºF/ 76 – 85 ºC
Table 3 -Temperature For Brewing Tea (2-5 min)

So, if you ask how to make less acidic tea. Then, you should be concerned about these factors while making tea. Maintaining the right amount of water, tea leaves, duration, and temperature will keep the tea acidic level lower and balanced.

What Is The Impact Of Tea Acidity On Acid Reflux?

Is Drinking Tea Causing Your Acidity

If you are experiencing the symptoms of acid reflux or just aware of it, you should not drink too much highly acidic or high caffeinated teas or coffees. More caffeine means it will increase the acid in your stomach. At the same time, the caffeine will relax your LES (lower esophageal sphincter) which also triggers heartburn.

Again, there is a component named theophylline found in black tea which also does the same thing as caffeine. With moderate acidity, this component makes the lower esophageal sphincter relaxed which results in the backup flow of the stomach acids. As a result, you will suffer from acid reflux. 

So, you should drink green tea, ginger, or white tea instead of any highly acidic tea. That will reduce the chances of heartburn. 

Is Acidic Tea Harmful To Teeth?

Definitely, acidic tea is harmful to your teeth. When you drink acidic tea like fruit tea, lemon tea continuously, it can damage your teeth’ enamel. Also, using too much sugar, honey and oxidized tea leaves can cause cavities. 

Some of you have the habit of drinking tea between meals. You may not be aware of it, but this habit also damages your teeth by producing acids. 

However, swishing or holding tea or coffee in your mouth can also cause damage to your teeth gradually. Kids and old are the real sufferers of this. 

Again, immediate bruising after drinking a cup of tea or coffee can also affect your teeth. As tea/coffee is acidic, they loosen the newly weakened enamel. When you brush your teeth, they come out and gradually make rough cracks and chips on your teeth.

Moreover, avoid too hot or too cold coffee if you love your teeth and want to keep them healthy for a long time.

Is Acidic Tea Safe During Pregnancy and Breastfeeding?

Drinking higher acidic tea is not safe for pregnant women also. Besides, they should avoid herbal teas to get rid of stomach issues, sleep problems, and nervousness. In that case, black tea, and green tea are safer options for them. 

Though more than 300mg of caffeine intake is not recommended for pregnant women. In addition, excess tea intake can cause headaches, anxiety, uterine contraction, and other pregnancy complications. 

However, breastfeeding moms can drink tea with a limited intake of 250-500ml or 2-3 cups per day. However, decaffeinated tea is a great option for them which won’t cause insomnia.

Is Acidic Tea Safe During Pregnancy and Breastfeeding

Is It Good To Drink Tea Or Coffee During Periods?

Drinking tea or coffee might help to manage and reduce the pain during this period. However, not all types of tea or coffee will help you. Drinking ginger tea, thyme tea, oolong, or green tea can reduce menstrual cramps. But consuming highly acidic tea, caffeinated tea, or too much intake before or during the menstrual cycle can worsen your menstrual cramps by narrowing blood vessels. So, limit your intake during this time to get rid of this struggle. 

Does Acid In Tea Affect Bone Density?

It’s not clearly proven but long-term habitual acidic tea intake can affect your bone density. However, herbal teas like oat straw tea are alkaline and they can enhance your calcium innate.

At the same time, this tea can create a defense against osteoporosis, releasing the luteinizing hormone of our body. This hormone can help in cell growth and make our bones stronger. 

However, avoiding acidic tea will be a good decision if you have a family history or other risks associated with bone loss. 

Acidic Tea Vs Alkaline Tea: Which One Should I Drink? 

Slightly acidic tea is okay if you won’t exceed your daily intake. For adults, the recommended daily intake of tea is approximately 3–4 cups (710–950 ml). However, alkaline teas are beneficial for your body in terms of neutralizing the acidity in the body.

After drinking alkaline tea like green tea or white tea, they help to balance and maintain the pH level of our body.

However, you should not drink too much acidic tea or higher alkaline tea. Higher acidic tea will damage your teeth, create problems during pregnancy, and also cause GERD. On the other hand, highly alkaline tea can cause dry skin, irritation, or an upset stomach.

FAQs

Is Tea Ok To Drink With Acid Reflux?

It depends. Mostly, you should not drink tea when experiencing acid reflux. That can make your GERD problems worse if you drink high acidic tea like lemon tea or fruit tea. However, a moderate amount of herbal tea like ginger tea or decaffeinated tea can help to reduce acid reflux.

Can Drinking Tea Cause Acidity?

Yes, drinking tea can cause acidity. It contains a component called theophylline which is commonly responsible for acid reflux in esophageal. Also, you will experience acidity if you are not aware of the pH level of tea, tea types, brewing process, and time.

What Kind Of Tea Is The Least Acidic?

Black tea, green tea, pu-erh tea, and oolong tea are the least acidic. Besides, some fruit tea and herbal tea e.g. cinnamon, mint, and chamomile tea are also less acidic. And, their pH range is between 4.9 to 8.

Is Tea Less Acidic Than Coffee?

Yes, most teas are less acidic than coffee. So far, the pH level of coffee is 4.85 to 5.10. Typically, black tea, green tea, white tea, and herbal tea have a less acidic nature. On the other hand, lemon tea or iced tea is more acidic than coffee.

Can Children Drink Tea?

Children over 2 years can drink unsweetened tea like herbal tea but not more than 1-2 cups per week. If your children are more than 4 years old, their caffeine intake can be around 45mg. That means they can drink a cup of decaffeinated tea or black/green tea. However, it’s not recommended to provide tea to your 12 months old kids anymore. 

What Type Of Tea Can A Diabetic Drink?

Diabetics patients can drink unsweetened black tea, green tea, and herbal tea for their anti-diabetic properties. However, according to NCBI, drinking 4 cups of tea can reduce the 20% risk of affecting type 2 diabetics. 

How To Lower The Acidity Of Your Tea?

Adding water or a pinch of salt can reduce the acidity of your tea. You may wonder, but adding milk can make lower acidic tea. Milk can cut the catechins and epicatechins antioxidants of tea and make acidity balanced. Also, using fresh tea leaves in less brewing time can reduce tea acidity.

Is Tea Better For Your Stomach Than Coffee?

Yes, tea is more gentle for our stomach than tea. Most coffee is more acidic than tea which can cause digestive problems as well as upset your stomach. Even the acidity of coffee can promote acid reflux and ulcers too.

Does Tea Make Urine Acidic?

Acidic tea makes the urine acidic. At the same time, it causes irritation in the urinary tract. Mostly, black tea and other high acidic teas are responsible for increasing the hippuric acid in urine. That results in kidney stones, diabetic ketoacidosis, diarrhea, etc.

Wrapping Up

Now it’s time to wrap up. Hopefully, your queries on “is tea acidic” are clear after the whole discussion. So far, you can neutralize the acidic property of your tea to reduce the chances of any side effects.

Therefore, you can limit your daily intake of tea if you can’t maintain the factors to reduce the acidity of tea.

Feel free to comment with any queries or suggestions.

Is Kombucha Acidic? Is It Good For Acid Reflux?

Kombucha is popular for its alleged health benefits. It contains billions of probiotics (living bacteria), which is the main reason for its popularity.

Still, many people are unsure whether Kombucha is good for acid reflux. So, here is a question about its nature, “is Kombucha acidic?”

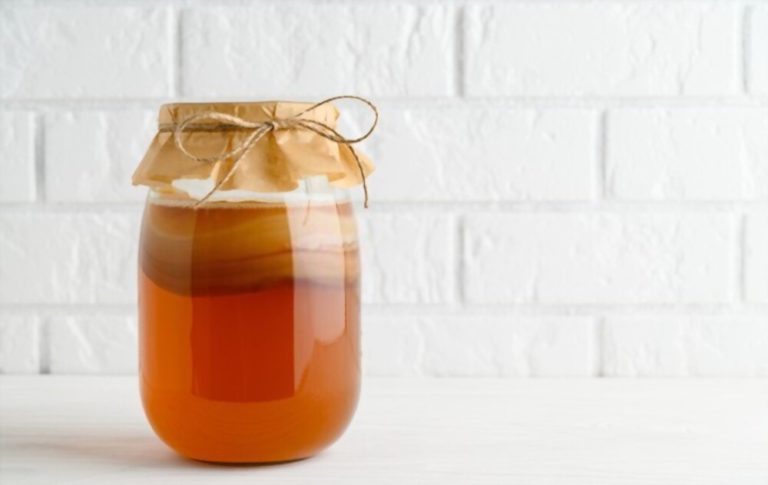
Kombucha is acidic which has a pH range less than 4.6, has a tart, tangy, and slightly sour taste. It is a fermented drink and the duration of fermentation determines the acidity of Kombucha. It is nearly as acidic as pop and energy drinks.

The nature of Kombucha is still debatable. So, let’s explore the benefits of the heart.

Kombucha Acidic Or Alkaline?

Kombucha is considered to be highly acidic. The alcohol and acetic acid are synthesized by SCOBY (symbiotic culture of bacteria and yeast), and these products are converted into acidity, giving the Kombucha a tart taste.

To enhance the taste, some companies add ginger, grapes, strawberries, lemon, cranberries, and Synergy’s Maqui Berry Mint, a mojito-inspired drink.

is Kombucha acidic

pH of Kombucha

Kombucha is acidic, with a pH of less than 4.6. It has an average pH of around 3.0 – 3.5 and a pH range of 2.5 to 3.5, making it highly acidic.  So, Kombucha tastes tarter when its pH is lower.

Beverage pH
Kumbucha brewed2.5 – 4.2
Sweet Kombucha3.5
GT’s Kombucha2.5 – 3.5
Humm Kombucha3
Homemade Kombucha2.5 – 3.0
pH of Kombucha

How To Raise pH Of Kombucha?

You can make the least acidic Kombucha possible, and the pH of Kombucha can be raised by:

  1. Add half a bottle (8oz or 250ml) of your favorite Kombucha to your container.
  2. Mix the batch gently by stirring it gently.
  3. Recheck pH to see if it’s below 4.2 and above 2.5.
  4. You can start brewing if it reaches this critical range.

Is Kombucha Tea Alkaline Or Acidic?

The acidic nature of Kombucha is indicated by its pH being less than the neutral range (below 7). When it is consumed, the body becomes acidic, and its normal functions are disrupted. However, it has been shown to alkalinize the body and help in blood alkalinization, restoring the body to its natural state.

Is Kombucha Good For Acid Reflux?

Acid reflux occurs when the sphincter muscle at the lower end of your esophagus relaxes at the wrong time, allowing stomach acid to back up into your esophagus. So, is Kombucha good for acid reflux? Unfortunately, the answer is a little more complicated.

Kombucha is acidic, but contains lactic acid bacterial species that may have probiotic properties. These bacteria can aid digestion and prevent gut inflammation. In addition, the acetic acid in it aids in the killing of harmful microorganisms. As a result, Kombucha can help improve gut health and is suitable for gastritis.

Its probiotic-rich nature is famous to improve overall gut health, so it’s likely to alleviate some discomfort associated with both ailments. To get the most out of it, look for a brand with organic ingredients and no added sugar. When shopping, avoid buying drinks with a higher sugar concentration.

Start with a small amount (4-6 ounces) to see how your body reacts. Then, you can gradually increase your intake if you don’t notice any adverse effects.

Is Kombucha Bad For Acid Reflux

Kombucha’s acid, caffeine, and alcohol can cause GERD symptoms or worsen heartburn. Acetic acid, on the other hand, may irritate the food pipe, increasing stomach acidity. In addition, it becomes carbonated as a result of the fermentation process. If you consume too much of it, the carbon dioxide in the digestive system builds up, causing excess gas and bloating.

Aside from these, Kombucha has the following side effects:

  • Nausea
  • Yellow skin (Jaundice)
  • Vomiting
  • Allergic reaction
  • Stomach infection
  • Yeast infection
  • Head and Neck pain

It is not good to drink Kombucha on an empty stomach.

Is Raw Kombucha Acidic?

Kombucha’s pH is less than 4.6, and it varies depending on the degree of fermentation. The dominant type of bacteria in Kombucha, Acetobacter, Gluconacetobacter, produces acetic acid, one of the most healthy acids and a clue to Kombucha’s low pH. Therefore, foods with a pH of 4.6 or lower have been deemed safe for sale without additional preservatives.

Ingredients

Kombucha is a fermented tea made from sugar, yeast, and black tea that has been fermented for weeks or more. During that time, bacteria and acids, as well as a trace of alcohol, form in the drink. As a result, it contains lactic acid bacteria and a healthy dose of B vitamins.

These bacteria and acids combine to form a film on the liquid’s surface known as SCOBY (symbiotic colony of bacteria and yeast).

Is Kombucha Good For You?

Kombucha is a fermented drink containing many living bacteria that are beneficial to human health.

Health Benefits of Kombucha

In addition, Kombucha tea is high in vinegar, B vitamins, and other chemical compounds. As a result, its supporters claim it helps prevent and manage severe health conditions ranging from high blood pressure to cancer.

It has the following advantages:

Probiotics

The mixture contains a variety of lactic-acid bacteria species that develop in great numbers during the fermentation process and may have probiotic properties. It gives you a gut full of beneficial bacteria that can enhance several aspects of your health, including weight loss, inflammation, and digestion.

Antioxidants

Kombucha, especially when made with green tea, appears to have antioxidant properties in the liver. Antioxidants remove free radicals from body cells and help to prevent or mitigate oxidative damage. Regularly consuming kombucha aids in the reduction of liver toxicity caused by toxic chemicals.

Antibacterial Properties

Acetic acid is produced during fermentation, which aids in the killing of bacteria and harmful microbes in your gut. It facilitates eradicating small amounts of damaging yeast and microbes that can cause illness without destroying the probiotic levels in your digestive tract.

Weight loss

Kombucha contains components that aid in weight loss. It provides beneficial bacteria that help digestion, nutrient absorption, and overall metabolism, allowing for more efficient fat burning.

Boost Immunity

Kombucha contains antioxidants, acetic acid, and probiotics, which help boost your immune system and fight infection, aiding digestion. As a result, it may reduce the risk of heart disease, certain cancers, and diabetes, among other benefits.

FAQs

Is Kombucha highly acidic?

The pH range for Kombucha is 3.0 to 3.5, which indicates its acidic nature. It could taste more tart and be very acidic. Your teeth may experience many issues due to this acid. To reduce the acidity of the Kombucha, combine it with fruit puree, honey, or sugar.

Is Kombucha good for an acidic stomach?

Kombucha is a potentially good source of probiotics, which can promote gut health and prevent constipation. Keep in mind that the more acidic Kombucha is likely to aggravate your GERD and may even increase the severity of its symptoms.

Does Kombucha make your body acidic or alkaline?

Kombucha has been documented to induce various adverse effects due to possible contamination. Additionally, it may result in nausea, vomiting, yeast infections, jaundice, stomach issues, and nausea. Women who are nursing or pregnant should not use it. Alcohol abuse is a danger for everyone.

Is Kombucha acidic for teeth?

Kombucha has sugar and acid that can eat away at and erode your tooth enamel, which is the tough outer coating of your teeth. It exposes the inner layer of your teeth by erosion: make them more vulnerable to decay and more sensitive to specific hot, cold, sweet, and spicy foods.

Is Kombucha bad for ulcers?

Probiotics in Kombucha are highly beneficial against stomach ulcers brought on by acetic acid, ethanol, or stress. Kombucha can prevent leaky gut and treat stomach ulcers, but the more acidic varieties can also result in mouth ulcers, tooth loss, and mouth sores.

Bottom Line

Now you know the answer to the question “Is acidic Kombucha“. It is highly acidic, but when you prepare it properly, it is safe. It is beneficial for acid reflux because of its valuable components, but excessive use can negatively affect the digestive system. If you’re making it at home, keep everything clean, including the equipment and your hands.

Are oranges acidic? Orange and its juice for heartburn good or bad

Oranges are the most delicious and mouth-watering of all the citrus fruits. Different regions of the world are famous for different kinds of oranges. The nutritional profile and the water content of oranges make them one of the best fruit choices.

But, Are Oranges acidic?

Yes, oranges are acidic and have a PH value between 3.7 and 4.3. Being a citrus fruit, oranges contain citric acid. But, there are different types of oranges having different PH values. Mainly oranges and their juice have a PH less than 7. This means oranges are acidic.

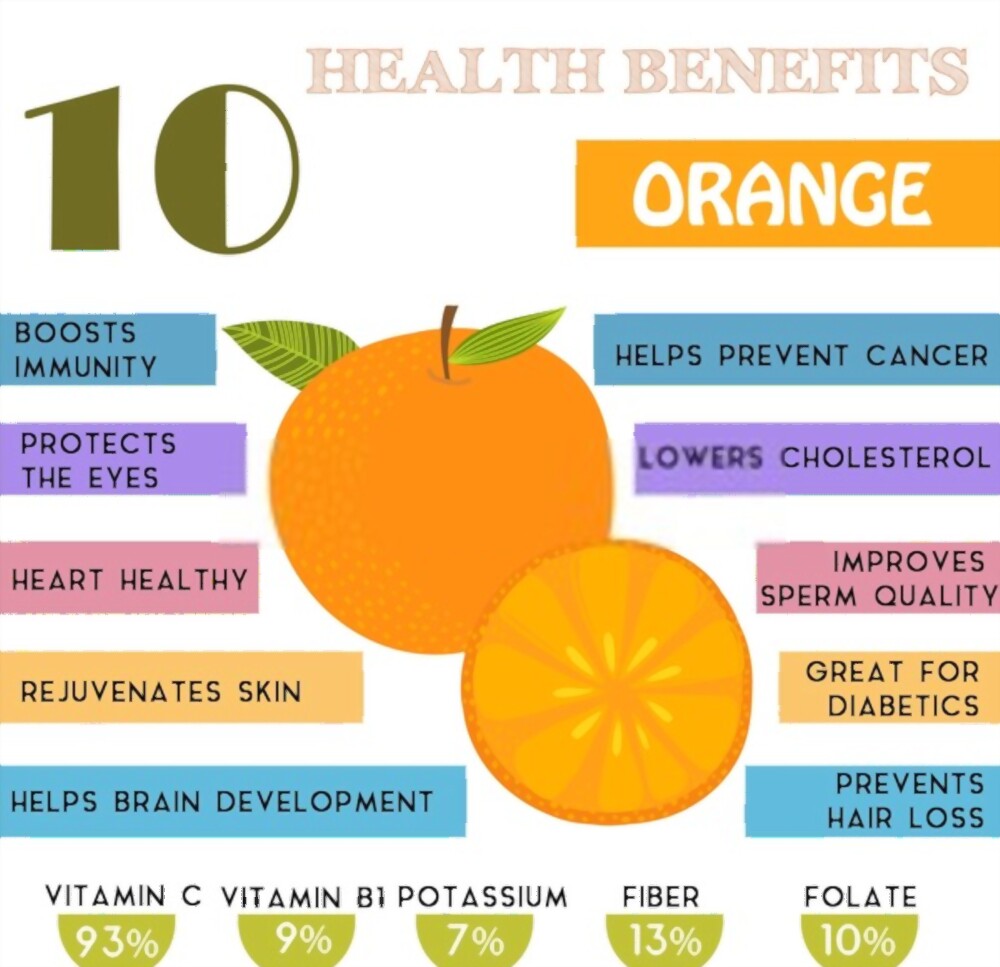
In this article, you will get to know the health benefits of eating oranges. Also, we will explain juice and acid reflux. So,  Let’s reveal the facts!

Why is Orange and its Juice Acidic?

The main criteria to measure the acidic or basic nature of anything is the PH scale. Anything having a PH less than 7 is acidic and more than 7 is basic.

Keeping in mind these facts, oranges have a PH of less than 7, so they are acidic. Almost all types of oranges have a low PH. But some are sweet and slightly alkaline. Those are very rare varieties.

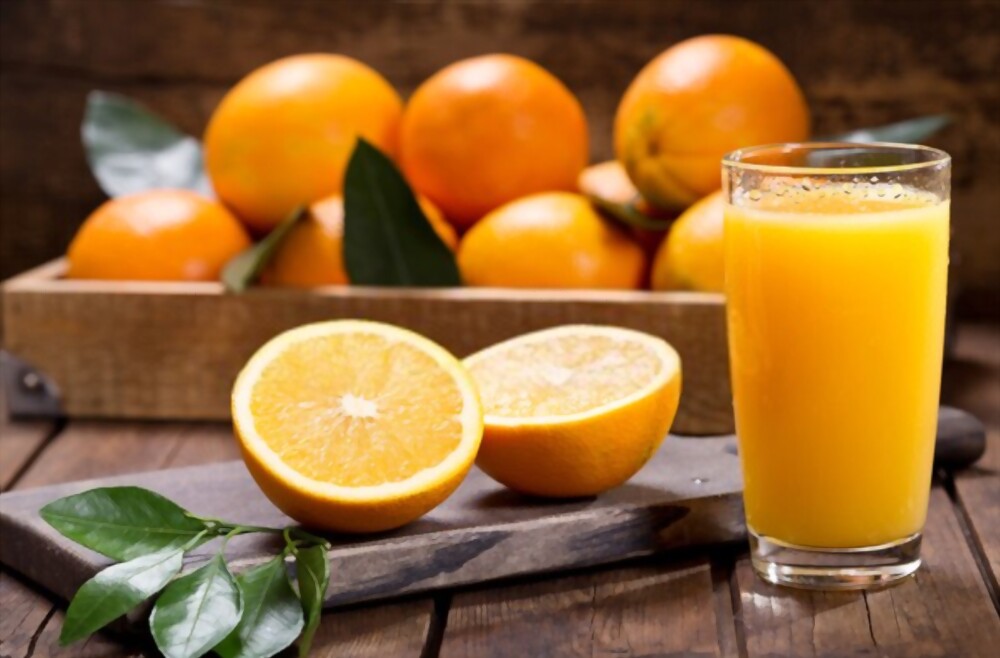
Orange and its Juice

Another reason for the acidic nature of oranges is that they have citric acid in them. Just like lemon and lime, they also have vitamin C or ascorbic acid. This ascorbic acid is responsible for the acidic nature of oranges.

PH of Orange and Orange Juice

Oranges have a PH ranging from 3 to 4. That’s the reason oranges are acidic. Also, orange juice is acidic.

The PH of store-bought orange juices varies the has a lot of additives and preservatives in them. Orange juices at grocery stores also have a lot of sugar which makes them more acidic. Also, they have artificial flavors that may change their PH.

There are more than 20 varieties of Oranges across the world. Some of them are tangy in taste, and the others are sweet and sour. The following table demonstrates the PH of different types of oranges.

Types Of orangesPH Ranges
Navel oranges3 to 4
Cara Cara oranges6 to 7
Seville Oranges7 to 8
Mandarin Oranges8 to 9
Valencia Oranges4.3
Blood oranges3.33 to 3.81
Tangerines3.90

Oranges PH

PH of Oranges ranges from 3.1 to 4.8. This PH is less than 7, so oranges are acidic. Also, the presence of different types of acid in oranges makes.

Orange Juice PH

Orange juice has a PH of around 3.5. It is also acidic. But this is the pure PH of orange juice. Store-bought orange juice may have a different PH due to sugar and preservatives.

Are Oranges Bad for an Acid Reflux?

Acid reflux is a condition when there is an extra amount of acid in your stomach that comes back into the esophagus. This is more likely to happen when you consume acidic foods.

As oranges are acidic, they can trigger acid reflux. Especially, if you’re having active gastritis, eating an orange or drinking orange juice can cause acid reflux or heartburn.

But, sometimes orange juice can be good for heartburn. You might be wondering why. The answer is oranges can have an alkalizing effect after they get metabolized. But this is only true when you drink a small amount of orange juice for mild heartburn.

Why do Orange and their Juice give me Heartburn?

If you’re suffering from heartburn by eating oranges or drinking orange juice, it means you’re having active gastritis. The other reason can be that there is already an extra amount of hydrochloric acid in your stomach.

As oranges are high in citric acid and ascorbic acid, they can trigger acid reflux. Also, in case of active gastritis, you can suffer from heartburn by drinking orange juice.

Are Oranges Acidic in the Stomach?

Whether oranges are acidic or basic in the stomach depends on how much oranges or orange juice you consume. Normally, when oranges enter the stomach they are acidic.

It also depends upon what type of oranges you eat. Eating those oranges that have very low PH is acidic in the stomach. However, there are a few types of oranges that are either alkaline or slightly acidic.

Are Mandarin Oranges Acidic?

The PH of mandarin oranges ranges from 8 to 9. So, are mandarin oranges acidic or alkaline? According to the PH scale method, those foods having PH greater than 7 are alkaline. That’s the reason,  mandarin oranges are alkaline.

The alkalizing effects of mandarin oranges are very good to treat the symptoms of acidity or acid reflux. Also, if you’re having acidity or gastritis, and you still want to eat oranges, mandarin oranges are a good choice.

Are Oranges Acidic When Digested?

As soon as orange juice reaches the stomach, it gets metabolized. Oranges indeed contain acids such as citric acid and ascorbic acid but oranges are very helpful in maintaining the healthy PH of our body. They can also help neutralize the acidity in the stomach.

Lemon, lime, oranges, and all citrus fruits have an alkalizing effect once they reach the stomach. That’s the reason, oranges become alkaline once they’re digested.

Are Sweet Oranges Acidic?

Most people think that sourness is associated with acidity. They think that sweet oranges are not acidic. But that’s not always the case. Oranges are acidic no matter if they are sweet, sour, or tangy in taste.

However, the extent of acidity varies according to the taste. Those oranges that have more citric acid content are sour and hence more acidic. On the other hand, sweet oranges have less amount of citric acid so they are less acidic.

Also Read: Are Grapes Acidic? Should You Avoid Grapes With Acid Reflux?

Benefits Of Eating Oranges at Night

Night time is when you need something to snack on. Most people want to choose a healthy snack option rather than munching on chips or popcorn.

Benefits Of Eating Oranges at Night

Oranges can be one of those healthy snacks to enjoy while watching a movie at night. Here are some health benefits of eating oranges at night.

Improve Sleep

Eating Oranges at night can help you enjoy a better night’s sleep. This is because they can boost the level of serotonin hormones. Also, oranges have compounds that can reduce stress and anxiety by reducing cortisol levels in the body. Hence, they can help you sleep properly.

Strengthen Your Immune System

Oranges contain plenty of vitamin C that can help boost your immunity. Particularly, when you eat oranges at night, vitamin C can help your body repair and regenerate healthy cells. This process can prevent you from getting different diseases.

Enhance your Vision

You might have heard that having carrot juice at night can enhance your vision. But eating oranges or having orange juice at night can also boost the vitamin A levels in your body. Hence, it can prevent macular degeneration, cataract, and other eye diseases.

Improve Sexual Performance

Vitamin C and ascorbic acid in the oranges help in the motility of the sperm and also prevent diseases like Erectile dysfunction. Eating oranges at night can increase sex drive and libido, hence improving sexual performance.

Control Blood Pressure

Oranges are rich in potassium so they can control your blood pressure. Also, eating oranges at night can be healthy for your heart and prevents cardiovascular diseases.

FAQs

Are Oranges acidic or alkaline?

To find the acid or basic nature of food, we must check its PH. If the PH of a certain food is less than 7, it has acidic nature. Those foods with PH greater than 7 are basic. Oranges have a PH range between 3 to 4. So, they fall in an acidic food category.

Do oranges alkalize the body?

Yes, eating a moderate amount of oranges has an excellent ability to alkalize the body. Just like lemons and limes, oranges after digestion can be converted to an alkaline state in the stomach. Hence, they can neutralize acidity and can have an alkalizing effect on the body.

Can eat oranges at night cause acid reflux?

As oranges are acidic, eating a lot of oranges at night can trigger acid reflux or heartburn. This usually occurs if you’re already suffering from gastritis or severe heartburn. In this case, you should avoid eating oranges.

Are Oranges as acidic as lemons?

Lemons have a PH of 2, while oranges have a PH between 3 and 4. So, lemons are more acidic as compared to oranges. Also, lemons have a greater amount of ascorbic acid which gives them a pretty sour taste. 

what is the best time to eat oranges?

You can eat oranges whenever you’re comfortable with eating them. There isn’t any specific time to eat oranges. However, there are a few more benefits of eating oranges at night. Also, if you want to snack on something healthy, oranges are the best choice.

Bottom Line

Are Oranges Acidic? Yes, oranges are acidic with a PH of 3 to 4. People having active gastritis or severe heartburn should avoid eating oranges.

However, there are certain health benefits of eating oranges that you can’t deny. Eating a moderate amount of oranges can be good for your health. But in case of heartburn, you must consult your doctor before eating oranges.

Roasted Stuffed Pears

0

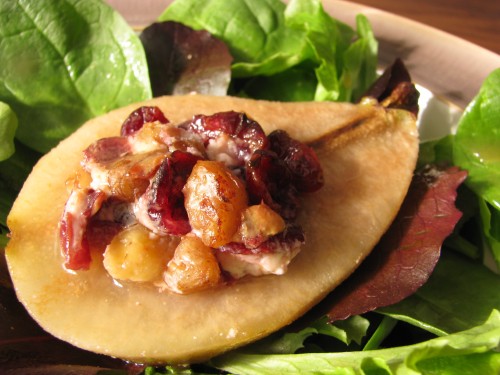
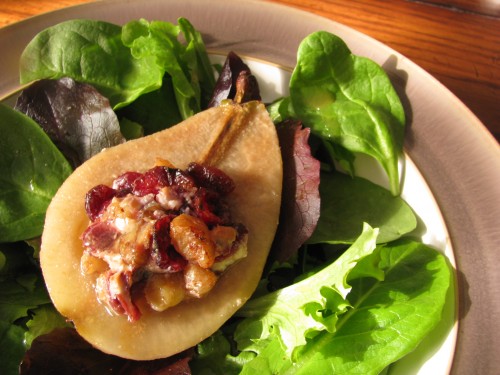
Elegant enough for the first course of a dinner party – but easy enough for a weeknight side dish – these roasted pears stuffed with dried cranberries, walnuts, and goat cheese are a healthy and tasty way to top a bed of lightly dressed greens.

Pears are a wonderful fruit to roast because they become tender without losing their shape. The hollowed-out pear halves become the perfect vessel for any combination of dried fruit, nuts, and cheese that your heart desires.

I suggest roasting extra pears and enjoying them for lunch the next day!

Name:Roasted Stuffed Pears
Cuisine:Fusion
Prep Time:15 minutes
Cooking Time:30 minutes
Total Time:45 minutes
Servings:4
Yield:4 stuffed pears

Ingredients

  • 1 ripe but firm Anjou pear
  • 1 Tbsp pure maple syrup

Instructions

1. Preheat Your Oven

Preheat your oven to 375°F (190°C) and line a baking dish with parchment paper.

2. Prepare the Pears

Wash the pears and cut off the tops. Slice a small piece from the bottom of each pear to make them stand upright. Use a melon baller or a small spoon to carefully remove the core and seeds, creating a hollow cavity in each pear. Be sure not to scoop all the way through.

3. Make the Stuffing

In a bowl, mix the chopped nuts, dried cranberries or raisins, brown sugar, cinnamon, and nutmeg. Drizzle the melted butter over the mixture and stir until it’s well combined.

4. Stuff the Pears

Gently stuff each pear with the prepared mixture, packing it lightly to fill the cavity.

5. Roast the Pears

Place the stuffed pears in the prepared baking dish. Drizzle honey over each pear for a sweet glaze. Cover the dish with foil and bake for about 30 minutes, or until the pears are tender when pierced with a fork.

6. Serve and Enjoy

Once roasted, let the pears cool slightly before serving. You can serve them warm with a scoop of vanilla ice cream or a dollop of whipped cream for an extra treat.

Nutrition Per Serving

Calories: 260 calories

Protein: 2 grams

Carbohydrates: 46 grams

Dietary Fiber: 5 grams

Sugars: 35 grams

Fat: 10 grams

Saturated Fat: 4 grams

Cholesterol: 15 milligrams

Sodium: 60 milligrams

Potassium: 230 milligrams

Vitamin C: 6% of the Daily Value

Calcium: 4% of the Daily Value

Iron: 2% of the Daily Value

Please note that these are approximate values and can vary based on factors such as the size of the pears and the specific brands of ingredients used. Additionally, the values do not include optional toppings like vanilla ice cream or whipped cream.

Directions:

  1. Preheat oven to 375*F.
  2. Peel the pear and slice it lengthwise in half. With a melon baller or small spoon, scoop out the core and seeds, leaving an indentation for the stuffing. Place pear halves in a baking dish.
  3. In a small bowl, mix together the dried cranberries, walnuts, and goat cheese. Divide the stuffing mixture evenly among the pear halves, mounding it on top of the indentation.
  4. In the bowl, whisk together the apple cider and maple syrup. Pour mixture over and around the pears. Bake for 30 minutes, occasionally basting the pears with the cider mixture. Serve warm or at room temperature on a bed of greens, dressed with the cider mixture.

Pizza with Jalapeno Chicken Sausage, Corn, and Salsa

0

I’m thinking about bringing back the all-American “Friday pizza night”. Or, if not every Friday, then at least making pizza one night every week. With pizza dough available at most grocery stores these days and infinite possibilities for toppings, homemade pizza couldn’t be an easier or more fun weekday meal.

For this Southwestern-style pie, I rolled out a pre-made whole wheat pizza dough ball and topped it with salsa verde, chopped jalapeno chicken sausage, thawed frozen corn, reduced fat Mexican blend cheese, and scallions. After about 12 minutes in the oven, the pizza was finished off with a scattering of chopped cilantro and a few drizzles of hot sauce.

In between bites, John managed an enthusiastic: “This is awesome! Definitely a keeper.”

I couldn’t agree more.

NamePizza with Jalapeno Chicken Sausage, Corn, and Salsa
CuisineItalian
Prep Time20 minutes
Cooking Time15 minutes
Total Time2 hours (including dough rising time)
Servings4 servings
Yield1 large pizza (about 12 inches in diameter)

Pizza with Jalapeno Chicken Sausage, Corn, and Salsa

Ingredients

  • whole wheat pizza dough for one pizza, (I like the refrigerated dough from Trader Joe’s), AT ROOM TEMPERATURE
  • 1/2 cup salsa of choice
  • 2 links jalapeno chicken sausage, roughly chopped
  • 1 cup frozen corn niblets, thawed
  • 1 cup reduced fat shredded Mexican blend cheese
  • 1/4 cup chopped scallions
  • chopped fresh cilantro, for garnish (optional)
  • hot sauce (optional)

Estimated Nutrition Per Serving

  • Calories: 380 calories
  • Protein: 18g
  • Carbohydrates: 42g
  • Dietary Fiber: 3g
  • Sugars: 3g
  • Fat: 16g
  • Saturated Fat: 6g
  • Cholesterol: 45mg
  • Sodium: 860mg
  • Vitamin D: 0%
  • Calcium: 20%
  • Iron: 15%
  • Potassium: 210mg

Please note that the nutrition values provided are estimates and can vary depending on the specific brands and quantities of ingredients used.

Directions

  1. Preheat oven to 425 degrees F.
  2. Lightly flour a large flat surface and gently roll out the room-temperature pizza dough to desired thickness (I like pizza crusts around 1/4 inch thick).
  3. Carefully transfer pizza crust to an un-rimmed cookie sheet or pizza peel.
  4. Spoon the salsa evenly over the pizza crust. Top with the chopped chicken sausage, corn, cheese, and scallions. Bake for 10-14 minutes, until the crust is crisp and the cheese is melted.
  5. Top pizza with chopped cilantro if using, and serve with hot sauce for drizzling if desired.

Apple Pie Bars {Gluten-Free & Vegan}

0

Now that the sugar rush of Halloween has passed, I bet you’re either a) done with sweets for a while or b) looking for a healthier way to satisfy your sweet tooth. If your answer is a), then I can’t help you because I have a daily desire for sweets… which obviously means if your answer is b), then this recipe is for you!

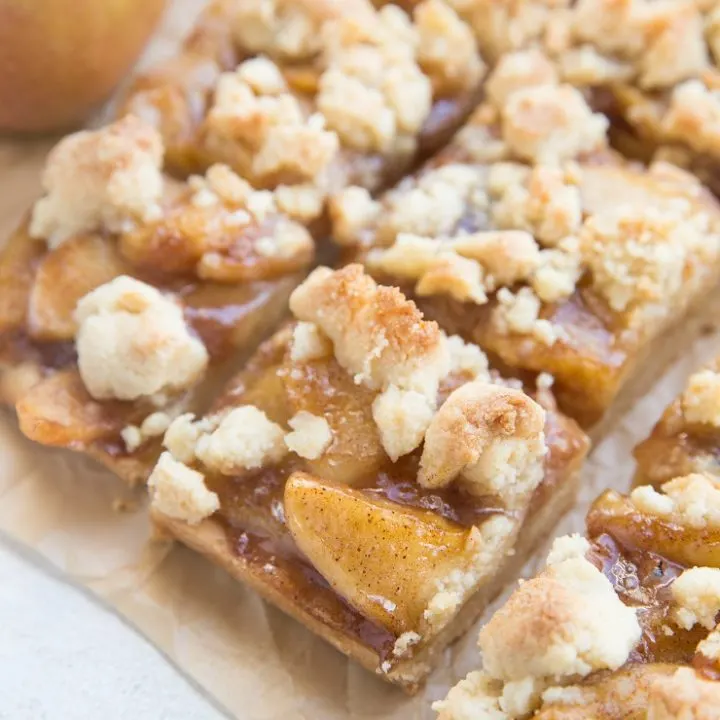
These bars start with a shortbread-like base…

which is topped with a sweet apple pie filling…

and then crowned with more of the shortbread crust.

There’s no butter, refined sugar, or wheat flour in these bars, yet they really do taste like apple pie.

You really must chill the pie if you’re to have any success cutting it into bars; and even then they tend to be pretty crumbly. Thus, I suggest serving the bars with forks to cut down on the messiness factor.

Whether your sights are set on a delicious Thanksgiving dessert (which guests with an array of food allergies or intolerances can enjoy) or on a healthy seasonal treat…

these apple pie bars fit the bill perfectly!

NameApple Pie Bars {Gluten-Free & Vegan}
CuisineFusion
Prep Time15 minutes
Cooking Time45 minutes
Total Time1 hour
Servings12
Yield12 bars

Ingredients

  • 3 Granny Smith apples, (preferably organic), peeled, cored, and finely chopped
  • 1/4 cup pure maple syrup
  • 1/2 tsp ground cinnamon
  • 2 cups blanched almond flour
  • 1/4 tsp salt
  • 1/2 tsp baking soda
  • 6 Tbsp melted & cooled coconut oil* (make sure to melt before measuring)
  • 3 Tbsp pure maple syrup

*I always use unrefined virgin coconut oil, but if you can’t stand even the faintest flavor of coconut, you can use refined coconut oil for this recipe.

Instructions

1. Preheat Your Oven

Preheat your oven to 350°F (175°C) and line an 8×8-inch (20×20 cm) baking pan with parchment paper.

2. Prepare the Crust and Crumble

In a bowl, combine the rolled oats, almond flour, melted coconut oil, maple syrup, cinnamon, and a pinch of salt.

Mix until everything is well combined and forms a crumbly texture.

3. Assemble the Crust

Take two-thirds of the oat mixture and press it firmly into the bottom of the prepared baking pan to create the crust layer. Use the back of a spoon to even it out.

4. Prepare the Apple Filling

In a separate bowl, toss the sliced apples with maple syrup, cinnamon, nutmeg, and lemon juice until the apples are well coated.

5. Layer the Apples

Spread the apple mixture evenly over the oat crust.

6. Add the Crumble Topping

Sprinkle the remaining oat mixture evenly over the apples to create a crumbly topping.

7. Bake

Place the baking pan in the preheated oven and bake for 40-45 minutes, or until the top is golden brown and the apples are tender.

8. Cool and Slice

Allow the apple pie bars to cool in the pan for at least 15-20 minutes before slicing them into squares.

9. Serve

Serve your gluten-free and vegan apple pie bars warm or at room temperature. They’re delicious on their own or with a scoop of dairy-free vanilla ice cream.

Estimated Nutrition Per Serving

  • Calories: 230 kcal
  • Total Fat: 15g
  • Saturated Fat: 7g
  • Trans Fat: 0g
  • Cholesterol: 0mg
  • Sodium: 30mg
  • Total Carbohydrates: 22g
  • Dietary Fiber: 3g
  • Sugars: 8g
  • Protein: 3g
  • Vitamin D: 0%
  • Calcium: 4%
  • Iron: 6%
  • Potassium: 95mg

Sour Cream & Onion Dip Recipe (Kinda, Sorta)

0

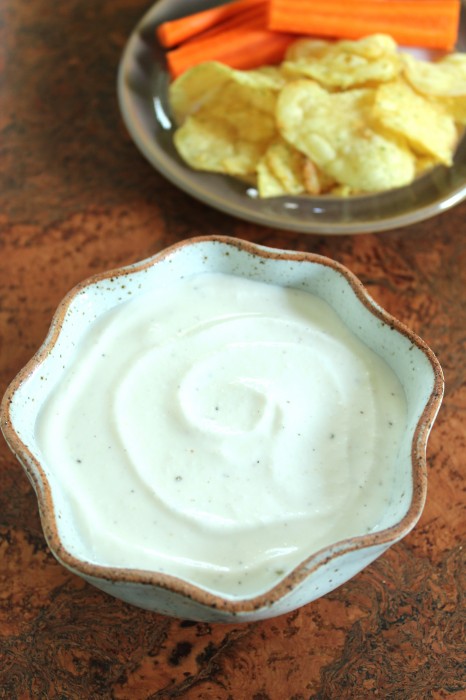
Sour Cream & Onion Dip… kinda, sorta because there’s neither sour cream nor onions in this dip – well, there’s granulated onion – but it does taste like sour cream & onion.

Whipped cottage cheese and Greek yogurt team up to form the creamy component of the dip, which is flavored with dill pickle juice, granulated onion & garlic, and salt & pepper. You have all of the thick creamy richness, the tanginess, and the oniony bite without all of the calories, fat, and artificial ingredients of the store bought stuff.

Fresh crunchy crudite goes beautifully well with this healthy dip, but what is an even better pairing?

Chips!

Honestly not something I typically buy, all-natural potato chips have been sneakily making their way into my shopping cart every few weeks during this pregnancy. I’ve been loving a small handful alongside my go-to cheese & veggie sandwich (whole wheat bread, sliced reduced fat sharp cheddar, sliced cucumber, romaine lettuce, sliced avocado, and dill pickle “sandwich stackers” – yum). Most of the chips I buy have a super short ingredient list, comprised of merely potatoes, canola oil, and salt.

When I saw Kettle Brand Sour Cream & Onion Chips while browsing the aisles at Whole Foods before leaving on vacation, I didn’t hesitate to grab a bag with the intention of enjoying the chips with this dip. True, these particular potato chips have a longer ingredient list than what I’d usually opt for, but I think they’re just fine as an occasional treat.

Chips, organic carrots, spoons, and fingers (I was eating this portion myself… no germs were shared!) were all dipped into the dip, but I think it would also be tasty smeared onto a sandwich in place of mayo.

I just made a tasty garlic & fresh herb dip tonight for the troops here at the beach, and it was a big hit… so I’ll have to make it again and document it for the blog to share with you guys! Until then, enjoy this sour cream & onion version.

Sour Cream & Onion Dip

Name: Sour Cream & Onion Dip Recipe (Kinda, Sorta)
Cuisine:American
Prep Time:10 minutes
Cooking Time:10 minutes (for sautéing onions and garlic)
Total Time:40 minutes (includes chilling time)
Servings:About 8 servings
Yield:Approximately 2 cups of dip

Ingredients

  • 1 cup 1% whipped cottage cheese
  • 1/4 cup plain 2% Greek yogurt
  • 2 Tbsp dill pickle juice
  • 1/2 tsp granulated onion/onion powder
  • 1/4 tsp granulated garlic/garlic powder
  • sea salt & freshly ground black pepper, to taste

Instructions

1. Sauté the Onions and Garlic

Heat the olive oil in a pan over medium heat.

Add the finely chopped onion and minced garlic.

Sauté until the onions become translucent and slightly caramelized, which should take about 5-7 minutes.

Remove from heat and let them cool.

2. Mix the Base

In a mixing bowl, combine the sour cream and mayonnaise.

Stir until the mixture is smooth and creamy.

3. Add the Flavor

Now, it’s time to bring out those classic sour cream & onion flavors.

Add the sautéed onions and garlic to the sour cream and mayo mixture.

Sprinkle in the onion powder, garlic powder, dried parsley, salt, and pepper.

Stir everything together until the flavors are well combined.

4. Chill and Serve

Transfer your “Kinda, Sorta” Sour Cream & Onion Dip into a serving bowl.

Cover it and refrigerate for at least 30 minutes. Chilling allows the flavors to meld together beautifully.

5. Enjoy

Once chilled, your dip is ready to be enjoyed!

Serve it with your favorite dippers like potato chips, pretzels, fresh veggies, or even as a topping for baked potatoes.

Estimated Nutrition Per Serving

  • Calories: 120 calories per serving
  • Total Fat: 11 grams
    • Saturated Fat: 3 grams
  • Cholesterol: 15 milligrams
  • Sodium: 180 milligrams
  • Total Carbohydrates: 3 grams
    • Dietary Fiber: 0 grams
    • Sugars: 1 gram
  • Protein: 1 gram

Brownie Dough Dark Chocolate Cups

0

It’s almost Valentine’s Day, which means one thing when it comes to food: chocolate.

I’ve combined two classic chocolate desserts – brownies & dark chocolate – into perfect little two-bite treats. The inside of these chocolate cups is actually comprised of walnuts, dates, cocoa powder, and a few flavor additions, but it tastes so similar to brownie dough that I couldn’t call it anything else.

The cups are a bit time-consuming what with painting melted chocolate onto mini muffin liners, but let’s call it a labor of love; the person you’re making these chocolate cups for is totally worth it!

Both of my loves adored the cups; Lily ate a bunch of the brownie dough filling before I even had a chance to fill the chocolate cups, and John gave rave reviews for the completed product.

These cups are a healthy & delicious departure from the highly processed packaged peanut butter version that is found all over the place in the days leading up to Valentine’s Day.

If there’s a chocoholic in your life (even if that person is you!), you really must make these.

Why settle for just chocolate or brownies if you can have both?!

Brownie Dough Dark Chocolate Cups

Name:Brownie Dough Dark Chocolate Cups
Cuisine:Fusion
Prep Time:15 minutes
Cooking Time:20 minutes
Total Time:35 minutes
Servings:12 cups
Yield:1 dozen

Ingredients

  • 1 cup toasted walnuts halves
  • 6 large Medjool dates, pitted (about 1/2 tightly packed cup)
  • 1/8 tsp Kosher salt
  • 2 Tbsp unsweetened cocoa powder
  • 1/4 tsp instant espresso powder (optional)
  • 1/4 tsp pure vanilla extract
  • 2 cups dark chocolate chips
  • 2 Tbsp coconut oil

Estimated Nutrition Per Serving

  • Calories: 200 calories
  • Total Fat: 10g
    • Saturated Fat: 5g
    • Trans Fat: 0g
  • Cholesterol: 30mg
  • Sodium: 150mg
  • Total Carbohydrates: 25g
    • Dietary Fiber: 2g
    • Sugars: 15g
  • Protein: 3g

Instructions

In the bowl of a food processor, process the walnuts until finely crumbled – the mixture will resemble coarse sand. Be sure not to over-process, or you will end up with walnut butter!

Add dates to the walnut crumbs in the food processor bowl, and blend just until mixture holds together when pinched. Add in the salt, cocoa powder, espresso powder, and vanilla extract and blend until the mixture comes together to form a crumbly “dough”.

Remove mixture from food processor, making sure to scrape the sides of the bowl.

Form mixture into a large ball, wrap in plastic wrap, and refrigerate until ready to make the cups (at least 10 minutes).

While the brownie dough chills, combine the dark chocolate chips and coconut oil and melt using one of two methods: you can either combine them in a double boiler (a heatproof bowl set over a small saucepan filled with 1 inch of simmering water) and stir until fully melted, or you can combine them in a heatproof bowl and microwave in 30 second intervals, stirring after each interval, until fully melted.

Using a pastry brush or small spoon, “paint” the inside (all the way up to the top) of 12 mini muffin liners with the melted chocolate (foil liners will be easier to peel off, but paper liners will also work). You want a thick enough layer so that you cannot see through the chocolate coating. Refrigerate the painted cups until the chocolate is fully hardened, at least 20 minutes.

When the dough has chilled, take it out of the fridge and roll into 12 balls; then slightly flatten the balls to form discs that will fit into mini muffin cups. Remove the hardened chocolate cups from the refrigerator and gently push one of the brownie dough discs into each one.

If the melted chocolate left in the bowl is starting to solidify, simply heat it again until fully melted. Spoon melted chocolate on top of brownie dough-filled chocolate cups, making sure that it reaches the edges so the brownie dough is completely surrounded by chocolate. You will probably not use all of the melted chocolate; reserve for another use.

Return completed cups to the refrigerator, and chill until completely hardened, at least another 20 minutes. Carefully peel off the liners.

Buffalo Blue Mac & Cheese

0

John and I have a running joke that we eat a lot of “kid food” in our house (this started before Lily was born, by the way). I make pizza every Friday night, John grills burgers on a regular basis throughout the summer, and he also makes some killer baked chicken fingers (I should encourage him to write a post for the blog!).

Then there’s macaroni and cheese. I’m a bit ashamed to admit just how much I love this quintessential kid food. Stovetop, baked, plain, or gussied up with fun additions like pumpkinsweet potato, and lobster… there’s a special place in my heart for it all. After every prenatal appointment, I treated myself to a bit from the Whole Foods hot bar, so I wouldn’t be surprised if I passed down my mac & cheese love to Lily ;).

I recently made one of Cooking Light’s most recent mac & cheese recipes, and unfortunately we were underwhelmed with the rather bland flavor. What we did like was the silky smooth cheese sauce that was comprised of milk, chicken stock, and neufchatel cream cheese.

I used that recipe as the basis for this Buffalo Blue Mac & Cheese, which is far from bland. Spicy wing sauce is swirled into the luscious – but low fat! – cheese sauce, and blue cheese crumbles are incorporated into the crispy panko topping to create little melty pillows amongst the crunch.

The vibrant buffalo sauce tints the sauce an orange hue reminiscent of the classic velveeta mac & cheese (which I don’t think I’ve actually ever eaten) without using the over-processed cheese “product”. I was light-handed with the buffalo sauce to appeal to the masses – who might not like super spicy food – but an extra drizzle after baking makes up for any missing heat.

NameBuffalo Blue Mac & Cheese
CuisineAmerican
Prep Time15 minutes
Cooking Time30 minutes
Total Time45 minutes
Servings8 servings
YieldAbout 8 cups

Ingredients For Pasta

  • 10 ounce whole wheat elbow macaroni
  • 2 tablespoons olive oil
  • 3 garlic cloves, minced
  • 2 cups low sodium chicken stock, divided use
  • 1/4 cup all-natural buffalo wing sauce (we like Wing Time medium heat, available at Whole Foods), plus more for drizzling if desired
  • 1/2 cup 1% low-fat milk, preferably organic
  • 3 Tbsp flour
  • 4 ounces low fat cream cheese (such as neufchatel or Greek yogurt cream cheese)
  • 3/4 cup freshly grated sharp cheddar cheese
  • freshly ground black pepper, to taste

Ingredients For Topping

Estimated Nutrition Per Serving (1 cup):

  • Calories: 380
  • Total Fat: 24g
  • Saturated Fat: 14g
  • Trans Fat: 0g
  • Cholesterol: 80mg
  • Sodium: 860mg
  • Total Carbohydrates: 28g
  • Dietary Fiber: 1g
  • Sugars: 2g
  • Protein: 15g

Please note that these nutrition estimates are approximate and can vary based on specific ingredients and portion sizes used.

Instructions

Preheat oven to 400°F.

Cook macaroni according to package instructions; drain and keep warm in a large bowl.

While macaroni is cooking, heat olive oil in a large saucepan over medium-high heat. Add garlic to pan; cook 1 minute, stirring. Stir in 1 cup stock; bring to a boil and cook for 1 minute. In a medium bowl, whisk together remaining 1 cup stock, buffalo sauce, milk, and flour until smooth. Whisk milk mixture into the garlic. Bring to a low boil; reduce heat to medium & cook 5 minutes or until mixture begins to thicken, stirring often. Remove milk mixture from heat; whisk in cream cheese and cheddar cheese until smooth. Season to taste with pepper. Pour over pasta in bowl, tossing to coat; set aside.

Make the blue cheese topping: in a small bowl, stir together the breadcrumbs, olive oil, & crumbled blue cheese until well-mixed.

Pour pasta mixture into a lightly greased 2-quart baking dish. Evenly scatter blue cheese topping over the pasta. Bake for 15 minutes, or until bubbling and golden brown.