Gatorade has become a household name in hydration drinks. Its colorful bottles and promise to replenish lost fluids make it a favorite among athletes and fitness enthusiasts. But does Gatorade hydrate you effectively? And when should you reach for it instead of plain water? Understanding its role in hydration can help you decide whether it’s the right choice for your needs.
What is Gatorade?
A Brief History of Gatorade
Gatorade was created in 1965 at the University of Florida. The goal was to help the university’s football team, the Gators, combat dehydration during intense games. Since then, it has evolved into a global sports drink brand, marketed as essential for athletes.
Key Ingredients in Gatorade
The core components of Gatorade include:
Water: The primary hydration medium.
Electrolytes: Sodium and potassium are added to replenish what the body loses through sweat.
Carbohydrates: Usually in the form of sugars, these provide energy.
Flavoring: Enhances taste to encourage people to drink more.
Types of Gatorade
Gatorade now comes in various forms to suit different needs:
Classic Gatorade: The original formula, high in electrolytes and carbohydrates.
G2: A lower-calorie option with reduced sugar content.
Gatorade Zero: Sugar-free, designed for those wanting electrolytes without the calories.
How Does Hydration Work?
The Body’s Need for Water and Electrolytes
Hydration is essential for survival. Water helps maintain body temperature, transport nutrients, and remove waste. Electrolytes like sodium and potassium balance fluids inside and outside cells.
Sweat and Electrolyte Loss
When you sweat, your body loses both water and electrolytes. Intense exercise or exposure to heat increases this loss. Without replenishment, dehydration can occur, leading to fatigue, cramps, and even heat-related illnesses.
Does Gatorade Hydrate You?
Gatorade is designed to replace fluids and electrolytes lost during sweating. The electrolytes, mainly sodium and potassium, help the body retain water. This is particularly useful during intense physical activity.
The Role of Carbohydrates
Carbohydrates in Gatorade provide quick energy. This is especially beneficial during prolonged exercise when glycogen stores in muscles are depleted. By restoring energy, Gatorade supports both hydration and performance.
Comparison with Water
Water is excellent for hydration in everyday situations. However, during intense exercise or hot weather, Gatorade may be more effective because it replaces lost electrolytes. It also encourages more drinking due to its appealing taste, which can help maintain hydration levels.
Gatorade quickly restores electrolytes lost through sweat. Sodium and potassium are essential for muscle function and fluid balance. This makes it ideal for athletes or those exercising for long durations.
Increased Fluid Retention
The sodium in Gatorade helps the body retain water. This can be crucial during extreme heat or long exercise sessions, preventing dehydration more effectively than plain water.
Palatability
One of Gatorade’s strengths is its taste. Many people find it easier to drink than water. This increased palatability leads to higher fluid intake, which is vital for staying hydrated.
Potential Drawbacks of Gatorade
High Sugar Content
One of the main criticisms of Gatorade is its sugar content. A 12-ounce serving contains about 21 grams of sugar, similar to some sodas. Consuming high amounts of sugar can lead to weight gain, insulin spikes, and an increased risk of chronic conditions like diabetes.
Caloric Contribution
Gatorade is calorie-dense for a drink, with approximately 80 calories per 12-ounce serving. For athletes, this is beneficial, as they need extra energy. However, for sedentary individuals, these calories can add up quickly and contribute to unnecessary weight gain.
Limited Electrolytes
While Gatorade contains sodium and potassium, it lacks other beneficial electrolytes like magnesium and calcium. Alternatives like coconut water or specialized electrolyte tablets often provide a broader range of minerals. This makes Gatorade less effective for those with specific electrolyte deficiencies.
When Should You Use Gatorade?
Intense Workouts Lasting Over 60 Minutes
Gatorade is most effective for activities lasting over an hour, such as marathon running, cycling, or intense sports. It replenishes lost fluids, electrolytes, and carbohydrates, keeping energy levels up.
Hot and Humid Climates
In environments where you sweat excessively, Gatorade can be helpful. Its electrolyte content supports hydration and prevents heat-related illnesses like cramps or heat exhaustion.
Illness-Related Dehydration
During illnesses causing vomiting or diarrhea, the body loses significant fluids and electrolytes. Gatorade can help rehydrate and restore balance. However, it’s always advisable to consult a healthcare professional in such cases.
Alternative Hydration Methods
For daily hydration or low-intensity activities, plain water or other low-calorie options may suffice. Alternatives like herbal teas, coconut water, or electrolyte-enhanced water can be better choices for general hydration.
Gatorade vs. Other Hydration Drinks
Water
Advantages: Zero calories, easily accessible, and perfect for everyday hydration.
Disadvantages: Lacks electrolytes, making it less effective during intense exercise.
Coconut Water
Advantages: Coconut water is naturally rich in potassium, low in calories, and sugar compared to Gatorade.
Disadvantages: Limited sodium content may not suffice for extreme sweating.
Electrolyte Tablets
Advantages: Customizable electrolyte levels without added sugars.
Disadvantages: May lack the palatability and carbohydrates found in Gatorade.
Other Sports Drinks
Advantages: Options like Powerade or Pedialyte often offer similar benefits to Gatorade.
Disadvantages: Sugar and calorie content can still be a concern.
Expert Opinions
Nutritionist Insights
Experts generally agree that Gatorade is useful for athletes and those with high sweat losses. However, for most people, water is sufficient for daily hydration. Gatorade’s sugar content makes it unsuitable as a casual drink.
Recommendations for Moderate Consumption
Nutritionists recommend drinking Gatorade only when truly necessary. Stick to it during high-intensity workouts or illnesses. For everyday hydration, opt for water or low-calorie alternatives. Gatorade Zero can be a better choice for those wanting electrolytes without added sugar.
FAQs
Does Gatorade hydrate better than water?
Gatorade hydrates effectively after prolonged exercise by replenishing electrolytes and fluids. For everyday hydration, water is sufficient and healthier due to the absence of added sugars.
Is Gatorade good for rehydrating after sickness?
Yes, Gatorade can help replace electrolytes and fluids lost during vomiting or diarrhea, but it may not be suitable for individuals needing low sugar options.
Can drinking Gatorade regularly harm your health?
Frequent consumption of Gatorade may contribute to excessive sugar and calorie intake, potentially increasing the risk of weight gain and related health issues.
Are there healthier alternatives to Gatorade for hydration?
Gatorade can be an effective hydration solution in specific situations. It is especially helpful for athletes, people exercising in hot climates, or those recovering from illness-related dehydration. The combination of water, electrolytes, and carbohydrates makes it ideal for replenishing fluids and energy during intense physical activities.
However, Gatorade’s high sugar content and calorie density mean it’s not suitable for casual consumption or as a substitute for plain water in everyday hydration. There are also alternative options, like coconut water and electrolyte tablets, that may better suit non-athletic needs.
Cream cheese is a versatile and popular dairy product enjoyed in households across the United States. Whether spread on bagels, swirled into cheesecakes, or blended into creamy dips, its rich flavor and creamy texture make it a favorite. But while cream cheese is undeniably delicious, is cream cheese healthy? Let’s dive in to find out.
Nutritional Profile of Cream Cheese
Cream cheese is primarily made from milk and cream, which gives it its distinct creamy texture. A typical serving (1 ounce) contains the following macronutrients:
Calories: About 99
Fats: 10 grams (6 grams are saturated fats)
Protein: 2 grams
Carbohydrates: 1 gram
Its high-fat content and low carbohydrate nature make it popular among those following low-carb diets like keto. However, the fats in cream cheese are mostly saturated fats, which should be consumed with caution. Its protein content is minimal compared to other dairy products like Greek yogurt or cottage cheese.
Vitamins and Minerals
Cream cheese provides some essential vitamins and minerals, including:
Vitamin A: One serving meets about 10-15% of the daily recommended intake. This vitamin supports vision, skin health, and immune function.
Calcium: Though cream cheese is dairy-based, its calcium content is low compared to milk or cheese.
Comparing Regular vs. Low-Fat Cream Cheese
Low-fat cream cheese is often marketed as a healthier alternative. Here’s how the two compare nutritionally:
Nutrient
Regular Cream Cheese (1 oz)
Low-Fat Cream Cheese (1 oz)
Calories
99
70
Total Fat
10g
5g
Saturated Fat
6g
3g
Protein
2g
2g
Low-fat cream cheese has fewer calories and fats, making it suitable for weight-conscious individuals. However, it may contain added stabilizers or sugars to maintain texture and flavor, which are worth noting when making dietary decisions.
Is Cream Cheese Healthy?
Cream cheese is a beloved dairy product, and while it is often viewed as an indulgence, it does offer several nutritional benefits. Here’s a closer look at its positive attributes:
Rich Source of Vitamin A
One of the standout benefits of cream cheese is its high content of Vitamin A. A single tablespoon can provide around 10-15% of the recommended daily intake. Vitamin A is essential for:
Eye Health: It helps maintain good vision and prevents issues like night blindness.
Skin Health: Vitamin A supports skin repair and regeneration, keeping it soft and healthy.
Immune Function: This vitamin strengthens the immune system, helping the body fight infections.
Low in Carbohydrates
Cream cheese contains less than 1 gram of carbohydrates per serving, making it a great option for low-carb or ketogenic diets. Its low glycemic index ensures it does not cause significant spikes in blood sugar, which is particularly beneficial for:
Despite its benefits, cream cheese also has notable drawbacks that must be considered, especially when consumed in excess.
High Saturated Fat Content
Cream cheese contains around 6 grams of saturated fat per ounce, which constitutes a significant portion of the daily recommended limit. Excessive saturated fat intake is linked to:
Cardiovascular Issues: Over time, high saturated fat consumption can lead to plaque buildup in arteries, raising the risk of stroke and heart attack.
Low Protein Content
Unlike other dairy products, cream cheese is not a significant source of protein, providing only 2 grams per ounce. Low protein intake can lead to:
Reduced Satiety: Protein-rich foods help you feel full longer, but cream cheese lacks this benefit.
Limited Muscle Support: Protein is vital for muscle repair and growth, which cream cheese does not significantly contribute to.
Calorie-Dense
At about 99 calories per ounce, cream cheese is calorie-dense despite its small serving size. Overindulging can lead to:
Weight Gain: Regular overconsumption of high-calorie foods like cream cheese can result in an energy surplus.
Difficulty in Portion Control: Its creamy and indulgent nature makes it easy to eat more than intended.
Limited Micronutrient Profile
While cream cheese is rich in Vitamin A, it lacks a broad spectrum of nutrients compared to other dairy products like yogurt or milk. It contains only small amounts of calcium and almost no Vitamin D, which are crucial for:
Bone Health: Calcium and Vitamin D deficiencies can lead to weak bones over time.
Overall Nutritional Balance: Relying on cream cheese as a dairy source might leave gaps in your diet.
Potential Additives in Processed Varieties
Commercial cream cheese varieties may contain stabilizers, artificial flavors, or preservatives. These additives:
Impact Health Negatively: Some additives have been linked to inflammation and digestive issues.
Reduce Nutritional Value: Processed versions often contain more unhealthy fats or sugars compared to homemade or natural options.
Lactose Content
Cream cheese contains lactose, a sugar found in milk, which can be problematic for people with lactose intolerance. Even small amounts of lactose can lead to:
Digestive Discomfort: Symptoms like bloating, gas, and diarrhea.
Restricted Usage: People with severe lactose intolerance may need to avoid cream cheese entirely.
Environmental and Ethical Concerns
Cream cheese production, like many dairy products, contributes to environmental issues due to the carbon footprint of dairy farming. Ethical concerns surrounding animal welfare in the dairy industry may also make it a less appealing choice for some individuals.
Is Cream Cheese Healthy to Eat Every Day?
Eating cream cheese daily is not inherently harmful, but moderation is essential. Overconsumption, especially of regular cream cheese, can lead to excessive calorie and saturated fat intake. Balance it with nutrient-dense foods like fruits, vegetables, and whole grains to maintain a healthy diet.
Moderation is Key
Cream cheese can fit into a balanced diet when enjoyed in moderation. Stick to portion sizes of about 1-2 tablespoons. Pair it with whole-grain crackers, fresh vegetables, or fruit to make it a healthier snack.
Cream Cheese for Specific Diets
Cream Cheese for Diabetics
For individuals with diabetes, cream cheese can be a suitable option:
Low Carbohydrate Content: With only 1 gram of carbs per serving, it has a minimal impact on blood sugar levels.
Glycemic Index: Cream cheese has a low glycemic index, making it a good choice for managing blood sugar.
However, diabetics should practice portion control and pair cream cheese with high-fiber foods like whole-grain bread or vegetables to create a balanced meal.
Cream Cheese for Weight Loss
Cream cheese can be part of a weight-loss plan when consumed mindfully:
Calorie Density: It is calorie-dense, so small portions can satisfy cravings without exceeding calorie limits.
Full-Fat vs. Low-Fat Options: While full-fat cream cheese is richer and more satisfying, low-fat varieties may better suit calorie-restricted diets.
Choose low-fat cream cheese sparingly, and avoid flavored varieties that might contain added sugars.
Alternatives to Cream Cheese
Cream cheese may be a favorite, but there are plenty of substitutes that offer similar creaminess with added health benefits. Let’s explore some of the best alternatives.
Greek Yogurt
Greek yogurt is a fantastic alternative to cream cheese. It’s tangy, creamy, and loaded with protein. One cup of plain Greek yogurt contains roughly:
Calories: 100-150
Protein: 10-20 grams
Calcium: A significant source for strong bones.
Greek yogurt works well as a spread, dip base, or ingredient in recipes. Swap it for cream cheese in bagels or dips for a protein-packed option.
Cottage Cheese
Cottage cheese is another nutrient-dense substitute for cream cheese. It is high in protein and relatively low in calories. You can blend it to achieve a smoother texture, making it suitable for spreads and dips. A typical serving (1/2 cup) contains:
Calories: About 100
Protein: 14 grams
Fat: 2-4 grams (in low-fat varieties).
This option is ideal for those looking to manage weight or increase protein intake.
Avocado Spreads
Avocados are creamy, rich in heart-healthy monounsaturated fats, and naturally dairy-free. Mash ripe avocados with a sprinkle of salt and lemon juice to create a spread that’s perfect on toast or as a dip. Avocados also deliver:
Fiber: Helps with digestion and satiety.
Potassium: Supports heart and muscle health.
Vegan or Plant-Based Cream Cheese
For those avoiding dairy, plant-based cream cheese options are widely available. These are often made from nuts, seeds, or soy. While they mimic the texture and flavor of cream cheese, always check the label for added sugars or unhealthy fats. Common options include cashew-based and almond-based spreads.
How to Include Cream Cheese in a Healthy Diet?
While cream cheese is indulgent, it can fit into a balanced diet if consumed mindfully. Here’s how to enjoy it without guilt.
Tips for Portion Control
Stick to 1-2 tablespoons per serving. This keeps calorie and fat intake in check.
Pair it with nutrient-dense foods like whole grains, fresh vegetables, or fruits.
Avoid doubling up on high-fat toppings, like butter or bacon, when using cream cheese.
Swap heavy cream and sugar with Greek yogurt and honey to create a lighter cheesecake. Use a whole-grain crust to add fiber.
Vegetable Dip
Blend cream cheese with low-fat Greek yogurt, fresh herbs, and spices. Serve with carrots, celery, or bell peppers for a low-calorie, nutrient-rich snack.
Whole-Grain Bagel Spread
Instead of slathering a thick layer, use a thin spread of cream cheese on a whole-grain bagel. Top with sliced tomatoes, cucumbers, or smoked salmon for a balanced breakfast.
FAQs
Is cream cheese good for diabetics?
Yes, cream cheese is low in carbs and has a minimal impact on blood sugar. However, diabetics should watch portion sizes and pair it with fiber-rich foods to maintain balanced blood sugar levels.
Is cream cheese bad for weight loss?
Cream cheese is calorie-dense, so moderation is key. Opt for low-fat versions or use it sparingly in recipes to enjoy its flavor without compromising your weight-loss goals.
What are the healthiest alternatives to cream cheese?
A small portion, about 1-2 tablespoons, can fit into a healthy diet. Be mindful of its high saturated fat content and balance it with nutrient-rich foods like vegetables or whole grains.
Conclusion
So, is cream cheese healthy? The answer lies in moderation and context. Cream cheese offers Vitamin A and a low-carb profile, making it appealing for some dietary needs. However, its high saturated fat content and low protein levels require careful consideration. Opt for low-fat versions if you’re calorie-conscious, and always pair cream cheese with nutrient-rich foods to balance your meal. Enjoy it as an occasional indulgence rather than a daily staple for optimal health.
Vitamin Water has become a popular drink for those seeking hydration with added benefits. It’s marketed as a healthier option compared to sugary sodas, offering a mix of vitamins and minerals in every bottle. But one common question often arises: does Vitamin Water have caffeine?
This curiosity stems from people being more conscious about caffeine in their daily diets. Whether it’s for health reasons or to avoid unexpected energy boosts, understanding what’s in your beverage is essential. This article dives into Vitamin Water’s caffeine content, variations, and nutritional profile to clear up any confusion.
Does Vitamin Water Contain Caffeine?
Vitamin Water comes in various flavors and formulations. Most of them are caffeine-free, but certain products include caffeine as an ingredient. Let’s break it down:
Regular Vitamin Water: These are the standard versions, primarily made with water, vitamins, minerals, and sometimes sugar or sweeteners. These varieties do not contain caffeine.
Vitamin Water Energy: This is a specific line within the Vitamin Water brand that does contain caffeine. It’s designed for people looking for a mild energy boost alongside hydration.
The caffeine content in Vitamin Water Energy is usually comparable to a small cup of coffee, around 50–75 milligrams per bottle. This makes it a viable alternative to coffee or energy drinks for those seeking a lighter jolt of energy.
If you’re unsure about whether your Vitamin Water contains caffeine, always check the label. The ingredients list and nutritional facts will clearly state if caffeine is present.
Variations in Vitamin Water and Their Caffeine Content
Vitamin Water can be divided into two main categories: caffeinated and non-caffeinated. Let’s explore these variations in detail.
Caffeinated Options:
Vitamin Water Energy: As mentioned earlier, this line contains caffeine. It’s targeted at those needing an energy boost while staying hydrated.
Key Features:
Caffeine content per bottle ranges between 50–75 milligrams.
Comes in flavors like Tropical Citrus and Berry Blast.
Includes additional B vitamins for energy metabolism.
Non-Caffeinated Options:
Regular Vitamin Water: These are the standard drinks without caffeine.
Key Features:
A mix of vitamins like C, B, and E.
Often sweetened with sugar or natural sweeteners.
Designed for hydration without any stimulant effect.
Key Differences Between Regular Vitamin Water and Vitamin Water Energy:
Purpose: Regular Vitamin Water is for hydration and vitamin supplementation. Vitamin Water Energy adds a functional boost through caffeine.
Ingredients: The Energy line includes caffeine and higher levels of B vitamins, whereas the regular line does not.
Why Do Some Vitamin Water Products Contain Caffeine?
Caffeine is added to some Vitamin Water products for specific reasons. It isn’t there by accident—it’s a deliberate choice by the manufacturers.
Boosting Energy and Focus
Caffeine is a natural stimulant. It increases alertness and focus by blocking adenosine, a chemical in the brain that promotes relaxation. By adding caffeine to Vitamin Water Energy, the drink provides a dual benefit: hydration and mental clarity. This makes it an attractive option for busy individuals.
Target Demographics
Caffeinated Vitamin Water appeals to:
Students: For staying alert during long study sessions.
Professionals: To maintain focus throughout the workday.
Fitness Enthusiasts: As a pre-workout hydration option.
The inclusion of caffeine allows Vitamin Water to compete with other energy drinks while maintaining a healthier image.
Nutritional Profile of Vitamin Water
When choosing Vitamin Water, understanding its nutritional content is important. Let’s look at what’s inside.
Calories and Sugar Content
Regular Vitamin Water: Contains 100–120 calories per bottle, mostly from added sugars. This can be a concern for those monitoring their sugar intake.
Vitamin Water is fortified with essential vitamins and minerals:
Vitamin C: Boosts immunity.
B Vitamins (B3, B5, B6, B12): Aid in energy production and metabolism.
Electrolytes: Help with hydration, especially post-exercise.
Comparison Between Regular and Sugar-Free Versions
Regular Versions: Higher in calories due to sugar but more widely available.
Sugar-Free Versions: A better option for those watching their calorie intake or managing conditions like diabetes.
When comparing Vitamin Water to other drinks, it’s essential to balance its benefits with your dietary needs. Some versions may provide hydration and nutrients but can be high in sugar or calories.
The FDA suggests that up to 400 milligrams of caffeine per day is safe for most adults. This is equivalent to about four 8-ounce cups of coffee. A single bottle of Vitamin Water Energy contains 50–75 milligrams of caffeine, which is well within the safe range for most individuals. However, if you consume other caffeinated beverages throughout the day, it’s important to monitor your total intake.
Potential Side Effects of Caffeine
Excessive caffeine consumption can lead to unwanted side effects such as:
Jitters: Feeling shaky or anxious.
Heart Palpitations: An irregular or rapid heartbeat.
Certain individuals should be cautious about consuming caffeinated Vitamin Water, including:
Pregnant Women: Caffeine intake should be limited to less than 200 milligrams per day.
Children and Adolescents: Caffeine is not recommended for younger age groups.
People with Sensitivities: Those prone to anxiety or heart issues may need to avoid caffeine.
Caffeinated Vitamin Water is best consumed early in the day to avoid disrupting sleep patterns. Always listen to your body’s response to caffeine and adjust accordingly.
Health Benefits of Vitamin Water
Vitamin Water, whether caffeinated or not, offers a range of health benefits. Its combination of hydration, vitamins, and minerals can support overall well-being.
Hydration and Electrolyte Replenishment
Staying hydrated is vital for all bodily functions. Vitamin Water provides an easy way to replenish fluids and electrolytes, especially after exercise. Some formulations include essential electrolytes like potassium and magnesium, which help maintain fluid balance and muscle function.
Benefits of Vitamins in Vitamin Water
Vitamin C: Known for its immune-boosting properties, Vitamin C also acts as an antioxidant, helping to protect cells from damage.
B Vitamins: Found in many Vitamin Water varieties, B vitamins (like B6 and B12) play a key role in energy production and brain function.
These benefits make Vitamin Water a convenient choice for those looking to combine hydration with added nutritional support.
For individuals looking to avoid caffeine, there are plenty of alternatives to caffeinated Vitamin Water. These options cater to a wide range of preferences and health needs.
Popular Caffeine-Free Options
Regular Vitamin Water: Most standard varieties are caffeine-free, focusing on hydration and vitamins without any stimulants.
Electrolyte Drinks: Brands like Pedialyte or coconut water provide hydration and electrolytes without caffeine.
Flavored Water: Options like LaCroix or Hint Water offer subtle flavors without caffeine or added sugars.
How to Identify Caffeine-Free Vitamin Water?
Always check the label to determine if the drink contains caffeine. Look for:
Ingredient List: Caffeine will be explicitly mentioned if present.
Packaging Labels: Products like “Vitamin Water Energy” will typically indicate caffeine content.
Selecting the right Vitamin Water for your needs involves a few key considerations. Here’s how to make an informed choice.
Check the Label for Caffeine Content
Always inspect the ingredients and nutritional facts to determine whether the product contains caffeine. This step is crucial if you’re sensitive to caffeine or trying to limit your intake.
Review Nutritional Information
Consider the sugar and calorie content. Some Vitamin Water varieties are high in sugar, which may not align with certain health goals like weight management or managing blood sugar levels. Sugar-free options are available and may be a better fit for some individuals.
Align with Your Health Goals
For Hydration: Choose Vitamin Water with added electrolytes.
For Energy: Select caffeinated options like Vitamin Water Energy.
For General Nutrition: Pick varieties rich in vitamins C and B.
Consider Your Lifestyle Needs
Active individuals may benefit from Vitamin Water with electrolytes, while those needing a quick energy boost can opt for caffeinated options. If you prefer to avoid added sugar, look for sugar-free formulations.
Not all Vitamin Water flavors contain caffeine. Regular Vitamin Water products are caffeine-free, but some versions, like Vitamin Water Energy, are specifically formulated with caffeine for an energy boost. Always check the label to confirm.
How much caffeine is in Vitamin Water Energy?
Vitamin Water Energy contains approximately 50-75 mg of caffeine per serving, depending on the specific product. This amount is moderate compared to a cup of coffee but enough to provide a gentle energy boost.
Is Vitamin Water with caffeine safe for kids?
Caffeinated Vitamin Water is not recommended for children due to its caffeine content. Children are more sensitive to caffeine, which can impact their sleep, focus, and overall health. Opt for caffeine-free alternatives instead.
Are there sugar-free Vitamin Water options with caffeine?
Yes, some Vitamin Water Energy products offer sugar-free options sweetened with alternative ingredients like stevia. These are suitable for those looking to reduce calorie intake while enjoying a caffeinated drink.
Conclusion
Vitamin Water offers a versatile range of beverages for hydration and nutrition. While most varieties are caffeine-free, products like Vitamin Water Energy provide a mild caffeine boost for those who need it. Understanding these differences helps you make informed choices based on your lifestyle and preferences.
Whether you’re sipping on it for the vitamins, hydration, or the occasional energy kick, always check the label. This ensures you know exactly what you’re consuming. So, next time you reach for a bottle, you’ll feel confident about what’s inside.
Coke Zero has become a popular choice for those looking to enjoy a soda without the calories or sugar. As a sugar-free alternative to regular Coke, it offers the familiar taste of cola while catering to those who want to avoid added sugar. However, this raises an important question: does Coke Zero have aspartame?
This inquiry matters because consumers are increasingly concerned about the safety of artificial sweeteners in their diet. In this article, we’ll break down the sweeteners used in Coke Zero, their safety, and what research says about potential health effects.
Does Coke Zero Have Aspartame?
Yes, Coke Zero contains aspartame. Aspartame is one of the primary sweeteners used to give Coke Zero its sweetness without adding calories. In addition to aspartame, Coke Zero also includes acesulfame potassium (Ace-K). These two sweeteners work together to create a balanced, sugar-free taste that mimics the flavor of regular Coca-Cola.
Aspartame provides the sweetness, while Ace-K enhances and stabilizes the flavor. This combination helps Coke Zero achieve its signature taste. Ace-K is particularly effective in masking any bitter aftertaste that might come from other sweeteners. Together, they make Coke Zero an appealing option for people watching their calorie intake.
Aspartame in Coke Zero: Safety and Health Risks
FDA Approval and General Safety
Aspartame has been approved by the U.S. Food and Drug Administration (FDA) for use in food and beverages since 1981. It is also endorsed by global regulatory bodies like the European Food Safety Authority (EFSA) and the World Health Organization (WHO). These agencies have reviewed extensive studies and determined that aspartame is safe for general consumption within the acceptable daily intake (ADI) limits.
Despite regulatory approval, aspartame has faced scrutiny from some researchers and consumers. A few studies have suggested possible links between aspartame and certain health issues, including:
Headaches and Migraines: Some individuals report sensitivity to aspartame, experiencing headaches or migraines after consuming it. However, these reports are largely anecdotal, and controlled studies have not confirmed a consistent link.
Allergic Reactions: In rare cases, people with a genetic condition called phenylketonuria (PKU) must avoid aspartame. Aspartame contains phenylalanine, which individuals with PKU cannot metabolize.
Cancer Concerns: Older studies raised concerns about a possible link between aspartame and cancer in laboratory animals. However, more recent reviews of human studies have found no clear evidence supporting these claims.
In addition to aspartame, Coke Zero uses acesulfame potassium (Ace-K) as a sweetener. Ace-K is another FDA-approved sugar substitute that is commonly combined with other sweeteners to improve taste. While Ace-K itself does not provide calories, it is about 200 times sweeter than sugar, making it a powerful tool for creating sweet, low-calorie beverages.
Safety of Ace-K
Like aspartame, Ace-K has been extensively studied and approved by regulatory agencies worldwide. The ADI for Ace-K is 15 milligrams per kilogram of body weight. Studies show that typical consumption levels of Ace-K in beverages like Coke Zero are well below this limit.
Concerns about Ace-K have mostly centered around potential effects on gut microbiota or long-term safety. However, current evidence does not conclusively link Ace-K to significant health risks.
Coke Zero vs. Diet Coke
Coke Zero and Diet Coke are both sugar-free soda options, but they differ significantly in their formulation and taste profile.
Differences in Sweeteners
Coke Zero uses a blend of aspartame and acesulfame potassium (Ace-K) as sweeteners. This combination enhances the flavor and provides a taste closer to regular Coca-Cola. On the other hand, Diet Coke relies solely on aspartame for its sweetness. The absence of Ace-K in Diet Coke results in a slightly different taste profile.
Taste Comparison
Coke Zero is often described as having a flavor profile that mimics the rich and bold taste of classic Coca-Cola. Diet Coke, by contrast, has a lighter and more distinct flavor. Many consumers find Coke Zero sweeter and more satisfying, while Diet Coke appeals to those who prefer a crisp, less intense cola taste.
Calorie Content
Both Coke Zero and Diet Coke are calorie-free, making them excellent choices for those managing calorie intake. The difference lies in their flavor profiles and individual preferences regarding the sweeteners used.
Are There Aspartame-Free Alternatives?
For consumers who prefer to avoid aspartame, there are several soda options available on the market. These alternatives cater to various tastes and dietary preferences:
Aspartame-Free Sodas
Pepsi Zero Sugar: Uses sucralose and Ace-K instead of aspartame.
Zevia: A line of sodas sweetened with stevia, a natural sugar alternative.
Coke Life: A Coca-Cola product sweetened with cane sugar and stevia (availability may vary).
Naturally Sweetened Options
Some consumers opt for naturally sweetened sodas or those that use alternative sweeteners like honey or agave. Brands like Zevia and Virgil’s are popular in this category.
Unsweetened Soda Options
For those avoiding sweeteners altogether, unsweetened sodas like sparkling water can be a refreshing alternative. Brands like LaCroix, Perrier, and Topo Chico offer a variety of flavors without any added sugars or sweeteners.
Side Effects of Aspartame
While aspartame is widely regarded as safe for consumption, some individuals may experience side effects due to sensitivity or overconsumption. Let’s break these down:
Commonly Reported Side Effects
Headaches: Some people report headaches or migraines after consuming aspartame. Sensitivity varies from person to person.
Digestive Issues: In rare cases, aspartame may cause mild gastrointestinal discomfort.
Allergic Reactions: Individuals with phenylketonuria (PKU) must strictly avoid aspartame, as it contains phenylalanine.
Long-Term Concerns
Studies exploring the long-term effects of aspartame have not found conclusive evidence of harm in humans. Concerns about cancer or neurological issues were based on earlier animal studies, which have not been replicated in large-scale human trials.
Moderation Is Key
For most people, consuming aspartame within the recommended limits poses no significant risks. However, individuals with sensitivities or health concerns should consult a healthcare provider.
FAQs
Does Coke Zero Sugar have aspartame?
Yes, Coke Zero Sugar contains aspartame, along with acesulfame potassium.
Is Coke Zero better than Diet Coke?
It depends on personal preferences. Coke Zero mimics the taste of classic Coca-Cola, while Diet Coke has a lighter, distinct flavor.
What are the side effects of aspartame?
Potential side effects include headaches or mild gastrointestinal issues in sensitive individuals. It is safe for most people when consumed within the recommended daily limits.
Are there sodas without aspartame?
Yes, options like Zevia, Pepsi Zero Sugar, and unsweetened sparkling waters do not contain aspartame.
Is aspartame safe for everyone?
While aspartame is safe for most people, those with phenylketonuria (PKU) should avoid it due to the presence of phenylalanine.
Conclusion
Coke Zero contains aspartame, alongside acesulfame potassium, to provide its signature sugar-free sweetness. Both sweeteners are approved for use by regulatory authorities worldwide and are considered safe for most people. However, some individuals may experience sensitivity or prefer to avoid artificial sweeteners altogether.
If you have concerns about consuming aspartame or other artificial sweeteners, it’s a good idea to discuss them with your healthcare provider. Ultimately, whether to drink Coke Zero, Diet Coke, or an aspartame-free soda comes down to personal preference and health considerations.
The Starbucks Pink Drink has taken social media by storm. Its vibrant pink hue and tropical flavor make it a favorite among fans. But apart from its looks, people often wonder: does the Pink Drink have caffeine? Whether you’re looking for a refreshing boost or avoiding caffeine altogether, understanding this drink’s components is essential. Let’s dive into what makes this beverage so unique.
What is the Pink Drink?
The Pink Drink is one of Starbucks’ most famous creations. It’s part of their “Refreshers” line, designed to be light and energizing. Its popularity comes from its visually appealing color and fruity, creamy taste. Here’s what makes up the Pink Drink:
Ingredients Breakdown
Strawberry Açaí Base The drink starts with a Strawberry Açaí base. This liquid contains fruit juices, açaí powder, and green coffee extract. It gives the drink its tropical flavor and subtle energy boost.
Coconut Milk Starbucks swaps traditional water with coconut milk for this drink. This addition gives it a creamy texture and balances the fruity flavors.
Freeze-Dried Strawberries Each Pink Drink comes with a generous serving of freeze-dried strawberries. These not only enhance the flavor but also add visual appeal.
What Makes It Special?
The blend of fruity and creamy elements sets it apart from regular Starbucks beverages. It’s a cooling option that’s perfect for summer or any time you want a refreshing drink.
Does the Pink Drink Have Caffeine?
Yes, the Pink Drink does contain caffeine. However, the amount is relatively small compared to traditional coffee beverages.
Caffeine in the Strawberry Açaí Base
The Strawberry Açaí base includes green coffee extract, which provides caffeine. Green coffee extract is made from unroasted coffee beans. It gives a mild energy boost without the strong taste of coffee.
As mentioned, a grande-sized Pink Drink contains about 45 mg of caffeine. This amount is similar to what you’d find in some soft drinks or tea.
Calories, Sugar, and Fat
Calories: A grande Pink Drink has approximately 140 calories. Most of these come from the coconut milk and sugar content in the base.
Sugar: The drink contains 24 grams of sugar in a grande size. This is higher than some other beverages, primarily because of the fruit juice base.
Fat: Coconut milk adds around 2.5 grams of fat, making it relatively low in fat compared to cream-based drinks.
The Pink Drink offers a flavorful, low-caffeine option for anyone seeking a refreshing treat. With its fruity blend, creamy coconut milk, and a touch of caffeine, it’s a standout in the Starbucks lineup. Want a lighter drink? You can customize it by requesting less sugar or opting for a smaller size.
Variations and Customizations
The Pink Drink is versatile and customizable, making it a favorite for creative drink lovers. Whether you’re looking to reduce caffeine or add unique flavors, here are some ways to make it your own.
How to Make a Caffeine-Free Pink Drink
If you want to enjoy the Pink Drink without any caffeine, it’s simple. Ask your barista to prepare it using only coconut milk, freeze-dried strawberries, and water or a fruit juice substitute. By omitting the Strawberry Açaí base (which contains caffeine from green coffee extract), you can enjoy the same creamy, fruity drink without the energy boost.
Popular Add-Ons
Matcha Powder Add a scoop of matcha for an earthy twist and an extra boost of antioxidants. Keep in mind that matcha does contain caffeine.
Extra Berries Double up on freeze-dried strawberries or add blueberries for added flavor and texture.
Vanilla Syrup A pump of vanilla syrup can make the drink sweeter and more dessert-like.
Light Ice Requesting light ice ensures more drink and less dilution.
Substitute Sweeteners For a healthier option, ask for sugar-free syrups or reduce the sweetness of the Strawberry Açaí base.
Is the Pink Drink Healthy?
Whether the Pink Drink fits into a healthy lifestyle depends on your dietary goals. Let’s explore the pros and cons to help you decide.
Pros
Low Caffeine Content: With just 45 mg of caffeine in a grande, it’s a gentler option than coffee or energy drinks.
Refreshing Alternative: The fruity and creamy combination is lighter than heavy, cream-based drinks like frappuccinos.
Customizable: You can tailor the drink to suit your dietary preferences, such as reducing sugar or swapping ingredients.
Cons
High Sugar Content: A grande size has 24 grams of sugar, which is on the higher side for a beverage. For context, this is similar to the sugar in some sodas.
Artificial Flavor Concerns: The Strawberry Açaí base contains artificial flavors and added sweeteners, which may not align with some health-conscious diets.
Verdict
The Pink Drink can be a refreshing choice in moderation. By customizing its ingredients, you can make it a healthier fit for your lifestyle.
Yes, the Pink Drink contains about 45 mg of caffeine in a grande size. The caffeine comes from the green coffee extract in the Strawberry Açaí base.
Can I get a caffeine-free Pink Drink?
Yes, you can ask for a caffeine-free version. Request your barista to remove the Strawberry Açaí base and use only coconut milk, freeze-dried strawberries, and water or a fruit juice alternative.
Is the Pink Drink vegan?
Yes, the Pink Drink is vegan. Its base ingredients, including coconut milk and freeze-dried strawberries, are plant-based. Confirm with your barista about any specific customizations.
Does the Pink Drink have sugar?
Yes, the Pink Drink contains sugar, mainly from the Strawberry Açaí base. A grande size has about 24 grams of sugar. You can ask for modifications to reduce the sugar content.
Conclusion
The Pink Drink is a standout option in Starbucks’ menu for its vibrant look and refreshing flavor. While it does contain caffeine, the amount is relatively small, making it suitable for most people.
Whether you’re sipping it for the taste or tailoring it to your preferences, enjoy the Pink Drink mindfully. Remember, small tweaks like reducing sugar or going caffeine-free can make it an even better fit for your needs. So, go ahead and make it your perfect pink indulgence!
If you’ve ever wondered, what is a frappe, you’re not alone. This chilled and frothy beverage has taken the coffee world by storm, becoming a go-to choice for many. Originally a Greek creation, the frappe gained widespread popularity in the U.S. for its creamy, customizable flavors.
Its adaptability has made it a beloved drink for coffee enthusiasts and non-coffee drinkers alike. Whether you’re enjoying it on a hot summer day or as a quick pick-me-up, the frappe offers something for everyone. Let’s dive deeper into what makes this drink so special.
What is a Frappe?
A frappe is a cold, frothy drink typically made by blending instant coffee, milk, sugar, and ice. Its texture is smooth and creamy, offering a delightful balance between sweetness and coffee’s rich taste.
The frappe’s origins trace back to Greece, where it was first crafted in the 1950s. Over time, its popularity spread globally, with each region adding unique twists. For instance, in Asia, it might include flavors like matcha or taro, while in the U.S., frappes often resemble dessert-like beverages.
Think of it as a chilled, blended beverage that serves as a blank canvas for creativity. You can make it simple with just coffee and ice or dress it up with syrups, whipped cream, and sprinkles. But what is a it made of at its core? Let’s look at the key ingredients.
Key Ingredients
Its recipe is refreshingly simple. Here’s what you need:
Coffee: Instant coffee is traditionally used for its bold flavor and quick dissolvability.
Milk: This can be regular dairy milk or non-dairy options like almond, soy, or oat milk.
Sugar: Adjusted to taste, sugar adds sweetness to balance the coffee’s bitterness.
Ice: Crushed or cubed, it’s essential for that frosty texture.
Toppings (optional): Whipped cream, chocolate shavings, or caramel drizzle elevate the drink.
Customizations are common. Many opt for vegan frappes by swapping dairy milk with plant-based alternatives. Some even use decaffeinated coffee for a caffeine-free version.
Craving one now? Search for a frappe coffee recipe and you’ll find endless variations. Making one at home is easy—just blend the ingredients until smooth. Want to learn how to make frappe at home? Start with your preferred coffee base, add milk and ice, sweeten as needed, and blend!
You’ve likely heard of Starbucks’ Frappuccino. Let’s break it down.
Ingredients: While frappes stick to coffee, milk, sugar, and ice, Frappuccinos are more elaborate. They often include syrups, flavored powders, and whipped toppings.
Preparation: A frappe is usually made with instant coffee, but Frappuccinos use brewed coffee or a coffee base mix.
Branding: “Frappuccino” is a trademarked name owned by Starbucks. A frappe, on the other hand, is a generic term.
In short, frappes are more traditional, while Frappuccinos cater to modern, dessert-like cravings. Remember, the former is the foundation; the latter is the evolution. But what is frappe in Starbucks? It’s essentially a sweet, blended drink inspired by the classic frappe.
Does a Frappe Have Caffeine?
Yes, most frappes do contain caffeine. The caffeine comes from the coffee used as the base. The exact amount varies depending on the type of coffee and serving size.
For instance, a traditional Greek frappe made with instant coffee has moderate caffeine levels. On the other hand, a frappuccino from Starbucks might have higher caffeine content due to the brewed coffee or espresso shots added.
What if you’re caffeine-sensitive? Don’t worry. Decaffeinated coffee can be used to create a caffeine-free frappe. It’s a great option for those who want the taste without the buzz. So, when someone asks, does a frappe have caffeine, the answer is yes—but it can be adjusted to suit your needs.
Frappe vs. Latte and Other Coffee Beverages
Frappes are often compared to other popular coffee drinks, such as lattes, cappuccinos, and iced coffees. Here’s how they differ:
Latte: A latte is hot and creamy, made with espresso and steamed milk. It lacks the icy texture and frothiness of a frappe.
Cappuccino: Similar to a latte but with more foam, cappuccinos are also served hot. Frappes, by contrast, are cold and blended.
Iced Coffee: Iced coffee is simply brewed coffee served over ice. It doesn’t have the blended, frothy texture that defines a frappe.
Wondering what is the difference between frappe and latte? Think of it this way: a latte is a warm hug, while a frappe is a cool breeze. And when comparing iced frappe vs blended frappe, the terms are often used interchangeably, but a blended frappe emphasizes its creamy texture.
How to Make a Frappe at Home?
Craving a frappe but don’t want to leave your house? Making this delicious, frothy drink at home is surprisingly easy. Whether you prefer the classic coffee version or a fun twist with added flavors, here’s a simple guide to help you whip up a frappe in minutes.
Classic Frappe Recipe (Step-by-Step Guide)
Gather Your Ingredients:
2 teaspoons of instant coffee (or brewed and chilled coffee).
1 cup of milk (dairy or non-dairy).
1-2 teaspoons of sugar (adjust to taste).
1 cup of ice cubes.
Optional toppings: whipped cream, chocolate syrup, or sprinkles.
Blend It All Together:
Combine the coffee, milk, sugar, and ice in a blender.
Blend until the mixture is smooth and frothy.
Pour and Serve:
Pour the frappe into a tall glass.
Add your favorite toppings for a café-style finish.
Customization Tips
Add Flavors: Enhance the flavor with syrups like vanilla, caramel, or hazelnut.
Experiment with Milk Alternatives: Use almond, oat, or soy milk for a vegan option.
Make It Extra Creamy: Add a scoop of vanilla ice cream for a dessert-like treat.
Try Different Bases: Replace coffee with matcha powder, chocolate, or even fruit for a non-caffeinated version.
While frappes are undeniably delicious, it’s important to consider their nutritional aspects. A traditional frappe can be high in calories and sugar, especially if it’s loaded with sweeteners and toppings. However, with a few smart choices, you can enjoy a healthier version without compromising flavor.
Calorie Content and Sugar Levels
A basic frappe contains around 150-200 calories.
Sweetened and topped frappes can climb to 400-500 calories.
Sugar levels vary, but many recipes include 10-15 grams per serving.
Reduce Sugar: Use natural sweeteners like stevia or skip the sugar altogether.
Choose Low-Calorie Milk: Opt for skim milk or unsweetened almond milk to cut calories.
Limit Toppings: Skip the whipped cream and syrups for a lighter drink.
Vegan-Friendly and Low-Calorie Options
Replace dairy milk with almond, oat, or coconut milk.
Blend with unsweetened cocoa powder or fruit for natural sweetness.
Use decaffeinated coffee for a caffeine-free option.
Whether you’re health-conscious or just experimenting, there’s always a way to make your frappe work for you. By tweaking the ingredients, you can create a drink that’s both satisfying and guilt-free.
FAQs
Is frappe a coffee?
Yes, a frappe is typically made with coffee, but variations exist. The traditional version uses instant coffee, while modern adaptations can include other bases like chocolate or matcha.
Does a frappe have caffeine?
Most frappes contain caffeine, derived from the coffee used as a base. However, you can make a caffeine-free frappe by using decaffeinated coffee or other non-caffeinated ingredients.
What is the difference between frappe and latte?
A frappe is a cold, blended drink with a frothy texture, often made with instant coffee and ice. A latte, on the other hand, is a hot drink made with espresso and steamed milk. Frappes are typically sweeter and more dessert-like, while lattes are smooth and creamy.
Conclusion
Frappes are a versatile and refreshing drink that has captured the hearts of coffee lovers worldwide. With endless options for customization, they’re perfect for any occasion—whether you prefer a traditional coffee frappe or a creative twist with unique flavors.
Why not try making one at home? With just a few simple ingredients and a blender, you can enjoy this café favorite right from your kitchen. Once you’ve mastered the basics, you’ll discover how fun it is to experiment with flavors and toppings.
So, the next time you’re craving a cool and frothy treat, skip the café and make your own frappe masterpiece. Enjoy the process, and don’t forget to share your creation with friends and family!
Lemonade is a beloved beverage worldwide, especially in the United States. But is lemonade good for you? This tangy, refreshing drink is made from simple ingredients: lemon juice, water, and sugar. Its variations range from the classic homemade recipe to sugar-laden commercial versions found on store shelves. It is a summer staple in the U.S., cherished for its ability to quench thirst on sweltering days.
It’s woven into the cultural fabric, from backyard barbecues to roadside stands. This article explores the nutritional value of lemonade, its potential health benefits, and the risks it may pose. Whether you’re a fan of the homemade version or store-bought varieties, understanding lemonade’s impact on your health is essential.
What Is in Lemonade?
Lemonade typically contains three primary ingredients: water, lemon juice, and sugar. Some versions add preservatives, artificial flavors, or colors to enhance shelf life and appeal. Homemade lemonade is often the purest form, with no additives. However, store-bought lemonade may include extra ingredients such as high-fructose corn syrup, citric acid, and synthetic vitamins.
When comparing the two, homemade lemonade often contains fewer calories and less sugar. A cup of homemade lemonade usually has around 100 calories, depending on the sugar amount. In contrast, a store-bought serving might exceed 150 calories, with added preservatives and sweeteners.
How Many Calories in Lemonade?
The calorie content of this drink varies significantly. Homemade lemonade contains about 80–120 calories per cup, depending on the sugar used. Store-bought lemonades often pack more, sometimes exceeding 150 calories due to added sugars and concentrates. For those watching their calorie intake, opting for a reduced-sugar or sugar-free version might be a better choice.
Is Lemonade High in Sugar?
Yes, it is high in sugar, particularly in commercial varieties. A single serving of store-bought lemonade can contain 20–30 grams of sugar, which is equivalent to 5–7 teaspoons. This amount is close to or even exceeds the American Heart Association’s recommended daily sugar intake (36 grams for men and 25 grams for women).
Homemade drink can be adjusted to contain less sugar, making it a healthier option. Comparatively, this drink has a higher sugar content than plain water but may contain less than sodas or certain fruit juices.
Health Benefits
Hydration and Electrolyte Balance
Staying hydrated is vital, especially in hot climates. Lemonade provides a flavorful alternative to plain water, encouraging people to drink more fluids. The addition of electrolytes from lemon juice, like potassium, helps maintain the body’s fluid balance. While water remains the gold standard for hydration, this lemon drink can offer a more palatable choice for some.
Does Lemonade Have Vitamin C?
Yes, it contains vitamin C, a powerful antioxidant that supports immune health. Lemons are rich in vitamin C, which aids in collagen production, enhances skin health, and bolsters the immune system. A single glass of it can provide up to 20–25% of your daily vitamin C requirement. However, the amount may decrease in store-bought versions, which often use diluted concentrates.
Aids Digestion
The citric acid in lemons can stimulate digestive enzymes, promoting better digestion. Drinking it before or after meals may help alleviate indigestion or bloating. Additionally, the alkalizing effect of lemon juice, despite its acidic nature, may help balance the body’s pH levels.
Potential Alkalizing Effects
While lemons are acidic, their metabolic effect on the body is alkalizing. This means they may help maintain a balanced pH in the body when consumed in moderation. This potential benefit, however, is primarily seen with fresh lemon juice rather than sugary commercial lemonades.
Potential Risks
Is Lemonade Bad for You?
Lemonade is not inherently bad, but it can be problematic if consumed in excess. The high sugar content in most versions can lead to weight gain, blood sugar spikes, and increased risk of type 2 diabetes. Moderation and mindful consumption are key to enjoying it without adverse effects.
Acidity and Dental Health
The acidity of the lemon drinks can harm tooth enamel over time, leading to increased sensitivity and a higher risk of cavities. Combining acid with sugar, as in this drink, further exacerbates the issue. To minimize dental damage, consider drinking it through a straw and rinsing your mouth with water afterward. Avoid brushing your teeth immediately after consuming acidic beverages, as this can cause more harm to softened enamel.
Artificial Additives in Commercial Lemonades
Commercial lemonades often include preservatives, artificial flavors, and synthetic sweeteners to enhance taste and shelf life. These additives can cause adverse reactions in some individuals, such as allergies or digestive issues. Opting for homemade juice allows you to control the ingredients and avoid unnecessary chemicals.
Can Lemonade Help You Lose Weight?
Lemonade can support weight loss when consumed thoughtfully. Is lemonade good for weight loss? The answer depends on its preparation. Low-calorie lemonade, especially homemade versions with reduced sugar, offers a refreshing alternative to sugary sodas and juices. Lemon juice contains compounds like polyphenols, which some studies suggest may help reduce fat accumulation. Additionally, lemonade’s tangy flavor can help curb cravings for high-calorie snacks, making it a helpful addition to your weight-loss strategy.
However, not all lemonades are created equal. Store-bought varieties often contain excessive sugar, which can add unnecessary calories and derail weight-loss efforts. Choosing or making lemon juice with minimal sugar and natural ingredients is key to maximizing its benefits for weight management.
Lemon Water vs. Lemonade for Weight Loss
When comparing lemon water and lemonade for weight loss, lemon water is often the better choice. Lemon water is simply water infused with lemon slices or juice, containing almost zero calories. It provides the same hydration benefits and the tangy essence of lemon without the added sugar of traditional lemonade. On the other hand, it often includes sugar, which can contribute to calorie intake.
Lemon water is also easier to prepare and can be enjoyed throughout the day without worrying about sugar consumption. If weight loss is your goal, consider sipping lemon water during the day and saving lemonade as an occasional treat.
Tips for Making Weight-Loss-Friendly Lemonade
Use Natural Sweeteners: Swap refined sugar for stevia, honey, or agave syrup. These alternatives are lower in calories and have a lower glycemic impact.
Dilute It: Mix more water into your recipe to reduce the concentration of sugar while keeping the flavor refreshing.
Add Herbs or Spices:Herbs in lemonade can enhance the flavor and provide additional health benefits.
Limit Serving Sizes: Stick to a single serving to manage calorie intake effectively.
Experiment with Sparkling Water: Add a fizzy twist to your drink without increasing the calorie content.
Why Homemade Lemonade Is Healthier?
Homemade lemonade is almost always a healthier option compared to store-bought varieties. It allows complete control over the ingredients, ensuring that you can limit sugar, avoid artificial additives, and incorporate natural flavors. Store-bought lemonades often contain high-fructose corn syrup, artificial colors, and preservatives, which can negate any potential health benefits.
When you make lemonade at home, you can tailor it to your preferences, using fresh lemons and healthier sweeteners to create a drink that’s both delicious and nourishing.
Best Sweeteners for Healthier Lemonade
If you’re trying to reduce sugar intake, consider these alternatives for sweetening lemonade:
Stevia: A calorie-free natural sweetener derived from the stevia plant.
Honey: Contains antioxidants and provides a natural, mild sweetness.
Agave Syrup: A plant-based sweetener with a lower glycemic index.
Monk Fruit Sweetener: A zero-calorie option with a fruity taste.
Coconut Sugar: A natural sweetener that’s less processed than white sugar.
Each sweetener has its unique flavor profile, so experiment to find the one that works best for your taste.
Recipes for Healthier Lemonade
Classic Low-Sugar Lemonade:
Ingredients: Fresh lemon juice, water, and a natural sweetener like stevia.
Instructions: Mix 1 cup of lemon juice with 4 cups of water. Sweeten to taste.
Mint and Ginger Lemonade:
Ingredients: Lemon juice, water, grated ginger, mint leaves, and honey.
Instructions: Boil ginger in water, strain, and mix with lemon juice and mint. Sweeten with honey.
Sparkling Berry Lemonade:
Ingredients: Lemon juice, sparkling water, blended berries, and agave syrup.
Instructions: Blend berries, strain for juice, and mix with lemon juice, sparkling water, and a touch of agave.
Is Lemonade Good for Pregnancy?
It can be a refreshing drink for pregnant women, but it should be consumed in moderation. Its high vitamin C content supports the immune system and aids in iron absorption. However, sugary lemonades can contribute to excessive weight gain or gestational diabetes.
Pregnant women should prioritize homemade drink with minimal sugar. Always consult a healthcare provider before making significant dietary changes during pregnancy.
Lemonade for Kids
Kids love lemonade, but the high sugar content in commercial versions isn’t ideal for their health. Homemade lemonade allows parents to adjust sweetness and use natural ingredients. Adding fun elements like colorful fruits or a splash of sparkling water can make it more appealing to children. Using honey or stevia instead of refined sugar keeps it healthier without compromising on taste.
Is Lemonade Good for Detox?
Lemonade, especially when made with fresh lemon juice, can be a supportive addition to a detox plan. Lemons are rich in antioxidants and citric acid, which may aid in liver function and toxin elimination.
Some detox plans include variations like the “lemon detox drink,” which combines lemon juice, water, cayenne pepper, and maple syrup. While these drinks can provide short-term benefits, they should not replace a balanced diet for long-term health.
Frequently Asked Questions (FAQs)
Does lemonade hydrate you better than water?
Lemonade hydrates effectively, but it’s not better than plain water. Its sugar content can slow absorption slightly. For optimal hydration, stick to water and use lemonade as a supplementary option.
Can lemonade help with digestion?
Yes, lemonade can aid digestion. The citric acid in lemons stimulates digestive enzymes, improving food breakdown. Drinking a small glass before meals can help reduce bloating and indigestion.
Is lemonade acidic or alkaline?
Lemonade is acidic due to its citric acid content. However, when metabolized, it has an alkalizing effect on the body, which may help balance pH levels.
What is the best lemonade recipe for weight loss?
The best recipe for weight loss is low-sugar lemonade. Combine lemon juice, water, and a natural sweetener like stevia. Add mint or ginger for extra flavor without extra calories.
Can I drink lemonade every day?
Yes, but moderation is key. Limit high-sugar versions to avoid weight gain and dental issues. Opt for homemade, low-sugar recipes for daily consumption.
Conclusion
Lemonade can be a delightful and refreshing beverage when consumed wisely. Homemade versions, with reduced sugar and no additives, offer a healthier alternative to store-bought varieties. While it provides hydration and a boost of vitamin C, its high sugar content and acidity can pose risks to dental health and overall wellness. Moderation, along with smart choices like using a straw and adjusting the sweetness, can help you enjoy this lemon drink without compromising your health.
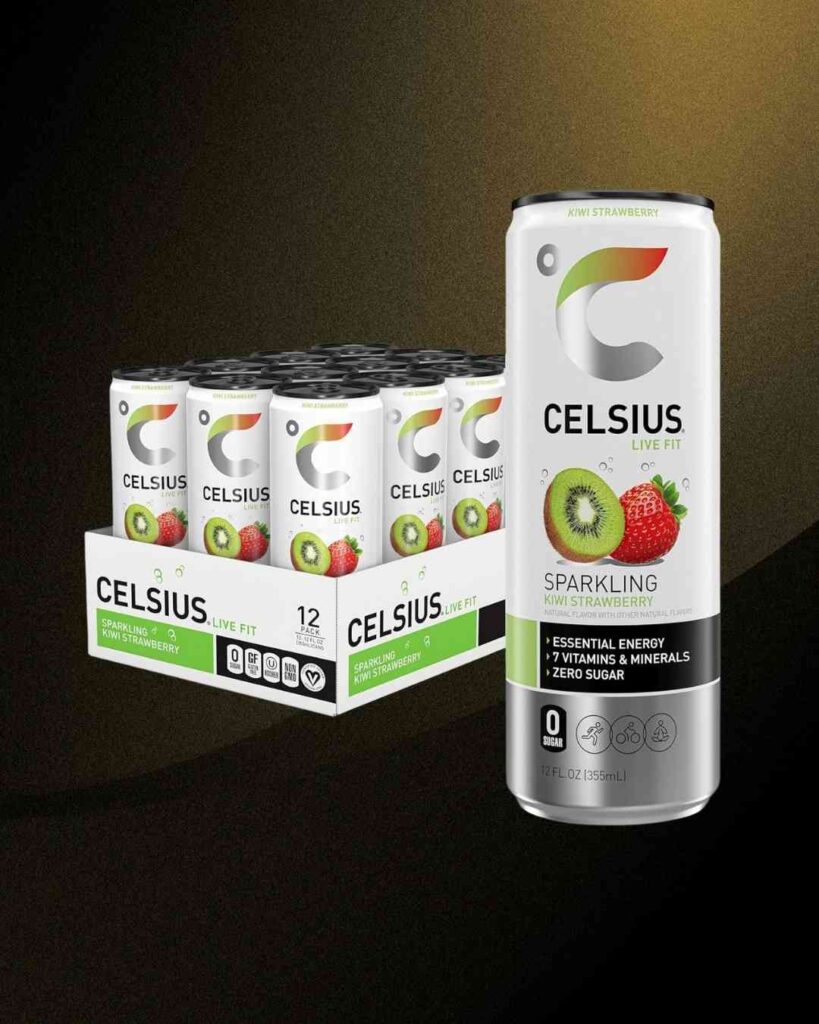
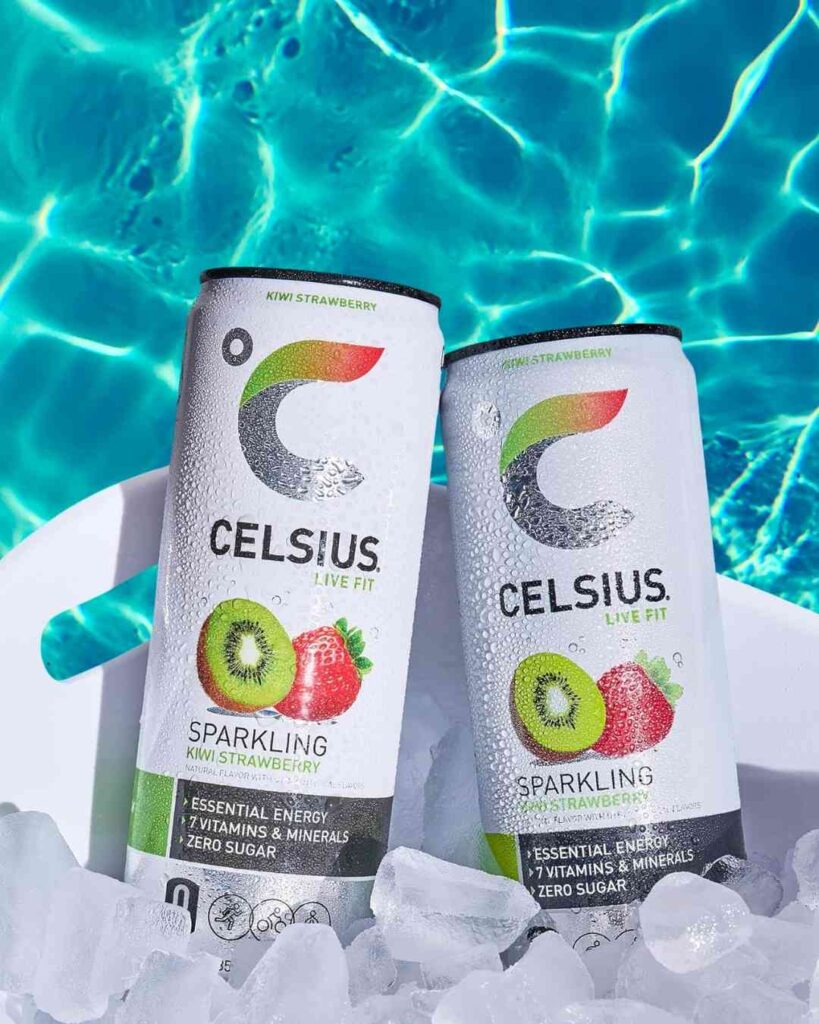
Celsius energy drink has gained immense popularity, especially among fitness enthusiasts in the U.S. Known for its promises to “burn calories” and enhance workout performance, it markets itself as a healthier alternative to traditional energy drinks.
However, many people are questioning, is Celsius bad for you? Concerns revolve around its ingredients, caffeine content, and potential long-term effects on health. While it appeals to the fitness-conscious, understanding its true impact is essential. Let’s explore whether it lives up to its claims or poses risks to its users.
What is Celsius Energy Drink?
Celsius energy drink is a brand known for promoting fitness-friendly beverages. It’s marketed as a healthier energy drink, offering a variety of flavors and formulations like Celsius Originals, Heat, and BCAA+.
Artificial and natural sweeteners, including sucralose and stevia
The drink is free from artificial preservatives and high-fructose corn syrup. It boasts claims such as “boosts metabolism” and “supports weight loss,” making it appealing to health-conscious consumers.
Is Celsius Energy Drink Bad for You?
Celsius may seem like a healthier energy drink, but there are several concerns about its ingredients and effects.
Caffeine Content and Its Effects
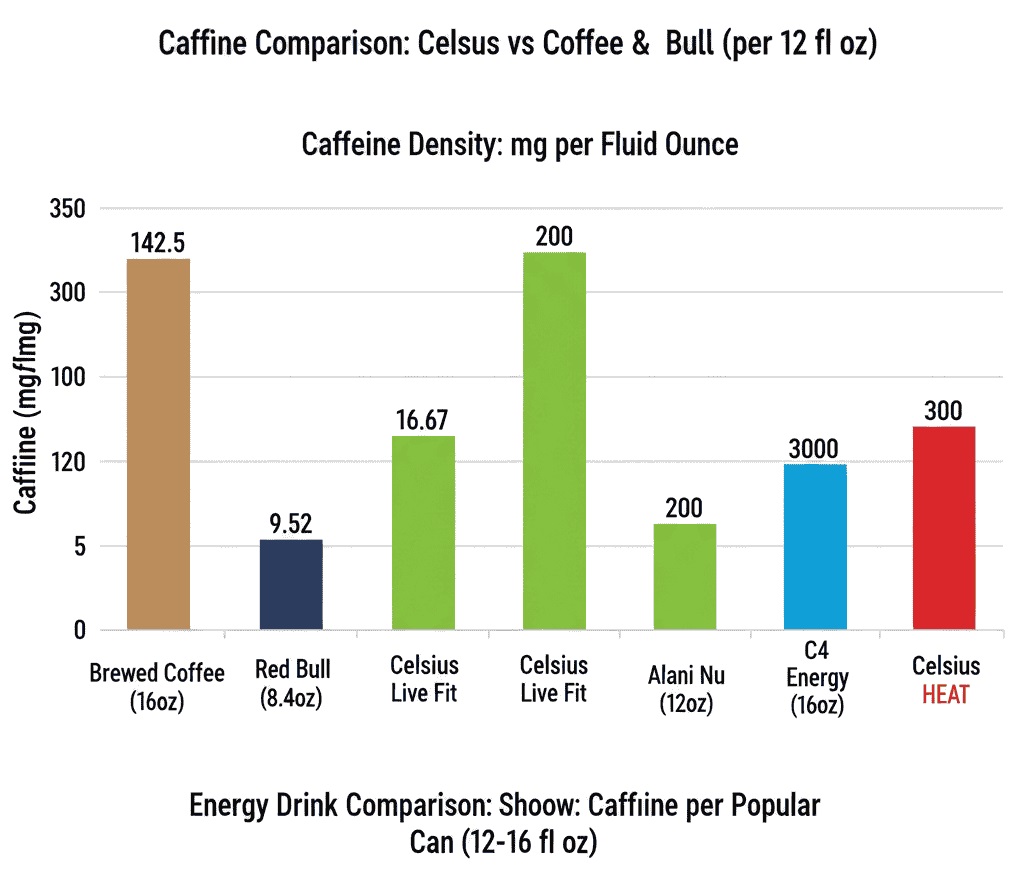
This energy drinks contain 200 mg of caffeine per can, equivalent to about two cups of coffee. For comparison:
A typical cup of coffee: ~95 mg caffeine
Other energy drinks: ~80–150 mg caffeine
This makes the drink one of the stronger energy drinks on the market. How much caffeine is in this energy drink can be concerning for those sensitive to stimulants. Excessive caffeine can cause:
Jitters
Insomnia
Increased heart rate
Heart palpitations
For people consuming multiple caffeinated products daily, the risks of overdose increase significantly. High caffeine intake can strain the heart, disrupt sleep, and cause anxiety.
Artificial Sweeteners and Additives
Celsius uses artificial sweeteners like sucralose and natural sweeteners like stevia to replace sugar. This raises the question: are they harmful?
Concerns about artificial sweeteners:
Sucralose may alter gut bacteria and impact digestion.
Studies suggest long-term use of artificial sweeteners could increase the risk of metabolic issues, though more research is needed.
While these sweeteners keep calories low, they might not be as harmless as they seem.
Impact on Metabolism and Weight
Celsius claims to “boost metabolism” and “burn fat,” but does it help with weight loss?
How it works:
The caffeine and green tea extract in the drink may temporarily increase metabolism.
Ingredients like guarana and taurine can give an energy boost.
Reality check:
Scientific evidence supporting long-term weight loss from Celsius is limited. Weight loss ultimately depends on diet and exercise, not a single beverage. While it might provide a temporary energy boost, relying solely on it for weight loss isn’t practical or sustainable.
Effects on the Heart and Blood Pressure
Energy drinks can significantly affect cardiovascular health. Does Celsius cause heart problems?
Potential risks:
High caffeine content can raise blood pressure and cause irregular heartbeats.
People with existing heart conditions may experience worsened symptoms.
Regular consumption of energy drinks has been linked to increased risks of heart-related issues, particularly in sensitive individuals. It’s essential to monitor how your body reacts to these drinks, especially if you have underlying health problems.
Potential Side Effects
Like all energy drinks, Celsius isn’t without side effects. Celsius energy drink side effects can include:
Short-term: Jitters, anxiety, nausea, and headaches
Long-term: Sleep disturbances, heart strain, and potential kidney damage
Is Celsius bad for your kidneys? Excessive caffeine can strain kidney function, particularly in individuals with pre-existing kidney conditions. Staying hydrated and avoiding excessive intake is crucial.
Who Should Avoid Celsius?
While Celsius might be fine for some, others should avoid it entirely.
Categories of People Who Should Avoid Celsius
Pregnant Women: High caffeine intake during pregnancy can increase the risk of complications.
People with Caffeine Sensitivity: Symptoms like rapid heart rate, anxiety, and sleep issues are common in sensitive individuals.
Children and Adolescents: Can teenagers drink Celsius? No, due to their lower tolerance for caffeine and developing nervous systems.
People with Heart Conditions: High caffeine can exacerbate heart-related problems, making it unsafe for those with cardiovascular diseases.
Is Celsius Healthy?
Celsius energy drink positions itself as a health-conscious choice among energy beverages, but is it truly healthy? Understanding its benefits and limitations can help make an informed decision.
Benefits of Celsius Energy Drink
Celsius is marketed as a fitness-focused energy drink packed with vitamins and natural ingredients. Is Celsius good for you? Let’s examine its potential benefits.
Claims About Natural Ingredients
Celsius contains natural components like green tea extract, guarana, and ginger root. These ingredients are associated with antioxidant properties and mild metabolism-boosting effects. Additionally, it includes essential vitamins like B12, which helps energy production, and vitamin C, known for its immune-boosting properties.
Low-Calorie and Sugar-Free
One of Celsius’s main selling points is its lack of sugar and low-calorie count. Unlike traditional energy drinks that are loaded with sugar, Celsius uses sweeteners like sucralose and stevia, making it suitable for calorie-conscious consumers.
Comparison with Other Energy Drinks
Compared to typical energy drinks that use artificial preservatives and high levels of sugar, Celsius stands out as a slightly healthier choice. It avoids high-fructose corn syrup and synthetic flavors, appealing to those looking for cleaner energy.
While these benefits are appealing, they come with caveats. Overconsumption or reliance on energy drinks, even those marketed as “healthy,” can lead to health issues.
Balanced Perspective
To determine whether Celsius is healthy, it’s crucial to weigh the pros and cons.
Pros:
Contains essential vitamins and natural extracts.
Sugar-free and low-calorie.
May temporarily boost metabolism and energy.
Cons:
High caffeine content can lead to negative side effects like insomnia and heart palpitations.
Contains artificial sweeteners like sucralose, which may affect gut health.
Long-term health impacts are not well-researched.
It can be a convenient energy boost, but moderation is vital to avoid adverse effects.
How to Consume It Safely?
Celsius is not inherently harmful, but consuming it recklessly can lead to problems. Understanding safe consumption practices is key.
Recommended Daily Intake
Experts recommend limiting caffeine intake to 400 mg daily for adults. With 200 mg of caffeine per can, one or two cans per day is the maximum safe limit for most people. However, combining it with other caffeinated products like coffee or tea may exceed the recommended caffeine threshold.
Importance of Moderation
Overconsumption of energy drinks can cause:
Insomnia
Increased heart rate
Jitters
Dehydration
Staying hydrated and consuming it alongside balanced meals can minimize risks. Always listen to your body’s response and stop consumption if you experience adverse effects.
Alternatives to Celsius Energy Drink
If Celsius doesn’t meet your needs or concerns you, several healthier alternatives can provide a natural energy boost.
Healthier Energy Drink Options
Zevia Energy: Contains natural caffeine and no artificial sweeteners.
Guayaki Yerba Mate: A plant-based energy drink rich in antioxidants and low in sugar.
Bai Bubbles: Offers mild caffeine and uses natural sweeteners.
These options offer energy boosts with fewer artificial ingredients compared to traditional energy drinks.
Natural Energy-Boosting Alternatives
Green Tea: A natural source of caffeine and antioxidants.
Black Coffee: Provides a clean energy boost without additives or calories.
Smoothies: Blend fruits and leafy greens for natural vitamins and sustained energy.
Nuts and Seeds: Packed with healthy fats and protein for long-lasting energy.
By switching to natural options, you can avoid the risks associated with energy drinks while still staying energized.
FAQs
Does Celsius Energy Drink Have Sugar?
No, Celsius energy drinks are sugar-free. Instead, they use sucralose and stevia to add sweetness without calories.
Is Celsius FDA Approved?
Celsius energy drinks are not FDA-approved in the sense of being explicitly evaluated. However, their ingredients must comply with FDA regulations for food and beverage safety.
Is Celsius Bad for Your Liver?
Excessive caffeine and artificial sweeteners in energy drinks like Celsius could potentially strain the liver over time. However, there’s no concrete evidence linking Celsius to significant liver damage when consumed moderately.
Can You Drink Celsius Every Day?
It’s not advisable to drink Celsius every day due to its high caffeine content. Daily consumption increases the risk of caffeine dependency, sleep disturbances, and other side effects.
What Happens if You Drink Too Much Celsius?
Drinking too much Celsius can lead to caffeine overdose symptoms like heart palpitations, dizziness, anxiety, and in severe cases, hospitalization. Always stick to recommended intake guidelines.
Conclusion
Celsius energy drink is a trendy choice for fitness enthusiasts, but it’s not without risks. While its claims of boosting metabolism and aiding weight loss are appealing, these benefits are short-lived and not a substitute for healthy habits. With high caffeine content, artificial sweeteners, and potential side effects, moderation is key. Always consider your health needs before consuming energy drinks like Celsius.
DayQuil is a popular over-the-counter medication used to relieve cold and flu symptoms. It’s known for easing discomfort during the day without causing drowsiness. Millions rely on DayQuil for its ability to treat nasal congestion, cough, and minor aches. But a common question arises: does DayQuil have caffeine?
Understanding the ingredients in any medication is crucial for making informed decisions about your health. Let’s dive deeper to uncover whether caffeine is part of DayQuil and explore its other components.
Does DayQuil Have Caffeine?
No, DayQuil does not contain caffeine. Its formulation is designed to provide daytime relief from cold and flu symptoms without the need for caffeine.
Explanation of Why Caffeine Is or Isn’t Present
Unlike some medications or products that use caffeine to boost energy or alertness, DayQuil’s purpose is different. It targets cold symptoms without stimulating the central nervous system. Its ingredients focus solely on alleviating congestion, reducing fever, and suppressing coughs.
Comparison to Other Over-the-Counter Medications
While DayQuil is caffeine-free, some medications, especially those marketed as pain relievers or combination products, may include caffeine. For example:
Excedrin uses caffeine to enhance pain relief.
Some energy-boosting cold remedies incorporate caffeine to fight fatigue.
DayQuil avoids caffeine, making it a suitable choice for those sensitive to stimulants.
Ingredients in DayQuil
To understand why DayQuil works so effectively, it’s essential to examine its active ingredients. Each plays a specific role in combating cold and flu symptoms.
Active Ingredients in DayQuil
Acetaminophen
What It Is: A pain reliever and fever reducer.
How It Works: Acetaminophen helps reduce headaches, body aches, and fever associated with colds and the flu. It works by blocking pain signals in the brain and lowering body temperature.
Dextromethorphan
What It Is: A cough suppressant.
How It Works: It acts on the brain’s cough center, reducing the urge to cough. This makes it easier to get through your day without constant throat irritation.
Phenylephrine
What It Is: A nasal decongestant.
How It Works: It shrinks swollen blood vessels in the nasal passages, reducing congestion and making it easier to breathe.
Role of Each Ingredient in Cold and Flu Relief
These three ingredients combine to tackle the most bothersome cold symptoms. Acetaminophen addresses pain and fever, dextromethorphan suppresses coughs, and phenylephrine clears up nasal congestion. Together, they provide comprehensive relief without causing drowsiness, making DayQuil a go-to daytime remedy.
Does DayQuil Contain Stimulants?
Phenylephrine as a Potential Stimulant
While DayQuil does not contain caffeine, it does include phenylephrine, which is considered a mild stimulant. Phenylephrine helps reduce nasal swelling and congestion but can have a slight stimulating effect on some users.
Effects of Phenylephrine on Wakefulness
Phenylephrine’s stimulation is minimal and not the same as caffeine’s energy-boosting properties. However, some people may feel slightly more alert after taking it due to its impact on blood vessels and nasal passages.
Clarification: Stimulant vs. Caffeine
It’s important to distinguish between a stimulant like phenylephrine and caffeine.
Caffeine acts directly on the central nervous system to increase energy and focus.
Phenylephrine works locally, primarily affecting nasal passages and blood flow. Its effects on wakefulness are indirect and much weaker than caffeine.
In short, while DayQuil may slightly perk you up due to phenylephrine, it does not rely on caffeine or act as an energy booster.
Does DayQuil Keep You Awake?
How does DayQuil Affect Energy Levels?
DayQuil is formulated as a non-drowsy medication. Its ingredients aim to treat symptoms like nasal congestion, fever, and cough without making you feel lethargic. However, one of its active components, phenylephrine, is a mild stimulant. This decongestant works by constricting blood vessels, which helps reduce swelling in nasal passages. While it doesn’t directly boost energy, it can make some users feel slightly more alert.
Does DayQuil Make It Hard to Sleep?
For most people, DayQuil does not cause significant sleep disturbances. However, the mild stimulant effect of phenylephrine might make it harder to fall asleep, especially if taken late in the day. This varies widely among individuals. Some people may feel energized after taking DayQuil, while others experience no change in their sleep patterns.
Common Experiences and Variations Among Users
DayQuil’s effects differ based on individual sensitivity to its ingredients. Some users report feeling slightly more awake or energized, while others notice no impact on their energy levels. Factors like age, weight, and metabolism can influence how your body reacts to the medication.
Does DayQuil Make You Sleepy?
Possible Side Effects of DayQuil
DayQuil is specifically marketed as a non-drowsy medication. However, a small percentage of users might feel fatigued or sleepy after taking it. This is usually due to how their bodies metabolize its ingredients, particularly dextromethorphan, which can have mild sedative effects in some individuals.
Sedative vs. Non-Sedative Effects
The majority of DayQuil users experience no sedation, thanks to its carefully balanced formula. Unlike its nighttime counterpart, NyQuil, DayQuil omits sedative ingredients like antihistamines. This makes it ideal for daytime use when you need to stay alert.
Tips to Avoid Sleep Disruptions While Using DayQuil
To prevent any unintended sleepiness:
Take DayQuil in the morning or early afternoon.
Avoid alcohol or other medications that can cause drowsiness.
Stay hydrated to help your body process the medication efficiently.
If you find DayQuil makes you unusually tired, consult your doctor to explore alternatives.
Alternatives to DayQuil for Specific Needs
Daytime Alternatives for Non-Drowsy Relief
If you’re seeking options similar to DayQuil, here are a few alternatives:
Sudafed PE: Contains phenylephrine for congestion relief.
Advil Cold & Sinus: Combines ibuprofen with a decongestant.
Mucinex D: Eases chest congestion with an expectorant.
These alternatives can offer non-drowsy relief while targeting specific symptoms.
Nighttime Medications for Better Sleep
For those struggling to sleep due to cold or flu symptoms, nighttime formulations like NyQuil or Theraflu are better choices. They often include antihistamines like doxylamine, which induce sleep while relieving symptoms.
Choose the right medication based on whether you need daytime alertness or nighttime rest.
DayQuil is designed to keep you alert during the day by avoiding sedative ingredients. It generally does not make users feel sleepy. However, phenylephrine may cause mild wakefulness in some individuals. Conversely, rare side effects like drowsiness can occur, depending on how your body reacts to the formula.
Can You Take DayQuil Before Bed?
It’s not recommended to take DayQuil just before bedtime. Its mild stimulant properties, particularly from phenylephrine, might interfere with your ability to fall asleep. If you need symptom relief at night, opt for NyQuil or another nighttime cold medication that includes sedatives.
Are There Any Energy-Boosting Ingredients in DayQuil?
DayQuil does not contain caffeine or any ingredients designed to provide energy. Phenylephrine, a decongestant, might give a slight feeling of alertness by improving airflow and reducing congestion, but this effect is subtle and not comparable to caffeine.
Conclusion
DayQuil is a caffeine-free solution for daytime cold and flu relief. Its active ingredients—acetaminophen, dextromethorphan, and phenylephrine—work together to combat common symptoms effectively. The absence of caffeine makes it a safe option for individuals sensitive to stimulants. While phenylephrine may cause slight alertness in some people, it’s not the same as a caffeine boost. Understanding what’s in your medication helps you make the best choices for your health.
Celsius has become one of the most popular functional fitness beverages on the market. It positions itself as a “healthy” energy alternative. People often turn to it for a pre-workout boost or a clean midday lift.
However, the energy punch this drink provides is significant. Many consumers are unaware of the exact stimulant content. The essential question remains: How much caffeine is in a Celsius?
This article will provide a complete, science-backed analysis. We will break down the caffeine content of every Celsius product. We will compare Celsius to common energy drinks and coffee.
This guide offers a comprehensive look at the safety and side effects associated with this popular beverage. We will ensure you have all the facts.
Quick Answer: How Much Caffeine Is in a Celsius Drink?
The standard caffeine content in Celsius is high. It is considerably higher than many competing energy drinks. The exact amount depends heavily on the specific product line you choose.
Here is a quick overview of the caffeine content across the main Celsius product lines:
Celsius Originals / Live Fit (12 oz Can): This is the flagship product line. It contains 200 mg of caffeine per can.
Celsius Essentials (12 oz Can): These formulas are marketed for enhanced performance. They also contain 200 mg of caffeine per can.
Celsius On-the-Go Packets: The powder packets are designed to be mixed with water. They typically contain the same amount, 200 mg of caffeine per serving.
The amount of caffeine in a Celsius can is consistently high. Consumers must pay close attention to the specific product line.
Celsius Caffeine Content & Nutritional Overview
This table compares the key differences between the most popular Celsius formulas. This will help you manage your stimulant and calorie intake.
Product
Size
Caffeine (mg)
Sugar (g)
Calories
Celsius Originals / Live Fit
12 oz
200 mg
0 g
10
Celsius Essentials
12 oz
200 mg
0 g
10
Celsius HEAT
16 oz
300 mg
0 g
10–15
Celsius On-the-Go Packets
1 packet
200 mg
0 g
5–10
Celsius Sparkling/Still (Non-Carbonated)
12 oz
200 mg
0 g
10
What Is Celsius? (And Is It an Energy Drink?)
Celsius is often referred to as a “functional fitness drink.” The company markets it primarily for its metabolic-boosting properties. It is not simply a high-sugar, high-stimulant beverage. It uses a proprietary blend of ingredients.
The primary functional ingredients, often called the MetaPlus® blend, include:
Green Tea Extract (EGCG): This compound is touted for its antioxidant and metabolism-boosting effects.
Ginger Root: Included for digestive support and potential anti-inflammatory properties.
Guarana Seed Extract: This ingredient is another source of natural caffeine.
Vitamins: It is fortified with B vitamins (B2, B3, B5, B6, B12) and Vitamin C.
These ingredients are combined with the high caffeine content. The synergy is claimed to promote thermogenesis.
Thermogenesis is the process of heat production in the body. The company claims this process slightly raises your metabolic rate. This burns more calories.
Clarification: Is Celsius an Energy Drink?
Yes, Celsius is unequivocally an energy drink.
Despite the marketing focus on “fitness” and “thermogenesis,” any beverage containing significant amounts of caffeine and other stimulants to enhance physical or mental performance falls under the energy drink category.
Celsius serves the same function as traditional energy drinks. It delivers a substantial dose of caffeine. This caffeine provides the central nervous system stimulation necessary for energy, focus, and endurance. Calling it a fitness drink simply refines its target audience.
The high caffeine content makes it a powerful stimulant. Is Celsius an energy drink? Yes, it is a functional energy drink.
Celsius Caffeine Compared to Other Drinks
The best way to understand the potency of a Celsius can is to compare it directly to other commonly consumed caffeinated beverages. The difference is often surprising to new users.
100% of the maximum recommended daily limit in half a serving.
Brewed Coffee
8 oz Cup
95 mg
Less than half the caffeine of Celsius.
Espresso Shot
1 oz Shot
63 mg
Less than one-third the caffeine of Celsius.
Drip Coffee (Large)
16 oz Mug
180–200 mg
Comparable to a single Celsius can.
Cold Brew Coffee
16 oz Serving
150–280 mg
Highly variable; can be less or more potent than Celsius.
A standard 12-ounce Celsius can deliver about two cups of traditionally brewed coffee worth of caffeine. If you consume a Celsius HEAT can (300 mg), you are getting the stimulant equivalent of over three standard cups of coffee.
Is Celsius stronger than coffee? Yes, per ounce, and often per container, Celsius is much stronger than a typical cup of brewed coffee. How much caffeine is in a cup of coffee is usually less than 100 mg. Celsius is often double that amount.
Celsius Caffeine vs Red Bull
Red Bull is the classic benchmark for energy drinks. The difference in caffeine content between Red Bull and Celsius is vast.
Celsius caffeine vs Red Bull comparison demonstrates that one Celsius can contains 2.5 times the caffeine of a standard Red Bull can. This disparity makes it clear that Is Celsius more powerful than Red Bull? Yes, based purely on stimulant dosage, Celsius is significantly more powerful. Consumers who are accustomed to the mild boost from Red Bull should approach Celsius with caution.
Celsius Caffeine vs Monster, C4, Alani Nu
The comparison with other popular, higher-dose energy and pre-workout drinks provides a better context for Celsius’s potency.
Energy Drink
Standard Serving Size
Caffeine Content (mg)
Celsius Live Fit
12 oz Can
200 mg
Monster Energy (Original)
16 oz Can
160 mg
Alani Nu
12 oz Can
200 mg
C4 Energy
16 oz Can
200–300 mg
Reign / Bang
16 oz Can
300 mg
Celsius’s 200 mg dose is comparable to other “performance” focused drinks like Alani Nu. It is also significantly higher than the traditional 160 mg found in a standard Monster can. What energy drink has the most caffeine?
Is Celsius Safe? Side Effects, Heart Health & Daily Limits
Because the caffeine level in Celsius is high, safety is a serious concern. It is essential to understand the potential side effects and health implications before making it a daily habit. We must use science to evaluate if is celsius bad for you.
Is 200 mg of Caffeine a Lot?
The Food and Drug Administration (FDA) currently suggests that healthy adults can safely consume up to 400 mg of caffeine per day. This amount is generally not associated with dangerous or negative side effects.
The Math: A single Celsius Live Fit can (200 mg) is exactly half of the FDA’s suggested daily limit.
When 200 mg May Feel Strong:
Caffeine Sensitivity: Some individuals metabolize caffeine slowly. They are genetically slow metabolizers. The effects of the 200 mg dose will last longer and feel much stronger.
Tolerance: If you rarely consume caffeine, 200 mg will cause jitters, anxiety, and a rapid heart rate.
Empty Stomach: Consuming Celsius on an empty stomach can lead to rapid absorption. This results in an intense rush and possible anxiety.
While 200 mg is generally safe for most healthy adults, it is a high single dose. It requires careful monitoring.
Are Celsius Drinks Bad for Your Heart?
Any beverage high in stimulants warrants a discussion about cardiac safety. Are Celsius drinks bad for your heart? For the majority of healthy adults, the answer is no, provided they stay within the 400 mg daily limit. However, the high dose can pose risks for certain groups.
Stimulant Effects: Caffeine directly stimulates the central nervous system. This causes the release of adrenaline.
Heart Rate and Blood Pressure: High caffeine intake predictably increases both heart rate and blood pressure. For individuals with underlying heart conditions, hypertension, or arrhythmias, this spike can be dangerous.
Vulnerability: Teens, individuals with undiagnosed cardiac issues, and those who mix Celsius with other stimulants (like certain cold medicines or alcohol) are at the highest risk.
If you have a history of heart issues, anxiety, or high blood pressure, you must consult a doctor before consuming high-caffeine products like Celsius. Is Celsius bad for you is context-dependent.
Why Was Celsius Banned by the NCAA?
The National Collegiate Athletic Association (NCAA) regulates what student-athletes can consume. Why was Celsius banned by NCAA?
The ban was not specifically about the amount of caffeine. The NCAA places strict limits on the concentration of specific stimulant ingredients found in an athlete’s urine during drug testing.
Guarana and Caffeine Limit: While Celsius itself is not prohibited, the combination of ingredients, specifically caffeine and the naturally occurring stimulants in guarana, makes it difficult for athletes to stay below the NCAA’s threshold for caffeine metabolites.
High Risk: The 200 mg dose puts athletes too close to the urinary threshold. It is therefore classified as a “high-risk” supplement by many collegiate athletic departments. The risk of failing a drug test is too great. Athletes are typically advised to avoid the product entirely to ensure compliance.
How Long Does Celsius Last in Your System?
The energy boost from Celsius is tied to the half-life of caffeine. The half-life is the time it takes for the body to eliminate half of the dose.
Caffeine Half-Life: The half-life of caffeine in a healthy adult is typically 4 to 6 hours.
Duration of Effect: If you consume 200 mg at noon, you will still have about 100 mg circulating in your system by 6 PM.
Metabolism Differences: Genetic factors, smoking habits (smokers metabolize caffeine faster), and liver function can alter this timeframe. A slow metabolizer may feel the effects for 8 to 10 hours. This is why consuming Celsius in the late afternoon can easily lead to insomnia.
How Long Does Celsius Take to Work?
Understanding the onset and peak effect of Celsius helps users time their intake, especially for workouts.
Onset Time: Celsius takes effect quickly. The stimulant usually begins to work within 15 to 30 minutes after consumption. The rapid delivery of liquid caffeine facilitates this quick onset.
Peak Energy: The peak stimulant effect is typically reached between 60 and 120 minutes (1 to 2 hours) after consumption. This is when the concentration of caffeine in the bloodstream is highest. This peak period is ideal for starting a strenuous workout.
Reddit-Style Insights (The User Experience)
Online forums often discuss the feeling of Celsius’s onset. Many users note that the rush from Celsius feels “cleaner” than that from a sugary energy drink. They attribute this to the zero sugar content.
However, users sensitive to caffeine often describe the onset as “too fast” or “anxiety-inducing.” The rapid, high-dose delivery can feel intense, especially on an empty stomach.
Celsius Product Line — Caffeine Content Breakdown
Celsius offers several distinct product lines. Each one caters to a different consumer need while maintaining a core identity.
Celsius Live Fit (Original)
This is the standard, most recognized can. It is marketed as a fitness drink.
Caffeine Content:200 mg per 12 oz can.
Use: Ideal for a moderate pre-workout boost, or for individuals with an existing caffeine tolerance needing a strong daytime lift.
Celsius Essentials
The Essentials line focuses on enhanced functional ingredients like L-Citrulline. It is aimed at a fitness-focused consumer.
Caffeine Content:200 mg per 12 oz can.
Use: Provides the same powerful stimulant dose as the Original but with added ingredients targeting pump and performance.
Celsius HEAT (High Caffeine)
Celsius HEAT is the most potent product in the lineup. It is designed for heavy gym users and extreme endurance activities.
Caffeine Content:300 mg per 16 oz can.
Safety Note: A single can of Celsius HEAT takes you three-quarters of the way to the FDA’s 400 mg daily limit. This product should only be used by individuals with high caffeine tolerance.
Celsius On-the-Go Packets
These powder packets provide convenience for travel or mixing into water bottles.
Caffeine Content: Typically 200 mg per single packet serving.
Use: Provides a similar experience to the can, offering flexibility in flavor concentration.
Celsius Coffee Line
Celsius also produces a line of functional coffee drinks. These are less common than the core product.
Caffeine Amounts: These vary, often ranging between 150 mg and 200 mg. Always check the individual label.
Use: Offers a different flavor profile, combining the functional ingredients with real coffee.
Is Celsius Better Than Coffee? (Pros & Cons)
The frequent comparison between Celsius and coffee highlights the trade-offs between convenience, health, and cost.
Pros: Celsius offers unmatched convenience and a reliable, consistent high dose of caffeine. Its zero-sugar formula appeals to those avoiding empty calories.
Cons: Coffee is a more natural source with fewer additives. It is significantly cheaper. It also allows for greater control over the dosage. The rapid, intense energy from Celsius can often lead to a harsher crash compared to the smoother energy from coffee.
Who Should NOT Drink Celsius?
Given the high stimulant load, Celsius is not suitable for everyone. Specific populations must avoid or severely limit their consumption.
Teens and Children: High doses of caffeine can interfere with neurological development and sleep patterns in adolescents. Teens should avoid energy drinks entirely.
Pregnant and Breastfeeding Individuals: High caffeine intake is associated with risks to the fetus and infant. Consult an obstetrician before consuming any energy drinks.
People with Heart Issues: As discussed, the vasoconstrictive effects and increased heart rate pose risks for people with hypertension, arrhythmias, or diagnosed heart disease.
People Sensitive to Caffeine/Anxiety Disorders: The 200 mg dose is a potent trigger for anxiety, panic attacks, and jitteriness in sensitive individuals.
Always prioritize medical consultation over general health guidance.
Does Celsius Help With Workouts and Weight Loss?
Celsius is heavily marketed around its ability to support weight loss and enhance workouts.
Workout Enhancement: The high caffeine dose is genuinely beneficial for workouts. Caffeine is a proven ergogenic aid. It improves physical performance, reduces perceived exertion, and enhances endurance. Celsius effectively provides the pre-workout boost needed for intensity.
Thermogenic Blend: The company highlights its MetaPlus blend (especially EGCG from green tea). EGCG has been shown in some studies to have a mild, temporary effect on metabolic rate (thermogenesis).
Evidence Review: While the ingredients have mild metabolic effects, the weight loss impact of Celsius alone is likely minimal.
The vast majority of any potential weight loss benefit comes from caffeine-induced increased physical activity (you work out harder and longer) and replacing high-calorie sugary sodas.
The claim that it “burns an extra 100 calories” is often debated and depends on the individual’s activity level.
FAQs
To provide complete topical depth, here are detailed answers to the most common user queries.
How much caffeine is in a Celsius?
A standard 12-ounce can of Celsius Live Fit or Celsius Essentials contains 200 milligrams (mg) of caffeine. The stronger Celsius HEAT contains 300 mg.
How much caffeine is in a can of Celsius?
The amount is either 200 mg (for Original/Live Fit/Essentials) or 300 mg (for HEAT). Always check the label, as 200 mg is the most common dose.
Does Celsius have more caffeine than coffee?
Yes, typically. A standard 12 oz Celsius (200 mg) has more than double the caffeine of an 8 oz cup of brewed coffee (about 95 mg).
Is 200 mg of caffeine a lot?
Yes, 200 mg is a significant single dose. It represents 50% of the maximum daily limit (400 mg) recommended by the FDA for healthy adults.
Is Celsius bad for your heart?
Celsius is generally safe for healthy individuals when consumed in moderation. However, its high caffeine content can elevate heart rate and blood pressure, making it potentially dangerous for people with pre-existing heart conditions or hypertension.
Is Celsius stronger than Red Bull?
Yes. A 12 oz Celsius (200 mg) is 2.5 times stronger than a standard 8.4 oz Red Bull (80 mg) based on caffeine content.
Is Celsius banned anywhere?
Celsius is not banned globally. However, it is restricted or strongly discouraged for use by NCAA student-athletes due to the risk of exceeding the NCAA’s urinary caffeine threshold during drug testing.
What energy drink has the most caffeine?
Energy drinks labeled “performance” or “extra strength,” such as Celsius HEAT, Reign, and C4, often contain the highest dose, peaking at 300 mg per can.
Does Celsius help you lose weight?
It is not a miracle weight loss tool. It can supportweight loss by boosting metabolism via its thermogenic blend and improving exercise performance due to high caffeine content. Diet and activity remain the primary factors.
Is Celsius safe daily?
Yes, for most healthy adults, one can of Celsius Live Fit (200 mg) is safe daily, provided you consume no more than 200 additional mg of caffeine from other sources (staying under the 400 mg limit).
How much caffeine is in a Celsius compared to a Monster?
A Celsius Live Fit (200 mg) has 40 mg more caffeine than a standard 16 oz Monster (160 mg).
Does Celsius contain artificial sweeteners?
Yes, Celsius typically uses Sucralose, an artificial sweetener, to achieve its zero-sugar status.
Is Celsius an energy drink?
Yes. Although marketed as a “functional fitness drink,” it acts as an energy drink because its primary function is to stimulate the central nervous system with caffeine.
Conclusion
The question of how much caffeine is in a Celsius is straightforward: 200 mg for the standard can and 300 mg for the HEAT formula. This places Celsius firmly in the high-caffeine tier of performance beverages.
This high dosage is the source of both its effectiveness and its potential risks. For the active, healthy adult, Celsius offers a powerful, convenient energy boost that can enhance workouts and productivity.
However, consumers must exercise moderation. One can of the standard formula consumes half of the recommended daily caffeine limit.
Our final advice is centered on safety and moderation:Know your caffeine sensitivity. If you choose Celsius, be mindful of any other caffeine sources you consume throughout the day. Never combine it with alcohol or other high-dose stimulants.
If you have any history of heart trouble or anxiety, opt for a lower-caffeine alternative like a small cup of brewed coffee.
Referenced Sources (URLs)
1. Caffeine Safety and Regulatory Guidelines (FDA)