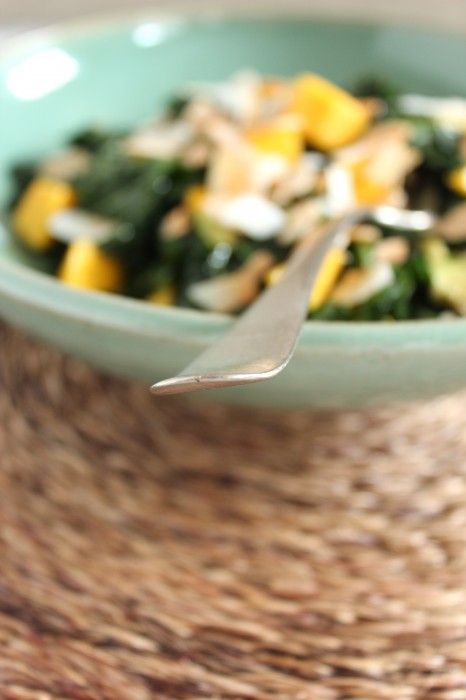
Massaged Kale Salad with Mango & Avocado is a vibrant and nutritious dish that combines the earthy flavor of kale with the sweet and creamy goodness of ripe mango and avocado. This salad is not only delicious but also packed with essential nutrients, making it a perfect choice for a healthy meal or a side dish. The secret to making kale tender and flavorful in this recipe is massaging the leaves with a zesty dressing. Let’s dive into this simple and refreshing recipe that’s sure to become a favorite in your kitchen.
I just can’t seem to get enough of the incredibly fresh, nourishing, and delicious combination of healthy ingredients.
First off, kale. I just might be the healthiest substance you can put into your body; and this nutritional superstar really is tasty raw, when you “massage” it with olive oil and coarse salt.
Then we have avocado and mango, which is a true match made in heaven. Creamy and rich meets sweet and juicy. I could eat a bowl of chopped avocado and mango and call it a meal. No problem.
Finally, finish off the salad with toasted sliced almonds and coconut flakes…
OH YES.
The salad can be made a few hours in advance and is best served at room temperature, rendering it perfect as part of a packed lunch.
Vegetarian. Vegan. Raw (well, minus the lightly toasted almonds & coconut).
Does it get any healthier than this?!
Name
Massaged Kale Salad with Mango & Avocado
Cuisine
American
Prep Time
15 minutes
Cooking Time
0 minutes (no cooking required)
Total Time
15 minutes
Servings
4
Yield
4 cups of salad
Ingredients
1 bunch lacinato (dinosaur) kale, leaves torn from the stalks and thinly sliced
1/4 cup Lime Olive Oil, such as Boston Olive Oil Company Whole Fruit Persian Lime (alternately, you can use 1/4 cup extra virgin olive oil + 1 Tbsp freshly squeezed lime juice)
Kosher salt & freshly ground black pepper, to taste
2 tsp agave nectar or honey
2 ripe champagne mangos, peeled, pitted, and diced
1 ripe but firm avocado, peeled, pitted, and diced
In a large bowl, toss the sliced kale leaves with a small drizzle of the olive oil and a bit of Kosher salt; massage with your hands until the kale softens and wilts, about 2-3 minutes.
In a small bowl or jar combine the remaining olive oil, honey, and salt & pepper to taste. Whisk or shake until well-combined.
Toss the massaged kale with the dressing and add in the diced mango and avocado.
Craving the cozy, comforting flavors of sweet potato pie but don’t want to make a whole pie for yourself? Look no further than these Sweet Potato Pie Pancakes for One.
This single-serving recipe combines the delicious essence of sweet potato pie with the ease and convenience of pancakes. Perfect for a lazy weekend brunch or a special treat, these pancakes are sure to satisfy your autumn cravings.
Name:
Sweet Potato Pie Pancakes for One
Cuisine:
American
Prep Time:
10 minutes
Cooking Time:
10 minutes
Total Time:
20 minutes
Servings:
1 serving
Yield:
3-4 pancakes
I know I claimed that Pumpkin Pie Polenta was my new favorite breakfast, but these pancakes give those grits a run for their money.
Perhaps it’s the cooler weather and impending holiday season that has me jonesing for sweet & comforting pie-inspired breakfast foods. Whatever the reason, I’ve been doing a pretty good job of satisfying the craving ;).
I’m so thankful for the day I created that first pancakes-for-one recipe. Since that morning last winter, there have been several variations; and as I sit down to devour each stack, I declare it to be my favorite.
In order to truly determine which ingredient combination is my absolute favorite, I think I’d need to try a forkful of each in one sitting.
For comparison sake, of course.
Now THAT sounds like a fun breakfast ;).
But for the time being, I’m loving the autumnal flavors in these sweet potato ‘cakes.
Fluffy, tender, gently sweetened, and fragrantly scented with spices found in sweet potato pie, these pancakes are a delicious seasonal breakfast that can be on your table (or on your lap while you lounge on the couch watching the morning news) in 10 minutes!
If you need further reason to make these, (hopefully that’s not the case, but…), take a look at their nutritional stats at the bottom of the post: not too heavy in calories, low in fat, & packed with filling fiber and fueling protein.
Pierce the sweet potato with a fork and microwave it until soft (usually about 4-5 minutes on high), turning it halfway through. Alternatively, you can bake the sweet potato in the oven at 375°F (190°C) for about 45 minutes. Let it cool slightly, then scoop out the flesh and mash it until smooth.
Prepare the Batter
In a mixing bowl, combine the mashed sweet potato, flour, milk, brown sugar, baking powder, cinnamon, nutmeg, salt, vanilla extract, egg yolk, and melted butter. Stir until all the ingredients are well combined.
Beat the Egg White
In a separate clean bowl, beat the egg white until stiff peaks form. Gently fold the beaten egg white into the pancake batter. This step adds lightness and fluffiness to your pancakes.
Cook the Pancakes
Heat a non-stick skillet or griddle over medium-low heat and lightly grease it with cooking spray or butter.
Pour a ladleful of the pancake batter onto the hot skillet to form a pancake. Cook until bubbles form on the surface, then flip the pancake and cook until it’s golden brown on both sides.
Make the Maple Pecan Drizzle
While the pancakes are cooking, warm the maple syrup in a small saucepan or microwave until it’s slightly heated.
Stir in the chopped pecans, and let it sit for a minute or two to infuse the flavors.
Serve
Stack the sweet potato pie pancakes on a plate, drizzle the warm maple pecan sauce over them, and enjoy!
Here we are on the kickoff morning of the Love Your Heart month-long event!
Cara is hosting this week’s giveaway, so head on over to her site for a chance to win a copy of our own Amy Roskelley’s book, 201 Healthy Smoothies & Juices for Kids, two bags of Paleonola grain-free granola, OR two 32 oz containers of Chobani yogurt.
Be sure to check out all of the hearty-healthy breakfast recipes featured today:
Cara’s Strawberry Date Avocado Smoothie (this week’s hostess)
Nicole’s Flaxseed and Walnut Waffles
Amy & Natalie’s Granola Berry Parfait
Name
Winter Blueberry Almond Baked Oatmeal (for one)
Cuisine
Fusion
Prep Time
10 minutes
Cooking Time
35-40 minutes
Total Time
45 minutes
Servings
1 serving
Yield
1 serving
My contribution to the lineup is this baked oatmeal with almonds and frozen blueberries.
Since we’re using frozen berries in place of fresh, I’m including Winter in the title. Berries are frozen at peak ripeness during their prime growing season, and fortunately retain their nutritional value through the freezing process.
Blueberries rank high amongst heart-healthy foods with good reason; they are jam-packed with antioxidants. According to recent studies, blueberries can help to regulate blood pressure and may reduce the “bad” LDL cholesterol that can lead to cardiovascular disease.
Another heart-healthy superstar in this recipe is rolled oats. Oatmeal may also lower LDL cholesterol and works against high blood pressure, type 2 diabetes, and weight gain.
Rounding out the heart-healthy ingredients in this baked oatmeal is almonds. Just like blueberries and oats, antioxidant vitamin E-rich almonds may lower LDL cholesterol and can also reduce the risk of blood clots (thereby reducing chances of a heart attack).
If the heart health benefits alone don’t convince you to make this baked oatmeal, hopefully this description will!
Fluffy and light, the baked oats are flecked with crunchy sliced almonds. Wild blueberries lend a bluish purple hue to the oats as well as a natural sweetness. A hint of almond extract comes through with each bite, and the souffle-like baked oatmeal is topped with a simple homemade blueberry syrup.
1/4 cup unthawed frozen wild blueberries, plus 2 Tbsp, divided
1 tsp pure maple syrup
Estimated Nutrition Per Serving
Calories: 400 calories
Carbohydrates: 65 grams
Protein: 14 grams
Fat: 10 grams
Fiber: 7 grams
Instructions
1. Preheat the Oven
Preheat your oven to 350°F (175°C). Grease an 8×8 inch (20×20 cm) baking dish with butter or cooking spray to prevent sticking.
2. Combine Dry Ingredients
In a large mixing bowl, combine the rolled oats, chopped almonds, cinnamon, and salt. Stir them together until well mixed.
3. Add Wet Ingredients
In another bowl, whisk together the egg, milk, maple syrup, vanilla extract, and almond extract (if using). Mix until all the wet ingredients are well combined.
4. Assemble the Dish
Spread half of the blueberries in an even layer in the greased baking dish. Next, add the oat and almond mixture evenly over the blueberries. Pour the wet ingredients evenly over the oats.
5. Add More Blueberries
Sprinkle the remaining blueberries on top of the oatmeal mixture. This will create bursts of juicy blueberries as you enjoy your baked oatmeal.
6. Bake It!
Place the baking dish in the preheated oven and bake for 35-40 minutes or until the top is golden brown, and the oatmeal is set. You can test for doneness by inserting a toothpick into the center; it should come out clean.
7. Serve and Enjoy
Once it’s done, remove the baked oatmeal from the oven and let it cool for a few minutes. Slice it into squares and serve it warm. You can drizzle a little extra maple syrup on top or add a dollop of yogurt for extra creaminess.
After polishing off those delicious little bites, I knew I wanted to dive right into concocting other cookie dough truffles.
Oatmeal raisin was the first variety to come to mind.
Sweet and chewy, with flavor accents of cinnamon and vanilla, these truffles really do taste like oatmeal raisin cookie dough!
I stuck with cashews because their mellow buttery flavor takes a backseat to the more prominent flavors, but a combination of cashews and peanuts would be super tasty – think peanut butter oatmeal raisin cookies.
Along that same line of thought, adding in a couple tablespoons of chocolate chips would be a welcomed addition as well.
That being said, these truffles are fantastic as they are, and I am already brainstorming the next cookie dough variation ;).
Oatmeal Raisin Cookie Dough “Truffles”
Printable Recipe
Name:
Oatmeal Raisin Cookie Dough Truffles
Cuisine:
Fusion
Prep Time:
15 minutes
Cooking Time:
0 minutes
Total Time:
50 minutes (includes freezing time)
Servings:
24 truffles
Yield:
Varies based on truffle size
Ingredients
3/4 cup raw (or dry-roasted) unsalted cashews
1/4 cup old-fashioned rolled oats
1/3 cup + 2 Tbsp raisins, divided
3 large pitted Medjool dates
1 tsp ground cinnamon
1 tsp pure vanilla extract
1/4 tsp Kosher salt
Instructions
1. Prepare the Cookie Dough
In a food processor, pulse the rolled oats until they reach a coarse, flour-like consistency.
In a mixing bowl, cream together the softened butter, brown sugar, and granulated sugar until it’s light and fluffy.
Add the vanilla extract, ground cinnamon, and salt to the butter-sugar mixture. Mix until well combined.
Gradually incorporate the oat flour and all-purpose flour until a smooth cookie dough forms.
Finally, fold in the raisins to distribute them evenly throughout the dough.
2. Shape the Truffles
Using your hands, roll the cookie dough into small bite-sized balls, roughly the size of a cherry or walnut. Place these balls on a parchment paper-lined tray.
3. Chill the Truffles
Put the tray with the cookie dough balls in the refrigerator for about 15-20 minutes to firm them up.
4. Prepare the Coating
In a microwave-safe bowl, melt the chopped semi-sweet chocolate and coconut oil in 30-second intervals, stirring between each interval until the mixture is smooth and glossy.
5. Coat the Truffles
Remove the cookie dough balls from the fridge. Using a fork or toothpick, dip each ball into the melted chocolate until it’s evenly coated. Let any excess chocolate drip back into the bowl.
6. Set and Serve
Place the chocolate-coated truffles back on the parchment paper-lined tray and allow them to set. This should take about 15-20 minutes at room temperature or you can expedite the process by popping them back in the refrigerator.
Once the chocolate has hardened, your Oatmeal Raisin Cookie Dough Truffles are ready to enjoy!
Directions
In the bowl of a food processor, combine the cashews and rolled oats. Process until finely crumbled – mixture will resemble coarsely ground flour. Remove from food processor bowl and set aside.
Place 1/3 cup raisins, dates, cinnamon, vanilla extract, and salt into the food processor bowl, and blend until a thick paste forms. Add the ground nut & oat mixture to the raisin & date paste and process until the mixture comes together to form a crumbly “dough”. Remove mixture from food processor and place in a mixing bowl. “Knead” in the 2 Tbsp raisins until evenly distributed.
Form mixture into a large ball and refrigerate for about 5-10 minutes.
When the dough has chilled for a bit, take it out of the fridge and roll into 10 balls.
Store in an airtight container in the refrigerator.
These values are based on typical ingredient quantities and may vary slightly depending on your specific recipe and portion sizes. It’s always a good idea to use a nutrition calculator or consult specific product labels for the most accurate nutritional information.
Enjoy your Oatmeal Raisin Cookie Dough Truffles while keeping an eye on your portion sizes for a delightful treat!
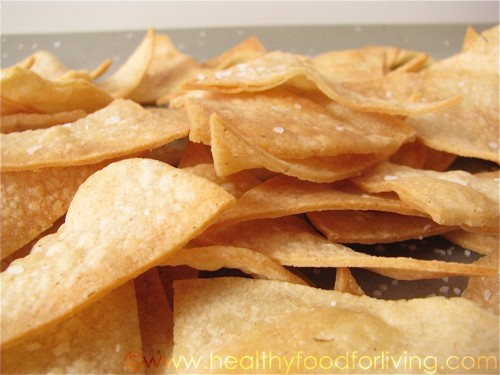
Both John and I prefer flour tortillas to the corn variety when making enchiladas, quesadillas, or tacos. Nevertheless, I bought a package of corn tortillas for making chicken tortilla soup the other day… and was left with 3/4 of a package threatening to go bad in the fridge.
What to do, what to do…
Baked tortilla chips popped into my mind, and the idea came to fruition in 15 minutes flat.
Simply coat as many tortillas as you’d like with cooking spray, stack ‘em up, and cut ‘em into wedges.
Place them on a baking sheet, sprinkle with Kosher salt…
I want you to think about the last time you crunched into a warm freshly made tortilla chip.
If you never have, then it is high time you do, my friend.
If, on the other hand, you have had the privilege of tasting freshly made tortilla chips, I want you to imagine how fantastic they would be fresh out of your oven!
With no grease to speak of, these baked chips are clearly healthier than the fried chips served in restaurants. The homemade version also allows you to play around with whatever spices strike your fancy.
Cinnamon-sugar, chile-lime, and cumin-cayenne come to mind.
What flavor would you make?
Name
Homemade Baked Tortilla Chips
Cuisine
Mexican
Prep Time
10 minutes
Cooking Time
15 minutes
Total Time
20-25 minutes
Servings
4 servings
Ingredients
10-12 corn tortillas
2 tablespoons vegetable oil
1 teaspoon salt
Optional seasonings: chili powder, cumin, paprika, garlic powder, or your favorite spices
Stack the tortillas on top of one another, and cut the pile in half. Cut each half in half again; then cut each quarter in half. Every tortilla will yield 8 triangles.
Place tortilla triangles on baking sheets in one layer. Sprinkle with salt.
Bake tortillas until crisp, lightly browned, and slightly curled, about 12 minutes. Watch closely so they don’t burn.
Toss the warm tortilla chips with additional salt to taste, if desired
Who doesn’t love waking up to the delightful aroma of pancakes? These Apple Cinnamon Pancakes for One are the perfect way to treat yourself to a cozy breakfast, especially on those mornings when you’re craving something a little extra special.
Packed with the warmth of cinnamon and the sweetness of apples, these pancakes are the ultimate comfort food. Plus, the recipe is designed for a single serving, so you can enjoy them all to yourself.
Name
Apple Cinnamon Pancakes for One
Cuisine
Fusion
Prep Time
10 minutes
Cooking Time
5 minutes
Total Time
15 minutes
Servings
1
Yield
3-4 small pancakes
You didn’t think I’d let National Pancake Week pass by without a new pancakes-for-one recipe, did you?
I may have missed National Pancake Day, but we’re still officially within the celebratory week… so here ya go ;).
I can’t believe it’s taken me this long to make apple pancakes for the blog, considering they were pretty much the only pancakes I grew up eating. My mom makes a wicked good stack of whole wheat apple pancakes, and this recipe is my version of her hearty ‘cakes.
Grated sweet apple and ground cinnamon are folded into my basic whole wheat pancake batter, resulting in these thick and fluffy discs of deliciousness that simply beg for a generous pour of maple syrup.
Now, I can usually polish off a batch of pancakes-for-one with no problem whatsoever; but I actually couldn’t quite finish this stack. I attribute this to the fact that when I made them, I was just recovering from a stomach bug that basically eradicated my appetite for a couple of days. I never lose my appetite, even when sick… so I really struggled for those two days. I was forced to put off a few cooking projects, as the mere sight and aroma of most foods made my stomach flip.
Needless to say, that was not a good scenario for a food blogger/recipe developer.
Anyway, I wrapped up the remaining pancakes and enjoyed the leftovers – reheated in the toaster oven – the next day; they might have been even better the second time around! I recall doing the same thing when there were leftovers of my mom’s apple pancakes, and I just love the extra crispiness awarded to the outside of the pancakes after a run through the toaster oven.
Why the long-winded digression about leftover reheated pancakes? Well… so you can make these pancakes on a weeknight, let them cool, refrigerate overnight, and toast ‘em up the next morning for a quick – but special – weekday breakfast. Weighing in under 400 calories, and boasting nearly 11 grams of fiber & over 14 grams of protein, these apple cinnamon pancakes don’t have to be relegated to a weekend splurge.
Place a non-stick skillet or griddle over medium-low heat to preheat while you prepare the pancake batter.
In a Mixing Bowl
In a medium-sized mixing bowl, combine the all-purpose flour, sugar, baking powder, baking soda, salt, and ground cinnamon. Mix these dry ingredients together until they are well combined.
Add the Wet Ingredients
Pour in the buttermilk and vanilla extract into the dry ingredients. Stir until just combined. Be careful not to overmix; a few lumps in the batter are perfectly fine.
Fold in the Apples
Gently fold in the diced apples. The apples will add a delightful crunch and sweetness to your pancakes.
Grease the Skillet
Lightly grease the preheated skillet with the melted butter.
Cook the Pancakes
Pour about 1/4 cup of the pancake batter onto the skillet for each pancake. Use the back of a spoon to spread the batter into a circular shape. Cook until you see bubbles forming on the surface, which usually takes about 2-3 minutes.
Flip and Finish Cooking
Carefully flip the pancakes and cook for an additional 1-2 minutes, or until they are golden brown and cooked through.
The weather here in New England has turned decidedly dreary – overcast, rainy, cold – and I’ve found myself torn between winter comfort food and lighter spring fare.
On the one side, I crave steaming soup and hot oatmeal whereas on the opposing side I long for fresh berries and cold overnight oatmeal.
The latter side won out with this recipe.
Despite morning temperatures hovering in the 40s, I couldn’t get the idea of chilled overnight oats out of my head.
Tropical flavors – specifically mango and coconut – shine in this satisfying breakfast that is served parfait-style.
Rolled oats are soaked overnight in creamy coconut milk and thick Greek yogurt, and then layered with sweet mango-banana soft serve & crunchy toasted coconut flakes.
Sure, I might have eaten the parfait while huddled beneath a warm blanket, but I enjoyed it despite the gloomy weather.
I’ll be making this throughout the summer months, for sure!
Name:
Overnight Coconut & Mango Oats Parfait
Cuisine:
Tropical
Prep Time:
15 minutes
Cooking Time:
0 minutes (no cooking required)
Total Time:
4 hours 15 minutes (including chilling)
Servings:
2 servings
Yield:
2 parfaits
Ingredients (1 serving)
1/3 cup old-fashioned rolled oats
1/3 cup 0% plain Greek yogurt
1/3 cup canned unsweetened light coconut milk
1 ripe banana, peeled & sliced
1 very ripe champagne mango, peeled and chopped
2 Tbsp unsweetened coconut flakes, lightly toasted until golden brown
Instructions
The night before you intend to eat the parfait, combine the oats, yogurt and coconut milk; stir well. Cover with plastic wrap and refrigerate overnight.
Also the night before, place the banana slices and mango pieces in a ziploc bag and freeze overnight.
In the morning, place the frozen banana and mango into a food processor (or high-speed blender) and process/blend until smooth and creamy.
Layer the cold overnight oats with the mango-banana soft serve and toasted coconut flakes.
Nutritional Information
Calories: 350 kcal
Carbohydrates: 55g
Dietary Fiber: 6g
Sugars: 34g
Protein: 6g
Fat: 13g
Saturated Fat: 8g
Cholesterol: 0mg
Sodium: 20mg
Potassium: 344mg
Vitamin A: 36%
Vitamin C: 45%
Calcium: 16%
Iron: 8%
Please note that these nutritional values are approximate and can vary depending on the specific brands of ingredients used and portion sizes.
If I am ever asked to compose a list of only 10 foods I could eat for the remainder of my life, sweet potatoes would – without question – be number 1. Why I disliked this superfood as a kid, I have no clue, but I’d have a difficult time living without the orange-fleshed vegetable now. Sweet potatoes require no ingredient additions to taste absolutely divine, but when dressed up a bit, they become nothing short of transcendent.
In this recipe, sweet potatoes are baked until they become so soft that the skin practically peels itself away from the flesh. The tender potato flesh is stirred into a butter-less yet creamy milk base, combined with tangy goat cheese and Greek yogurt, and finished off with a crown of dried cranberries and toasted pecans. The resulting soup is incredibly thick, surprisingly filling, and undeniably comforting.
Place potatoes directly on oven rack and bake for 50-60 minutes, or until very soft. Let rest until cool enough to handle. Cut potatoes in half lengthwise, scoop out the flesh, and coarsely mash in a bowl.
Place flour in a pot or Dutch oven and gradually add in the milk, whisking until blended. Cook over medium heat until thickened, (about 8 minutes), whisking often. Add in the mashed sweet potato flesh, crumbled goat cheese, salt and pepper to taste, and cinnamon. Stir until the goat cheese melts. Reduce stove heat to low.
Stir in the Greek yogurt and cook over low heat until heated through, a few minutes. Serve topped with the pecans and dried cranberries.
Here we are already at week four of Love Your Heart month! Today’s featured meal is dinner, and I’m excited to share with you a comforting soup recipe chock full of heart-healthy ingredients.
Be sure to check out all of the hearty-healthy dinner recipes featured today:
Research has shown that black beans can lower blood cholesterol levels, thereby decreasing risk of cardiovascular disease and heart attack. These little fiber-packed gems are also filled with both antioxidant and anti-inflammatory phytonutrients. One cup of black beans provides nearly two-thirds of the Daily Value for folate (a B vitamin vital for decreasing risk of cardiovascular disease) and about 180 milligrams of omega-3 fatty acids.
Potassium-rich sweet potatoes can help to prevent heart attack and aid in normal heart function and blood pressure. The orange-fleshed vegetable is also packed with antioxidants as well as anti-inflammatory nutrients for heart health.
Finally, avocados may help to decrease inflammatory risk factors while improving cholesterol levels. Omega-3 fatty acids and oleic acids – both inherent in avocados – are known to improve heart health.
Combining these three heart healthy foods into one dish is actually a common occurrence in our kitchen. Sweet potato & black bean tacos or enchiladas topped with guacamole are quick and easy to make, not to mention delicious to eat.
I decided to switch things up a bit by using these ingredients in a hearty soup, perfect for these lingering winter days.
This thick and creamy blended soup gets a flavor punch from chipotle peppers in adobo sauce, amongst other Mexican spices. Sweet potato cubes are pan-roasted to form crisp “croutons”, which are joined by creamy avocado and tangy Greek yogurt atop the steaming soup.
Spicy, satisfying, flavorful, healthy, and easy… what else could you want in a soup?!
Name
Spicy Chipotle Black Bean Soup with Crispy Sweet Potato “Croutons”
1 cup finely chopped yellow or white onion (about 1 medium onion)
4 garlic cloves, finely minced
1 chipotle pepper in adobo sauce, minced
2 tsp adobo sauce
1 tsp ground cumin
1/4 tsp cayenne pepper, or more to taste
2 (15 oz) cans black beans, rinsed and drained
1 (15 oz) can fire-roasted diced tomatoes with green chiles, undrained
2 cups low-sodium vegetable or chicken broth
Kosher salt and freshly ground black pepper, to taste
1/2 Tbsp freshly squeezed lime juice
1/2 avocado, peeled, pitted, and diced
chipotle hot sauce, optional
2% plain Greek yogurt, optional
Instructions
Heat olive oil in a large dutch oven or saucepan set over medium-high heat. Add in the chopped onion and cook, stirring frequently, until soft and translucent, about 5 minutes. Add in the minced garlic cloves, chipotle pepper, adobo sauce, cumin, and cayenne; stir & cook for 30 seconds.
Add in the drained beans, fire-roasted tomatoes, and vegetable broth. Bring to a boil, reduce heat to low, and simmer for 10 minutes.
Puree using an immersion blender OR by transferring the soup into a blender in 3 batches.
Stir in lime juice. Season to taste with salt and pepper.
Serve topped with Sweet Potato Croutons, diced avocado, and optional accoutrements.
Heat olive oil in a medium skillet set over medium-high heat. Add in the sweet potato cubes, a generous pinch of Kosher salt, and the chile powder. Stir to coat the sweet potato, then let sit for 2-3 minutes, or until crisp and browned on the bottom.
Stir the potatoes and brown the other side for another 2-3 minutes.
Repeat step 3 until all sides of the sweet potato cubes are crisp and browned. Drain on paper towel and season to taste with salt and pepper.
Nutritional Information Per Serving
Calories: 275 kcal
Carbohydrates: 52g
Protein: 8g
Fat: 5g
Saturated Fat: 1g
Cholesterol: 0mg
Fiber: 11g
Sugar: 7g
Sodium: 752mg
1. First up we have The Vegan Slow Cooker cookbook by none other than my fellow Key Ingredient Back Burner blogger, Kathy Hester. I can tell you from working with her that Kathy has some fantastic vegan recipes up her sleeve; and this cookbook has given me an incentive to finally buy a slow cooker!
2. Another winner will receive one 12 can variety pack from Pure Alaska Salmon. Canned wild salmon is great to have on hand in the pantry, and would make a perfect quick substitute for fresh salmon in my Salmon Caesar Salad Sandwiches.
To Enter the Giveaway, leave a comment on this blog post for each of the following actions. Enter as manytimes as you like!
Leave a comment telling me about your favorite heart-healthy dinner or why you’d like to try this soup.
Mention this giveaway on Twitter or Facebook with a link to this page.
Follow me on Facebook or Twitter.
Follow Kathy Hester on Facebook or Twitter.
Follow Pure Alaska Salmon on Facebook or Twitter.
Link up to a heart-healthy dinner recipe on your blog. Please share the love by using our badge
Copy & paste this code into the html of your heart-healthy dinner post:
Link up your heart-healthy dinner recipe here!
Powered by Linky Tools
Click here to enter your link and view this Linky Tools list…
THIS GIVEAWAY IS NOW CLOSED. THANK YOU FOR PARTICIPATING!
Giveaway Rules: No purchase necessary. The contest will close on Monday, February 27th at 11:50pm EST, at which point a winner will be chosen via random number generator. Winner must reside in the United States and supply a valid email address in the commenting form. Winner will be contacted and have 3 days to respond, at which point s/he forfeits the prize and another winner will be chosen. Winner will provide name, email address, shipping address and phone number and give me permission to supply this information to the sponsors of the giveaway items.
You see, a couple of months ago we went to dinner at a local seafood restaurant and John ordered the lobster macaroni & cheese. We both had high hopes for his selection, but what was put down in front of him resembled boxed mac & cheese in both appearance and taste.
Needless to say, we were disappointed.
I told him right then and there that I would make a homemade version for Valentine’s Day, and I held true to my word.
I turned to one of my cooking idols, Ina Garten, for a base recipe on which I could put my healthier spin, and the Barefoot Contessa did not let me down!
I’m not sure I really have words for how lusciously delectable this dish is, but I will try.
The rich gruyere and sharp cheddar do not compete with the sweet and succulent lobster meat, which is like hidden treasure amongst the creamy cheese sauce and crisp breadcrumb topping. This is one of those dishes that compels you to close your eyes as you relish in each delicious bite… until your plate is picked clean.
Yeah, John loved it :). As did I!
Name
Lobster Mac & Cheese
Cuisine
American
Prep Time
15 minutes
Cooking Time
40 minutes
Total Time
55 minutes
Servings
6 servings
Ingredients
canola oil cooking spray
1/2 lb penne (preferably whole wheat or whole wheat blend)
1/4 cup flour (I used all-purpose, but any will work)
6 oz (about 2 cups) grated gruyere cheese
4 oz (about 1 1/4 cup) grated 50% reduced fat sharp cheddar cheese, such as Cabot
1 tsp Kosher salt
freshly ground black pepper, to taste
1/2 lb freshly cooked lobster meat, chopped into 1-inch pieces (I purchased cooked lobster – a combination of claw, knuckle, and tail meat – from my local fish monger)
2 slices whole wheat sandwich bread, lightly toasted and pulsed in a food processor to form fine crumbs (alternately, you can use 3/4 cup unseasoned breadcrumbs, but fresh is much better!)
Estimated Nutrition Per Serving
Calories: 600 kcal
Fat: 38g
Saturated Fat: 23g
Cholesterol: 170mg
Sodium: 900mg
Carbohydrates: 33g
Fiber: 2g
Sugars: 6g
Protein: 29g
Directions
Preheat oven to 350°F. Lightly coat an 11 x 7 inch baking dish with canola oil cooking spray.
Bring a medium pot of water to a boil. Add in penne and cook until al dente (about 2-3 minutes less than amount of time recommended on the package). Drain.
Meanwhile, heat milk in a small saucepan over medium-low heat until hot but not boiling. Turn off heat.
Melt 3 Tbsp butter in a large saucepan over low heat. Whisk in flour for 1 minute.
While continuing to whisk, pour in the hot milk and whisk mixture until smooth and thick, about 1 minute. Remove from heat and stir in the grated cheeses, salt, and pepper.
Stir in the drained cooked penne and lobster meat until fully combined. Pour mixture into the prepared baking dish.
Melt the remaining 1 Tbsp butter in the microwave and stir in the breadcrumbs until moistened. Evenly spread the buttered breadcrumbs over the penne, cheese, and lobster mixture. Bake for 25-30 minutes, or until the breadcrumbs are golden brown and the cheese is bubbly.


")