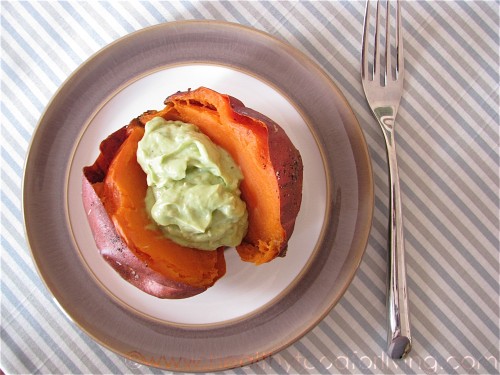
If you’re looking for a scrumptious and healthy side dish or appetizer that’s bursting with flavor and texture, look no further than these Baked Sweet Potatoes with Avocado & Goat Cheese Cream. This dish combines the natural sweetness of roasted sweet potatoes with the creamy richness of avocado and goat cheese. It’s not only a treat for your taste buds but also a nutritious choice for any occasion.
Included in this dish are three of my five favorite foods, rendering this recipe perfect for posting on my birthday (the big 2-8)!
Scrub and dry sweet potatoes. Pierce potatoes a few times with a knife or fork. Lightly coat with olive oil cooking spray and season to taste with salt and pepper. Place seasoned potatoes onto a foil-lined baking sheet and bake until soft, about 45-60 minutes.
Meanwhile, combine avocado, goat cheese, and citrus juice in the bowl of a food processor. Pulse until smooth and creamy, streaming in water (1 tablespoon at a time) until desired consistency is reached (I used just 1 tbsp). Season to taste with salt and pepper.
When the potatoes are done, slice them lengthwise and top with avocado & goat cheese crema.
Estimated Nutrition Per Serving
Calories: 305 kcal
Total Fat: 20g
Saturated Fat: 6g
Trans Fat: 0g
Cholesterol: 13mg
Sodium: 667mg
Total Carbohydrates: 28g
Dietary Fiber: 8g
Sugars: 4g
Protein: 7g
Vitamin D: 0%
Calcium: 81mg
Iron: 2mg
Potassium: 849mg
Please note that these nutritional values are approximate and can vary based on factors such as the size of sweet potatoes, the amount of olive oil used, and the specific brands of ingredients. It’s always a good idea to consult a nutritionist or use a trusted nutrition calculator for precise dietary information, especially if you have specific dietary requirements or restrictions.
The holiday season is a time for joy, togetherness, and of course, delicious food. When it comes to creating the perfect holiday meal, nothing beats a beautifully roasted turkey.
In this recipe, we’ll guide you through the steps to create a mouthwatering, juicy, and flavorful roast turkey that will make your holiday gathering truly unforgettable.
Remove the turkey from its packaging and pat it dry with paper towels.
In a small bowl, mix together the softened butter, minced garlic, dried thyme, dried rosemary, dried sage, salt, and pepper. This will be your flavorful herb butter.
Season the Turkey
Gently lift the skin of the turkey and rub the herb butter mixture underneath the skin, covering as much of the meat as possible. This will help keep the turkey moist and infuse it with flavor.
Pour the chicken or turkey broth into the bottom of the pan. This will keep the turkey moist and create a flavorful base for gravy.
Cover the turkey with aluminum foil, leaving a little space at the top to allow steam to escape.
Roast
Roast the turkey in the preheated oven for about 3.5 to 4 hours, or until the internal temperature reaches 165°F (74°C) in the thickest part of the thigh.
Basting
Every 30 minutes, baste the turkey with the pan juices. This adds more flavor and helps the skin become beautifully golden and crisp.
Resting
Once the turkey reaches the desired temperature, remove it from the oven and tent it loosely with foil. Let it rest for at least 20-30 minutes. This allows the juices to redistribute, resulting in a moist and tender turkey.
Carving
Carve your turkey and serve it with your favorite holiday sides like mashed potatoes, stuffing, cranberry sauce, and gravy made from the pan drippings.
Estimated Nutrition Per Serving (1/12 of the turkey):
Seriously, how could these be anything other than absolutely delicious?!
The light & cakey blondies are moist, tender, and bursting with peanut and banana flavor. I especially love the pockets of peanut butter that sunk down into the batter while baking. The peanut butter chip morsels are also pretty darn fantastic; as are the stray bits of sweet and marshmallow-y banana that didn’t quite get mashed all the way.
Actually, everything about these blondies is fabulous!
If you’re a peanut butter & banana junkie like me, then you really must make these.
Peanut Butter & Honey Banana Blondies
Printer-Friendly Recipe
Name:
Peanut Butter & Honey Banana Blondies
Cuisine:
Fusion
Prep Time:
15 minutes
Cooking Time:
25 minutes
Total Time:
40 minutes
Servings:
12 squares
Yield:
12 servings
Ingredients
1/4 cup unsweetened applesauce
2 Tbsp canola oil
2 Tbsp Sucanat or lightly packed brown sugar
1/4 cup honey
1 cup mashed overripe banana (about 3 medium bananas with almost-black peels)
1 egg
1 tsp pure vanilla extract
1/2 cup whole wheat pastry flour
1/2 cup peanut flour (if you cannot find this, simply sub in an additional 1/2 cup whole wheat pastry flour)
1 tsp baking powder
1/2 tsp baking soda
1/4 tsp salt
1/2 cup all-natural peanut butter chips (I used Sunspire)
1/4 cup all-natural peanut butter (I used Honey Nut Banana Better Butter)
Instructions
1. Preheat the Oven
Preheat your oven to 350°F (175°C) and grease an 8×8-inch (20×20 cm) baking pan or line it with parchment paper for easy removal.
2. Mash the Bananas
In a mixing bowl, mash the ripe bananas until they are smooth. Bananas that have brown spots on the peel are ideal as they are sweeter and add a nice depth of flavor.
3. Combine Wet Ingredients
To the mashed bananas, add the creamy peanut butter, honey, melted butter, egg, and vanilla extract. Mix everything together until well combined. The mixture should be smooth and creamy.
4. Sift Dry Ingredients
In a separate bowl, sift together the all-purpose flour, baking soda, and salt. Sifting helps remove lumps and ensures even distribution of dry ingredients.
5. Combine Wet and Dry Ingredients
Gradually add the sifted dry ingredients to the banana and peanut butter mixture. Stir until the flour is fully incorporated. Be careful not to overmix; just mix until there are no visible streaks of flour.
6. Transfer to Baking Pan
Pour the blondie batter into the prepared baking pan. Use a spatula to smooth the top for even baking.
7. Bake
Place the baking pan in the preheated oven and bake for approximately 20-25 minutes or until the edges are golden brown and a toothpick inserted into the center comes out with a few moist crumbs. Remember that blondies will continue to cook a bit after removing them from the oven, so it’s better to slightly underbake them for a soft and chewy texture.
8. Cool and Slice
Allow the blondies to cool in the pan for about 10-15 minutes, then use a sharp knife to slice them into squares or bars.
9. Enjoy
Serve your Peanut Butter & Honey Banana Blondies as a sweet and nutty treat, a snack, or even as a dessert with a scoop of vanilla ice cream.
Directions
Preheat oven to 350°F.
Lightly coat an 8 x 8 inch square pan with canola oil cooking spray. Line the pan with parchment paper so that the ends hang over the edges of the pan. Lightly coat the parchment with cooking spray.
In a large bowl, beat together the applesauce through mashed banana with an electric mixer until well combined. Beat in the egg, followed by the vanilla.
In a medium bowl, whisk together both types of flour, baking powder, baking soda, and salt.
Add dry ingredients to the wet, and stir with a rubber spatula or spoon just until moistened. Fold in peanut butter chips.
Pour batter into prepared pan. Drop peanut butter by the teaspoonful on top of the batter, leaving room between each spoonful. You can either leave as is, or drag a butter knife through the peanut butter and batter to create a marbled effect. (The peanut butter I used requires refrigeration, so it was rather difficult to swirl it into the batter given its firmer consistency).
Bake blondies until a toothpick inserted into the center of the pan comes out clean, about 25-28 minutes.
Allow blondies to cool for 10 minutes in the pan, then remove by picking up the ends of the parchment paper.
Allow to cool completely on a wire rack before cutting into bars.
Estimated Nutrition Per Serving
Calories: 180g
Total Fat: 10g
Saturated Fat: 3g
Trans Fat: 0g
Cholesterol: 23mg
Sodium: 145mg
Total Carbohydrates: 20g
Dietary Fiber: 2g
Sugars: 9g
Protein: 4g
Please note that the nutrition values are approximate and can vary based on the specific brands of ingredients used and portion sizes.
It’s always a good idea to consult with a registered dietitian or use a nutrition calculator for precise nutritional information, especially if you have dietary restrictions or specific health concerns. Enjoy your Peanut Butter & Honey Banana Blondies responsibly!
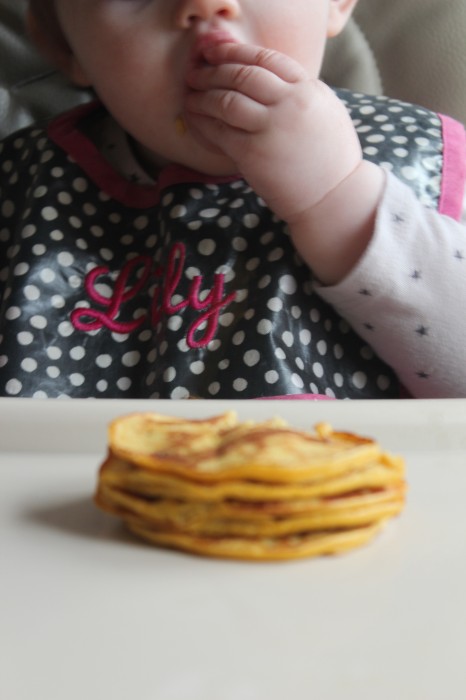
These “pancakes” are flour- & sugar-free, consisting solely of bananas, pumpkin puree, eggs, & baking powder. I’ve seen a few recipes for this kind of pancake circulating around the blogosphere, and decided to try out a pumpkin version for Lily.
The verdict? She loved them and polished off this entire stack.
I tasted them myself, and want to toss out a disclaimer that they – of course – don’t taste like regular ol’ pancakes, (because there is no flour), but they are tasty! Their spongy texture makes them easy for baby to eat, and their natural sweetness means no maple syrup is needed.
This may very well be Lily’s Thanksgiving day breakfast!
Name:
4 Ingredient Pumpkin Pancakes for Baby
Cuisine:
Fusion
Prep Time:
5 minutes
Cooking Time:
10 minutes
Total Time:
15 minutes
Servings:
6 small pancakes
Yield:
2 servings
Ingredients
butter or vegetable oil for cooking
1/4 cup very well-mashed ripe banana (about 1/2 large banana)
1/4 cup pure pumpkin puree
2 large eggs, preferably organic
1/4 tsp baking powder
Estimated Nutrition Per Serving
Calories: 70 kcal
Carbohydrates: 12g
Protein: 3g
Fat: 1g
Fiber: 2g
Sugar: 2g
Vitamin A: 60% of Daily Value (DV)
Iron: 6% DV
Calcium: 2% DV
Potassium: 90mg
Instructions
Prepare the Pumpkin Puree
Start by ensuring your canned pumpkin puree contains only 100% pumpkin, with no added sugars or spices. This guarantees that your baby gets the pure, natural goodness of pumpkin.
Combine Ingredients
In a mixing bowl, combine the canned pumpkin puree, oat flour, egg (or mashed banana if using a banana instead of an egg), and a pinch of cinnamon if desired. Mix the ingredients until they form a smooth batter. The consistency should be thick but pourable.
Cooking
Heat a non-stick skillet or griddle over medium heat. You can lightly grease the surface with a small amount of cooking oil or cooking spray, but it’s not necessary thanks to the non-stick surface.
Once the skillet is hot, pour a small amount of the pancake batter onto the surface to form small, baby-sized pancakes. Use a spoon to gently spread the batter into a round shape.
Cook the pancakes for about 1-2 minutes on each side or until they are golden brown and cooked through. Keep an eye on them to prevent burning.
Cool and Serve
Allow the pancakes to cool for a few minutes before serving. They should be at a safe temperature for your baby to handle.
For added nutrition, you can serve these pancakes with a dollop of plain yogurt, a drizzle of pure maple syrup (for babies older than one year), or a fruit puree.
If you’re a fan of the delightful combination of chocolate and peanut butter, you’re in for a treat! Homemade chocolate peanut butter cups are a classic confectionery delight that’s surprisingly easy to make at home.
Begin by lining a standard muffin tin with paper or silicone cupcake liners. This will make it easier to remove the peanut butter cups once they’re set.
Step 2: Make the Peanut Butter Filling
In a mixing bowl, combine the creamy peanut butter, powdered sugar, softened butter, vanilla extract, and a pinch of salt. Stir until the mixture is smooth and well combined. This will be your delicious peanut butter filling.
Step 3: Create the Peanut Butter Layers
Spoon a small amount of the peanut butter mixture into each of the cupcake liners, filling them about one-third of the way. Use the back of the spoon to flatten and smooth the peanut butter layer.
Step 4: Melt the Chocolate
In a microwave-safe bowl, combine the semisweet or dark chocolate chips and coconut oil. Microwave in 20-30 second increments, stirring after each interval, until the chocolate is completely melted and smooth.
Step 5: Add the Chocolate Layer
Spoon the melted chocolate over the peanut butter layer in each cup, covering it completely. Tap the muffin tin gently on the counter to even out the chocolate.
Step 6: Set and Chill
Place the muffin tin in the refrigerator and allow the chocolate peanut butter cups to chill for at least 30 minutes, or until they are firm.
Step 7: Enjoy!
Once the cups have hardened, remove them from the muffin tin and peel away the paper or silicone liners. Your homemade chocolate peanut butter cups are now ready to be enjoyed! Store any leftovers in an airtight container in the refrigerator.
Pro Tip: Get creative with your peanut butter cups by adding chopped nuts, sea salt, or even a drizzle of caramel for an extra layer of flavor and texture.
Enjoy your homemade chocolate peanut butter cups, and happy indulging!
Estimated Nutrition Per Serving
Calories: 220 calories
Total Fat: 15g
Saturated Fat: 7g
Trans Fat: 0g
Cholesterol: 5mg
Sodium: 60mg
Total Carbohydrates: 16g
Dietary Fiber: 2g
Sugars: 11g
Protein: 6g
Please note that these nutrition estimates are approximate and can vary depending on the specific ingredients and brands used.
The values provided are based on a typical serving size for one peanut butter cup.
If that’s not a recipe for the ultimate healthy-but-delicious breakfast (or dessert!) condiment, I don’t know what is.
Spread this luscious espresso-laced chocolate peanut butter on a warm muffin, stir it into hot stovetop oatmeal, drizzle it over creamy Greek yogurt, blend it into a smoothie, or eat it right off the spoon!
Name
Mocha Peanut Butter
Cuisine
Fusion
Prep Time
10 minutes
Cooking Time
10 minutes (roasting)
Total Time
20 minutes
Servings
Makes about 1 cup
Yield
1 cup
Ingredients
1 1/2 cup dry roasted, unsalted peanuts, preferably organic
1/8 -1/2 tsp canola oil (omit entirely for a thicker, less drizzle-able consistency)
1 Tbsp + 1 tsp cocoa powder
tiny pinch of Kosher salt
1 Tbsp instant espresso powder
2 tsp evaporated cane juice OR granulated sugar
1/2 tsp pure vanilla extract
Instructions
Place peanuts into the bowl of a food processor. Process until peanuts break down into a paste, scraping down the sides as necessary, about 3-5 minutes.
Meanwhile, place the chocolate chips over a double boiler (set a heat-proof bowl over a pot with 1 inch of simmering water), and stir until fully melted. Set aside to cool slightly.
If you’re looking for a drippy consistency, start with adding just 1/8 tsp canola oil: with the motor of the food processor running, stream in the oil and process until a smooth butter forms. Add an additional 1/8-1/4 tsp if desired.
Spoon in the melted chocolate, and process until combined.
Add in the cocoa powder, salt, espresso powder, evaporated cane juice, and vanilla extract, and puree until well-combined.
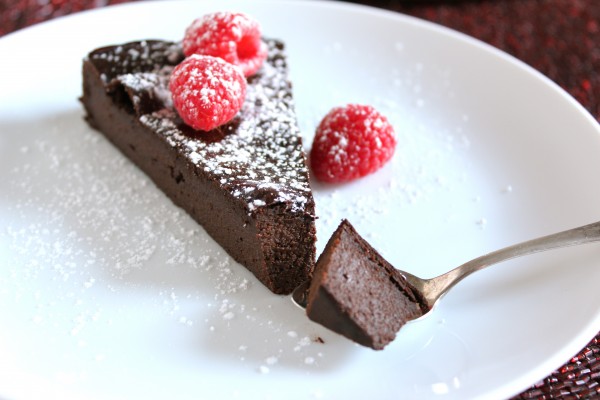
When it comes to chocolate desserts, few can resist the allure of a perfectly baked Flourless Chocolate Cake. Its rich, dense, and velvety texture makes it a favorite among chocolate enthusiasts.
Whether you’re a seasoned baker or a novice in the kitchen, this recipe is simple to follow and sure to impress. Get ready to embark on a journey to chocolate heaven!
Rich.
Fudgy.
Dense.
Sweet.
Chocolaty.
Decadent.
Valentine’s Day-worthy.
Healthy?
In this case: absolutely!
You can have it all with this healthified flourless chocolate cake.
A very close friend of my mother-in-law (for all intents and purposes, John’s “aunt”) made a ridiculously delectable flourless chocolate cake when our families convened for Christmas, and I was picking at the leftovers for days afterward.
I became rather obsessed with making a healthy version, finally got around to experimenting in the kitchen, and thought that Valentine’s Day would be the ideal occasion to share with you the recipe I came up with.
I used a recipe from Whole Foods as my inspiration. Now just because a recipe hails from this health food mecca does not mean that it will necessary be light. Check out the link above for the nutritional information of the original cake, and you’ll see precisely what I mean.
Instead of a full cup (2 sticks!) of butter, I used avocado and banana puree; in place of 1 1/4 cups of sugar, I used 1/2 cup + some liquid Stevia extract.
[I have been occasionally using Stevia for a couple of years now, and for some reason have put off incorporating it into recipes for the blog. Are you interested in seeing more recipes using this all-natural zero-calorie sweetener?].
The rich avocado puree ensures that the cake comes out dense and fudgy; the banana puree adds moisture and natural sweetness without fat.
These healthy substitutions allowed me to cut out more than half of the sugar, half of the calories, 2/3 of the total fat AND 2/3 of the saturated fat from the original recipe.
A bite of this indulgent cake is akin to sinking your teeth into a chocolate truffle. Or a spoonful of chocolate ganache. Yet, unlike its traditional counterpart, a generous slice of this cake won’t make you curl up in the fetal position with a stomachache. Rich enough to satisfy even the most intense chocolate cravings, but light enough to leave you feeling fantastic after eating it, this flourless chocolate cake is my new favorite dessert!
8 ounces good-quality 60% cacao bittersweet chocolate, roughly chopped (I used Ghiradelli)
1/2 cup well pureed ripe avocado flesh (from about 1 avocado)
3/4 cup very ripe banana puree (from about 2 bananas) SEE NOTE
1/2 cup unrefined cane sugar
1 tsp pure vanilla extract
1 cup unsweetened cocoa powder
1 Tbsp espresso powder
1/2 tsp vanilla liquid Stevia extract (or to taste)
6 eggs, preferably organic
powdered sugar, optional
NOTE: There will be a very slight banana flavor to the freshly baked cake, which will disappear after 24 hours of chilling in the fridge. If you’re in a rush and simply must serve the cake the same day you make it, try subbing in an additional 1/2 cup of pureed avocado flesh (thereby using 2 whole avocados) for the banana puree. You will probably want to add additional sugar and/or Stevia if you make this substitution to make up for the sweetness of the banana. The additional avocado & sugar will obviously change the nutritional information.
Instructions
Preheat oven to 375°F. Lightly butter or oil a 9-inch spring-form pan. Cut out a circle of parchment paper to fit the pan and place it in the bottom. Lightly oil or butter the parchment paper circle.
Place a small saucepan with one inch of water over medium-high heat. Once the water has come to a boil, Top the saucepan with a heatproof bowl and add in the chopped chocolate; stir until fully melted.
In the bowl of a food processor fitted with the steel blade, combine the pureed avocado flesh, pureed banana, melted chocolate, sugar, and vanilla. Puree until completely smooth, scraping down sides of the food processor bowl as needed. Add in the cocoa and espresso powder; puree until incorporated. Add in the stevia extract. Taste and add more stevia extract if desired. Add in one egg at a time and puree after each addition until perfectly smooth.
Pour batter into prepared pan and bake for about 30-35 minutes, or until the cake has risen and is just firm in the center. Let cool completely, then cover tightly with plastic wrap and chill in the refrigerator for 24 hours (cake will deflate as it cools). Remove the sides of the spring-form pan before slicing and serving.
Nutritional Information Per Serving
Calories: 350 calories
Total Fat: 25g
Saturated Fat: 15g
Trans Fat: 0g
Cholesterol: 145mg
Sodium: 125mg
Total Carbohydrates: 30g
Dietary Fiber: 4g
Sugars: 22g
Protein: 5g
Please note that these are approximate values and can vary based on specific brands of ingredients used and portion sizes.
The nutrition information is for the cake only and does not include any additional toppings or accompaniments like whipped cream or ice cream.
Be sure to check out all of the hearty-healthy dessert recipes featured today:
Cara’s Chocolate Raspberry Cupcakes
Nicole’s Meyer Lemon and Blackberry Olive Oil Polenta Cake
Amy’s Fruit Tarts
As someone who generally prefers vanilla or fruity flavors when it comes to ice cream, I surprised myself when chocolate frozen yogurt was the first idea to pop into my head when brainstorming heart-healthy desserts.
The flavonoids in dark chocolate (we’re talking chocolate with at least 75% cocao) can reduce inflammation that leads to heart disease, and may also lower blood pressure by deactivating free radicals in your blood; thereby keeping your arteries healthfully open.
It tastes pretty damn good, too ;).
A creamy and rich cocoa-spiked Greek yogurt base is dotted with chopped dark chocolate in this decadent-tasting frozen yogurt.
It would be outrageous slowly melting over a warm brownie – and I know from personal experience that it’s amazing topped with melted peanut butter – but this frozen yogurt is also delicious all on its own.
1/2 cup evaporated cane juice (or another granulated unrefined sugar)
1/2 tsp pure vanilla extract
1/2 cup unsweetened cocoa powder (if you’re concerned about lumps, you can sift the cocoa powder before adding it to the yogurt; I did not do this)
2 1/2 oz dark chocolate (at least 70% cocao & preferably fair trade), chopped (about 1/2 cup)
Instructions
In a large bowl, combine yogurts, evaporated cane juice, vanilla extract, and cocoa powder. Stir until the evaporated cane juice and cocoa powder are completely dissolved. Refrigerate mixture for at least one hour.
Freeze according to ice cream maker manufacturer’s instructions, adding the chopped dark chocolate in the last couple of minutes of churning.
Serve immediately as soft serve, or spoon into a freezer-safe container and place in freezer until “ripened” (hardened).
Once frozen solid, thaw at room temperature for 30 minutes or until softened.
Nutritional Information Per Serving
Calories: 220 calories per serving
Protein: 8 grams per serving
Fat: 11 grams per serving
Carbohydrates: 22 grams per serving
Fiber: 1 gram per serving
Sugar: 19 grams per serving
Sodium: 45 milligrams per serving
These nutrition estimates are based on using full-fat Greek yogurt and may vary depending on the specific products and quantities used.
The final giveaway is a fantastic one! Be sure to visit Cara’s, Nicole’s, and Amy’s sites for other chances to win.
One lucky winner will receive a prize pack consisting of the following goodies + a $25.00 gift card from Bob’s Red Mill.
To Enter the Giveaway, please leave one comment for each of the following actions. Enter as many times as you like!
Leave a comment telling me about your favorite heart-healthy dessert or what you like about this frozen yogurt.
Link up to a heart-healthy dessert recipe on your blog. Please share the love by using our badge!
Mention this giveaway on Twitter or Facebook with a link to this page
Follow me on Facebook or Twitter
Follow Bob’s Red Mill on Twitter
Like Bob’s Red Mill on Facebook
Giveaway Rules No purchase necessary. The contest will close on Sunday March 4th at 11:59 pm EST, at which point a winner will be chosen via random number generator. Winner must reside in the United States and supply a valid email address in the commenting form. Winner will be contacted and have 3 days to respond, at which point s/he forfeits the prize and another winner will be chosen. Winner will provide name, email address, shipping address and phone number and give me permission to supply this information to the sponsors of the giveaway items.
Or maybe you’re not a snacker at all. If that’s that case, then… I don’t understand you, but we’re still cool.
If you are a sweet-salty snacker, then consider your craving satisfied.
Much less sugary than typical caramel corn, this version includes peanuts and peanut butter for texture, flavor, and an added kick of protein.
The vegan peanut butter caramel sauce comes together in just a couple of minutes, and is drizzled over freshly popped corn and salted peanuts before baking baked until light and crunchy.
Yum.
NOTE: this is a less sweet version of the classic caramel corn, rendering it ideal for satiating a snack – rather than dessert – craving.
Start by popping your popcorn. You can use an air popper, microwave, or stovetop method. Make sure to remove any unpopped kernels, so you don’t bite into an unexpected crunch.
2. Prepare a Baking Sheet
Line a large baking sheet with parchment paper or a silicone baking mat. This will make it easier to remove the caramel corn later.
3. Make the Caramel Sauce
In a medium saucepan, combine the granulated sugar, unsalted butter, corn syrup, and salt over medium heat. Stir continuously until the mixture comes to a boil. Once it boils, let it cook without stirring for about 4-5 minutes, or until it reaches a deep amber color. Be careful not to burn it; watch closely.
Remove the caramel sauce from the heat and quickly stir in the baking soda. It will bubble up, so be cautious. After that, add in the creamy peanut butter and vanilla extract. Stir until everything is well combined, and you have a smooth, velvety caramel peanut butter sauce.
5. Combine Popcorn and Caramel
Place the popped popcorn in a large mixing bowl. Pour the warm caramel peanut butter sauce over the popcorn. Using a spatula or wooden spoon, gently toss the popcorn until it’s evenly coated with the caramel sauce. Be patient; it may take a minute or two to coat all the popcorn properly.
6. Spread on the Baking Sheet
Spread the caramel-coated popcorn onto the prepared baking sheet. Use a spatula to even it out. While it’s still warm, sprinkle a pinch of sea salt evenly over the top for that perfect sweet and salty balance.
7. Let It Cool
Allow the salted peanut butter caramel corn to cool and harden for about 15-20 minutes.
8. Break into Pieces
Once it’s completely cooled and the caramel has hardened, break the caramel corn into pieces. You can make it as small or as large as you like.
9. Serve and Enjoy
Transfer your Salted Peanut Butter Caramel Corn to a serving bowl or store it in an airtight container. Enjoy the irresistible combination of sweet, salty, and nutty flavors!
Ok, so I splurged on a jar of Barney Butter a few weeks ago after not having any in the house for quite some time. Despite it being – in my opinion – the best commercially produced almond butter on the market these days, I do prefer to make my own almond butter most of the time.
As I neared the bottom of the jar, (always a sad sight… but it does mean oats in a jar is in the near future!), I realized that it was high time I came up with a new homemade almond butter recipe.
In keeping with the spirit of the holidays, I wanted to highlight seasonal flavors, and gingerbread seemed like a perfect choice.
Although I love pure almond butter dearly, my favorite nuts – by far – are pecans, so they were tossed into the mix as well. The rich buttery pecans help the almonds to break down easier, negating the need for oil to create a smooth and “drippable” nut butter.
In order to replicate the flavors of gingerbread, I gathered together the necessary ingredients – molasses, cinnamon, ginger, and cloves – and experimented with amounts until I was happy with the results.
Voila! Gingerbread-flavored pecan-almond butter.
The spices don’t overwhelm the nut butter, but the gingerbread flavor does gently come through. Like all homemade almond butters, this one is ever-so-slightly gritty, but in a pleasant way.
You may be wondering why I photographed the nut butter with a spoon.
Simple.
That is the precise vehicle with which the majority of this delectable concoction will be consumed. Sure, I smeared a bit on a slice of warm homemade banana bread and some of it will undoubtedly make its way into a few bowls of oatmeal, but something this delicious deserves to be enjoyed unadulterated by other foods!
I suggest making multiple batches; keep one for yourself and give others away as holiday gifts. I don’t have anything against gifting plates of homemade cookies this time of year, but you’ll certainly stand out from everyone else if you present your friends and family with jars of homemade nut butter.
Gingerbread Pecan Almond Butter
by Lauren Zembron
Name
Gingerbread Pecan Almond Butter
Cuisine
American
Prep Time
15 minutes
Cooking Time
10 minutes (roasting nuts)
Total Time
25 minutes
Servings
16 servings (1 tablespoon each)
Yield
1 cup
Ingredients
1 cup raw almonds
1 cup raw pecan halves
2 tsp Unsulphured blackstrap molasses
1 tsp brown sugar
1/2 tsp ground cinnamon (or more, to taste)
1/2 tsp ground ginger (or more, to taste)
pinch ground cloves (or more, to taste)
pinch of salt
Instructions
Roast the Nuts
Preheat your oven to 350°F (175°C). Spread the almonds and pecans evenly on a baking sheet. Roast them in the oven for about 8-10 minutes, or until they become fragrant and slightly golden. Be sure to watch them closely to prevent burning.
Cool the Nuts
Remove the nuts from the oven and allow them to cool for a few minutes.
Blend the Nuts
Transfer the roasted almonds and pecans to a food processor. Process them for about 10-15 minutes, scraping down the sides as needed. At first, the nuts will turn into a coarse meal, but keep processing until the oils are released, and the mixture becomes creamy.
Add the Spices
Once the nut butter reaches a smooth consistency, add the blackstrap molasses, ground cinnamon, ground ginger, ground cloves, ground nutmeg, and salt to the food processor. If you prefer a sweeter nut butter, you can also add honey at this stage. Continue to process the mixture until all the ingredients are well incorporated, and the nut butter has a gingerbread flavor.
Adjust to Taste
Taste the nut butter and adjust the spices and sweetness according to your preferences. You can add more spices or honey if desired.
Store
Transfer the Gingerbread Pecan Almond Butter to a clean, airtight container. It can be stored at room temperature for a short time or in the refrigerator for longer shelf life.
Enjoy
Spread this delectable nut butter on toast, drizzle it over oatmeal, use it as a dip for apple slices, or get creative with it in your favorite recipes. It’s perfect for adding a warm, nutty, gingerbread twist to your holiday dishes.
Estimated Nutrition Per Serving
Serving Size: 1 tablespoon (about 16g)
Calories: 96
Total Fat: 8g
Saturated Fat: 0.6g
Trans Fat: 0g
Cholesterol: 0mg
Sodium: 18mg
Total Carbohydrates: 5g
Dietary Fiber: 1g
Sugars: 3g
Protein: 2g
10 Simple Gingerbread Pecan Almond Butter Recipes
1. Gingerbread Almond Butter Toast
Spread Gingerbread Pecan Almond Butter generously on warm, toasted bread. Top it with sliced bananas and a drizzle of honey for a quick and delightful breakfast or snack.
2. Almond Butter and Jelly Sandwich
Create a twist on the classic PB&J sandwich by replacing peanut butter with Gingerbread Pecan Almond Butter. Pair it with your favorite fruit preserves or jelly for a sweet and nutty treat.
3. Almond Butter Smoothie
Blend a tablespoon of Gingerbread Pecan Almond Butter into your morning smoothie for a creamy and protein-packed addition. It adds a hint of gingerbread warmth to your favorite fruit and yogurt blend.
4. Gingerbread Almond Butter Oatmeal
Stir a spoonful of Gingerbread Pecan Almond Butter into your morning oatmeal. It will infuse your oats with rich flavor and make your breakfast extra satisfying.
5. Almond Butter and Fruit Dip
Mix Gingerbread Pecan Almond Butter with a bit of Greek yogurt and honey for a delectable fruit dip. It’s perfect for apple slices, strawberries, or even pretzels.
6. Almond Butter Energy Bites
Combine rolled oats, almond butter, honey, and a touch of cinnamon. Roll the mixture into bite-sized balls, chill, and enjoy a nutritious and energizing snack.
7. Almond Butter Stuffed Dates
Stuff Medjool dates with Gingerbread Pecan Almond Butter and a sprinkle of sea salt for a sweet and savory treat that’s both indulgent and healthy.
8. Almond Butter and Banana Pancakes
Add a dollop of Gingerbread Pecan Almond Butter to your pancake batter or spread it on top of pancakes for a delightful breakfast. Top with banana slices and maple syrup.
9. Almond Butter Granola Bars
Mix Gingerbread Pecan Almond Butter with oats, honey, and your favorite nuts and dried fruits. Press into a baking dish, chill, and cut into bars for a homemade snack.
10. Almond Butter Rice Cakes
Spread Gingerbread Pecan Almond Butter on rice cakes and top with sliced strawberries or blueberries. It’s a quick and healthy snack that satisfies your sweet cravings.