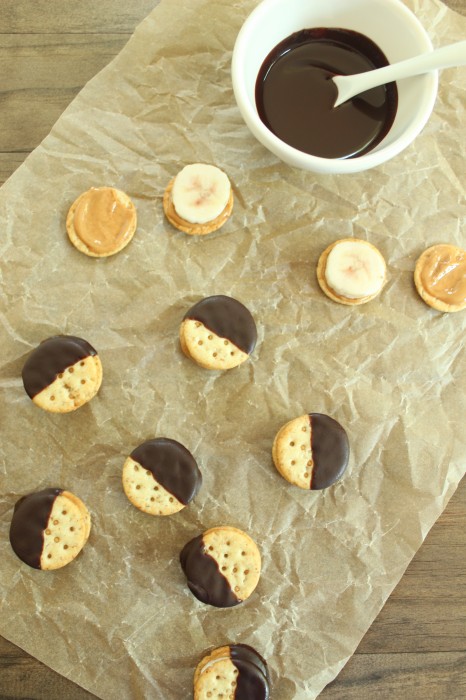
I had Lily in mind when I made these fun little treats, even though she’s still too young to experience the deliciousness that is chocolate & peanut butter (baby girl has NO idea what she’s missing!). She LOVES bananas, though, and the petite stature of these cracker bites deems them kid-friendly.
They’re also perfectly healthy – and not too sweet (we’re making our own chocolate for this recipe!) – for mindful parents to give to their kiddos.
Trader Joe’s carries these mini whole grain crackers – which taste like a popular buttery cracker – that I really like (and can pop like candy if I’m not careful). For this recipe, we’re spreading ‘em with a bit of peanut butter, sandwiching a frozen banana slice in between a pair, and dipping the whole shebang into an easy & healthy homemade chocolate sauce.
When you combine melted coconut oil, cocoa powder, and maple syrup, you’re rewarded with a delicious refined sugar-free chocolate sauce that hardens when chilled.
The recipe makes more chocolate sauce then you’ll need for the cracker bites, but please don’t toss it! You can warm up leftovers until liquified and drizzle over ice cream for a homemade chocolate shell, spoon it over oatmeal for a decadent breakfast, or, (as I’ve been doing), eat it by the mini spoonful.
These little bites would be perfect for a kid’s birthday, but would also go over quite well at an adults-only get-together. Or just make them for yourself!
I can’t wait to make – and enjoy – these with Lily when she’s older :).
2 1/2 Tbsp virgin coconut oil, melted and then cooled to room temperature (you want the oil to be liquid, but not warm)
2 1/2 Tbsp unsweetened dark cocoa powder, sifted to remove any lumps
1 Tbsp pure maple syrup, preferably grade B, at room temperature (if you add cold ingredients to melted coconut oil, the oil with solidify)
Instructions
If you haven’t already, peel, slice, and freeze the banana.
Spread a bit of peanut butter onto the bottom of each cracker.
Place a frozen banana slice onto one of the pb-covered crackers. Top with another pb-covered cracker.
Repeat previous step with remaining crackers & bananas.
Place assembled cracker bites back into the freezer.
In a bowl, stir together the melted coconut oil, sifted cocoa powder, and room-temperature maple syrup until very smooth.
Dunk half of each cracker bite into the chocolate sauce. Place chocolate-dipped cracker bites into the freezer for a third time, until the chocolate sauce has hardened into a shell, about 5 minutes.
Thanksgiving is, without a doubt, my favorite day of the year. Sharing a bountiful meal with family and friends as the sun sets on a cool Autumn evening is the perfect occasion to ruminate over what we are thankful for. My family’s tradition for the last Thursday in November commences with a hearty breakfast followed by “stuffing and trussing” the turkey. Once the bird is tucked into the oven, we convene for a leisurely hike to stretch our legs, admire the migrating geese and give the dogs a good run-around. Once back home, we shed our fleece jackets, knit hats, and woolen gloves into a pile by the front door, and congregate around a roaring wood fire. Some fold themselves into cozy love seats accompanied by a soft blanket and captivating novel, while others gather around a board game. We all take frequent trips into the kitchen, unable to ignore the incredibly tantalizing aromas wafting throughout the house. Handfuls of nuts and bites of light hors d’oeuvres whet our appetites for the impressive spread of golden-brown roast turkey, baked stuffing, sweet potato casserole, sauteed green beans with toasted almonds, jeweled cranberry sauce, and waldorf salad. After sharing stories and many laughs, we convince ourselves that there is room in our distended bellies for a sampling of pecan pie, apple crisp, and pumpkin pie. Then we roll ourselves back into the living room and lounge until we can no longer keep our eyes open.
It is a good day.
This year marks my first Thanksgiving away from my parents and brother, but I will be surrounded by family and friends nonetheless. My husband and I will be making the short drive down to Connecticut to spend the festive holiday with his family. Although I will miss the traditions that I have enjoyed in years past, I am looking forward to participating in those of my new in-laws.
Speaking writing (?) of new traditions, a friend of ours is hosting a pre-Thanksgiving feast this weekend. Mike will provide the bird, and his guests will adorn the table with a variety of side dishes and desserts. John and I were asked to bring mashed potatoes, so I set to work on Saturday morning whipping up a Thanksgiving-worthy version of this classic turkey accompaniment. I prefer the chunkier texture of “smashed” to “mashed” potatoes, but you could certainly peel the potatoes prior to cooking and whip them after cooking to achieve a smoother consistency. I lightened this typically heavy dish by subbing in 2% milk for the heavy cream and 2% Greek yogurt for the sour cream, as well as significantly cutting down on the amount of butter. To pump up the flavor factor, I added in a generous amount of roasted garlic. Two whole heads of garlic may sound excessive, but the roasting process does a beautiful job of mellowing out the naturally pungent flavor of the raw vegetable.
4 lbs red potatoes, scrubbed and cut into 2-inch pieces
1 1/2 cups 2% reduced fat milk
2 Tbsp butter or margarine
1/2 cup 2% plain Greek yogurt
Directions
Preheat oven to 450*F.
Slice each head of garlic in half widthwise, and drizzle with olive oil.
Wrap garlic in foil and roast for 30-40 minutes, until the garlic cloves have softened. Let cool, then squeeze the garlic pulp out of the papery skin. Mash in a small bowl.
Cover the potatoes with cold water in a large stock pot. Bring water to a boil, reduce heat to a simmer, and cook the potatoes for 10-15 minutes, until easily pierced with a knife.
Drain the water from the pot, and add to the potatoes the mashed roasted garlic, milk, butter, and Greek yogurt. Smash with a potato masher until desired texture is achieved. Season generously with salt and pepper.
Although I would never part with my favorite sweet potato casserole, these smashed potatoes are good enough to earn a place on the Thanksgiving table.
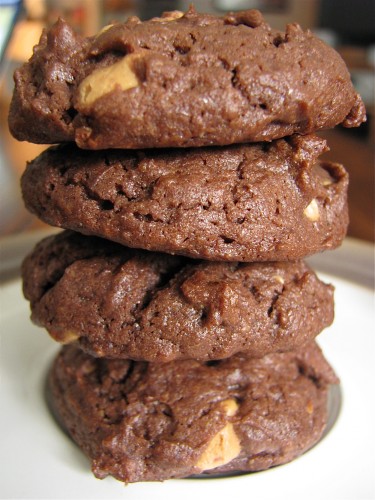
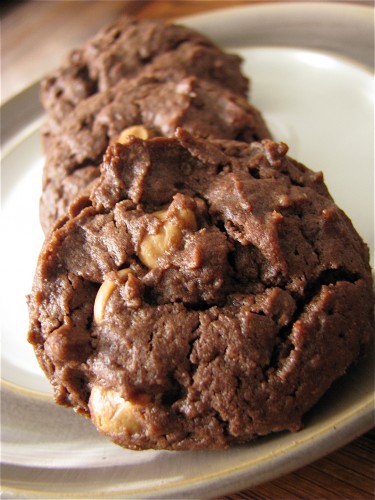
As much as I adored my Flourless White Chocolate Peanut Butter Cookies, these dark chocolate peanut butter spin-offs might be even better.
Flourless chocolate desserts – such as cakes or tortes – are known for their exorbitantly dense fudge-like texture, and can be difficult to get through without a few sips of water, milk, or wine in between each decadent bite. Although those rich treats have their loyal followers, I typically prefer a dessert with a lighter consistency. Regardless of which category you fall into, these flourless cookies are sure to win you over as they strike the perfect balance of intense chocolate flavor and light chewy texture.
The best word I can think of to describe the texture of these cookies is pillowy. The slightest bit of crisp coating gives way to a soft and brownie-like interior dotted with creamy peanut butter chips. A word of caution: don’t be tempted to bake the cookies until they’re completely firm; in order to achieve the right lightness, they must be taken out of the oven while still seemingly under-baked. As they cool, the cookies will set up a bit, but will remain soft and chewy.
I can’t imagine that this will be the case, but if there are leftover cookies, they can be stored in – and enjoyed straight from – the freezer.
My first peanut butter recipe for the Peanut Butter & Co. All-Star Recipe Blog is posted today! Head on over to check out my Peanut Butter Chicken Chili.
In celebration, I have decided to give away one jar of peanut butter to a lucky reader.
How is it possible that I have never hosted a giveaway on Healthy Food For Living?
Preheat your oven to 350°F (175°C) and grease a 9×5-inch loaf pan.
In a large mixing bowl, combine the mashed bananas, PB & Co. Smooth Operator peanut butter, honey, granulated sugar, egg, and vanilla extract. Mix until well combined.
In a separate bowl, whisk together the flour, baking soda, and salt.
Gradually add the dry ingredients to the banana mixture, alternating with buttermilk, beginning and ending with the dry ingredients. Mix until just combined. If desired, fold in chopped nuts for extra crunch.
Pour the batter into the prepared loaf pan and smooth the top.
Bake for 50-60 minutes or until a toothpick inserted into the center comes out clean.
Allow the banana bread to cool in the pan for 10 minutes before transferring it to a wire rack to cool completely.
Once the banana bread has cooled, drizzle it with PB & Co. White Chocolate Wonderful peanut butter for an indulgent finish.
Wow, what a fantastic response to the PB & Co. giveaway! You guys clearly love peanut butter just as much as I do. The responses were pretty evenly split between White Chocolate Wonderful and Cinnamon Raisin Swirl.
We have a winner…
Random Integer Generator
Here is the random number:
177
Timestamp: 2011-03-11 7:59:47 EST
# 177 Anna said “I would def. love the cinnamon raisin swirl! mmmm! my favorite way to enjoy pb is simple: toast!”
Anna, you have a jar of Cinnamon Raisin Swirl peanut butter coming your way :). Kindly send me an email at foodliving AT gmail DOT com with your full name and address when you get the chance! PB & Co. has kindly offered to ship off your winnings, so you can expect a package sent directly from them.
Many of you mentioned that you can’t find certain flavors at your local grocery stores. I highly suggest placing an order through the Peanut Butter & Co. website – trust me, it’s worth the shipping charges!
I’ve had a lot of fun reading through this survey on friends’ blogs, so I thought I’d jump on the bandwagon and fill it out myself.
Here we go!
A-Z Survey
A. Age: 28
B. Bed size: A queen cherrywood sleigh bed, which is too small for John, me, Roxie (cat), and Shelby (dog). We need a king!
C. Chore you dislike: Cleaning the toilets. Which is why this is John’s chore ;).
D. Dogs: Best animals on the planet (sorry, Roxie). Shelby is a 6 year old mixed breed we adopted from the SPCA, and my life would not be the same without her! I had dogs growing up as well (golden retrievers and labs), and luckily John became a dog person after we started living together.
E. Essential start to your day: Breakfast! I typically eat breakfast within 1/2 hour of waking up. I’m usually pretty hungry in the mornings.
F. Favorite color: Green & blue. And Purple. And all shades in between. I like cool colors better than warm!
G. Gold or silver: I actually don’t wear much jewelry – the only pieces I wear everyday are my engagement and wedding rings. That being said, I prefer silver to gold.
H. Height: 5’4″. Wish I was taller, but what can you do.
I. Instruments you play(ed): I took piano lessons throughout elementary/middle school, played clarinet and violin in elementary school, and dabbled with guitar in college. I’d really like to get better at the latter – John is my inspiration as he is quite the guitar player.
J. Job title: Special educator, food blogger, recipe developer.
K. Kids: Soon!
L. Live: Currently, we live in a sun-drenched apartment in the suburbs just west of Boston. We’re looking into buying a house, and probably won’t stray too far away from where are now.
M. Mom’s name: Melinda/Mel.
N. Nicknames: Laur, L, The Carbo Queen (thanks, Dad), Breecker (my maiden name), Breecks, L-Dawg (from college… don’t ask, because I don’t have an answer!).
O. Overnight hospital stays: None, thank goodness.
P. Pet peeves: Massholes (bad Massachusetts drivers), people who complain all of the time, and people who try to push their beliefs/opinions on others.
Q. Quote from a movie: Can I pick one from a book instead? “I prefer the saddle to the streetcar and star-sprinkled sky to a roof, the obscure and difficult trail, leading into the unknown, to any paved highway, and the deep peace of the wild to the discontent bred by cities…It is enough that I am surrounded with beauty.” ~ Everett Ruess, excerpted from Into The Wild by Jon Krakauer
R. Righty or lefty: Righty.
S. Siblings: Older brother Dan, who lives in Austin with his wife and two adorable kids.
T. Time you wake up: 4:45 with John’s alarm, then 6:00 with mine. 6:30 on the weekends. What can I say… I’m a morning person.
U. Underwear: Um… yes?
V. Vegetables you don’t like: Cabbage & mushrooms. Blech. And olives. Wait, are those a fruit?
W. What makes you run late: Honestly, not much. I am usually too early.
X. X-rays you’ve had: Routine dental and tibia (shin bone) when I broke it playing soccer. I played tennis from there on out.
Y. Yummy food you make: Hopefully everything that makes it onto the blog! I suppose my “signature” recipes are the varieties of mini cheesecakes and dried fruit & nut “truffles”/bites. I also adore pretty much anything withsweetpotatoesin it.
These truffles are comprised of medjool dates, apple juice sweetened dried blueberries, cashews, and unsweetened coconut flakes. I entertained the idea of playing around with coconut extract, cinnamon, and salt for added flavor, but ended up really enjoying the truffles as they are.
Place chopped dates and heaping 1/4 cup dried blueberries into the bowl of a food processor, and process until they form a chunky paste, about 20-30 seconds.
Place cashews into the food processor bowl along with the dried fruit paste, and process until mixed, about 10-20 seconds. Remove mixture from food processor.
“Knead” the remaining 1 Tbsp dried blueberries into the dough, until well-incorporated. The mixture will be sticky.
Form 8 small balls out of the mixture by rolling them between your palms. Set aside.
Place the shredded coconut onto a cutting board or plate and roll the balls around in the coconut until fully coated.
Once again, roll the balls between your palms so that the coconut adheres and creates a “crust”.
Store in the refrigerator.
Estimated Nutrition Per Serving (1 truffle)
Calories: 100 kcal
Total Fat: 6g
Saturated Fat: 4g
Trans Fat: 0g
Cholesterol: 2mg
Sodium: 20mg
Total Carbohydrates: 11g
Dietary Fiber: 1g
Sugars: 9g
Protein: 1g
Please note that these nutrition values are approximate and can vary based on the specific brands and ingredients used.
If you’re searching for a delightful twist on the classic Swiss potato dish, look no further than Crispy Sweet Potato Rösti. This dish combines the earthy sweetness of sweet potatoes with the irresistible crispy texture of a traditional rösti. It’s a perfect side dish or even a standalone meal for brunch or dinner. Follow this simple recipe to create a mouthwatering crispy sweet potato rösti that will leave everyone at the table craving for more.
Name
Crispy Sweet Potato Rösti
Cuisine
Fusion (Swiss-inspired)
Prep Time
15 minutes
Cooking Time
20 minutes
Total Time
35 minutes
Servings
4 servings
What the heck is a Rösti?
It’s basically a big latke-type potato pancake that is fried until super crispy and then cut into wedges. This is a basic recipe, which calls for only grated sweet potatoes, olive oil, salt, and pepper; but onions, scallions, garlic, herbs, etc. would be delicious flavor additions.
The flipping technique might sound a bit tricky, but it’s actually fairly easy. You just need a plate that fits snuggly into a 10-inch skillet, as shown above. I think the hardest part of the process is patiently waiting for the potatoes to reach crispy perfection – which takes about 25 minutes…
… but is definitely worth the wait! Sweet potatoes take a while to crisp up, but the end result is delightful.
Start by grating the peeled sweet potatoes using the large holes of a box grater. You want thin, even shreds for the best texture.
Squeeze Out Excess Moisture
Place the grated sweet potatoes in a clean kitchen towel or cheesecloth. Squeeze out as much excess moisture as possible. This step is crucial for achieving a crispy rösti.
Combine Ingredients
In a large mixing bowl, combine the grated sweet potatoes, chopped onion, minced garlic, salt, black pepper, and paprika if you’re using it. Mix everything together until well combined.
Heat Butter and Oil
In a large skillet (preferably non-stick), heat the butter and olive oil over medium-high heat. Allow the butter to melt and coat the bottom of the skillet evenly.
Press the Sweet Potato Mixture
Once the skillet is hot, add the sweet potato mixture. Use a spatula or the back of a spoon to press the mixture down firmly, creating a flat, even pancake shape. Press it down firmly to help it hold together.
Cook Until Crispy
Cook the rösti on medium-high heat for about 8-10 minutes or until the bottom is golden and crispy. You can periodically lift the edge with a spatula to check the color.
Flip the Rösti
Carefully place a large plate or a lid over the skillet. Hold it firmly and flip the skillet upside down, so the rösti lands on the plate. If needed, add a little more butter or oil to the skillet before sliding the rösti back into the pan to cook the other side. Cook for an additional 8-10 minutes or until the second side is also golden and crispy.
Serve
Once both sides are crispy and the sweet potatoes are cooked through, transfer the crispy sweet potato rösti to a serving plate. Garnish with fresh herbs, like rosemary or thyme, for added flavor and presentation.
Slice and Enjoy
Slice the rösti into wedges or squares and serve immediately while it’s still hot and crispy.
This Crispy Sweet Potato Rösti is a delightful combination of crispy and tender, sweet and savory. It makes a fantastic side dish for a variety of meals, or you can enjoy it as a satisfying main course. Give this recipe a try, and you’ll have a new favorite way to enjoy sweet potatoes!
Sound like a strange combination? I used to think so, too… but I’ve come to fully embrace the surprisingly scrumptious pairing of the two.
The inspiration for this summery dessert was yet another purchase from the Boston Olive Oil Company.
Vanilla Balsamic Vinegar.
This slightly sweet and intensely aromatic vinegar is definitely a dessert-worthy ingredient. When combined with a bit of sugar, balsamic vinegar breaks down, softens, and flavors whatever berries you choose to pair it with.
My berry of choice was obviously strawberries, but the macerating method would work beautifully with raspberries and/or blueberries as well.
You could even separately macerate red berries & blueberries to layer with the white ricotta for a patriotic 4th of July dessert!
Now, on to the other component of this beautiful layered dish: ricotta cheese. Ricotta has an underlying natural sweetness, rendering added sugar unnecessary.
My berry of choice was obviously strawberries, but the macerating method would work beautifully with raspberries and/or blueberries as well.
Now, on to the other component of this beautiful layered dish: ricotta cheese. Ricotta has an underlying natural sweetness, rendering added sugar unnecessary.
See those vanilla bean specks? No need to buy a ludicrously expensive vanilla bean – vanilla bean paste will do the trick. The vanilla ricotta tastes like partially melted (albeit somewhat grainy) french vanilla ice cream, I kid you not.
And when you pair together that rich & creamy ricotta and those juicy & sweet vanilla balsamic strawberries, something pretty fantastic happens.
This dessert came out even better than I could have hoped!
The acidic balsamic vinegar is the perfect compliment to the sweet berries, and the vanilla-specked ricotta cheese pulls it all together.
I know that some parfaits and trifles can be made in advance and chilled in the fridge until serving, but I would caution you against doing so in this particular case. If the assembled dessert sits for too long, the vinegar will seep into the cheese, and you’ll end up with brownish ricotta – not pretty. I also prefer the strawberries at room temperature to when they’re cold; I think their flavor is more pronounced.
Have I successfully convinced you to use balsamic vinegar in your desserts yet?
I certainly hope so.
Enjoy the remainder of the holiday weekend! John and I are taking the transcontinental journey out to California for a mini vacation followed by his company’s three-day conference, but I’ve already planned a couple of recipes to post. If I get some good shots of the west coast, I’ll be sure to share them with you!
1 Tbsp vanilla balsamic vinegar, available at Boston Olive Oil Company, alternately, you can use 1 Tbsp regular balsamic vinegar + 1/4 tsp pure vanilla extract
1 Tbsp evaporated cane juice or other non-refined granulated sugar
1/2 cup + 2 Tbsp part-skim ricotta cheese
1 tsp pure vanilla bean paste
Directions
Gently toss the chopped strawberries with the vanilla balsamic vinegar and the evaporated cane juice. Let sit and macerate at room temperature for 30 minutes.
Meanwhile, stir together the ricotta and vanilla bean paste.
Layer the macerated strawberries and vanilla ricotta into glasses.
There’s something truly comforting about the aroma of freshly baked apple crisp wafting through the kitchen.
It’s a classic dessert that brings back memories of home and the love and care that goes into each delicious bite.
Today, we’re sharing a cherished family recipe for Mom’s Apple Crisp that’s sure to warm your heart and satisfy your sweet tooth.
Name:
Mom’s Apple Crisp
Cuisine:
American
Prep Time:
20 minutes
Cooking Time:
45 minutes
Total Time:
1 hour
Servings:
8 servings
Yield:
1 9×9-inch baking dish
Ingredients:
For the Filling:
6-7 medium-sized apples (a mix of sweet and tart varieties like Granny Smith and Honeycrisp works well)
1/2 cup granulated sugar
1 teaspoon ground cinnamon
1/4 teaspoon ground nutmeg
1/4 teaspoon salt
1 tablespoon lemon juice
1 teaspoon vanilla extract
For the Topping:
1 cup old-fashioned rolled oats
1/2 cup all-purpose flour
1/2 cup brown sugar (packed)
1/2 cup unsalted butter (cold and cubed)
1/4 teaspoon baking powder
1/4 teaspoon baking soda
1/4 teaspoon salt
1/2 teaspoon ground cinnamon
Instructions
1. Preheat the Oven
Preheat your oven to 350°F (175°C). Grease a 9×9-inch (23×23 cm) baking dish or a similar-sized ovenproof dish.
2. Prepare the Apples
Peel, core, and thinly slice the apples. Place them in a large mixing bowl.
3. Add the Filling Ingredients
In the bowl with the sliced apples, add the granulated sugar, ground cinnamon, ground nutmeg, salt, lemon juice, and vanilla extract. Toss everything together until the apples are well coated with the mixture.
4. Make the Crisp Topping
In a separate bowl, combine the old-fashioned rolled oats, all-purpose flour, brown sugar, cold and cubed unsalted butter, baking powder, baking soda, salt, and ground cinnamon. Use a pastry cutter or your fingers to mix the ingredients until they resemble coarse crumbs.
5. Assemble the Crisp
Spread the apple mixture evenly in the greased baking dish.
Sprinkle the crisp topping over the apples, covering them completely.
6. Bake to Perfection
Place the dish in the preheated oven and bake for 40-45 minutes, or until the topping is golden brown, and the apples are tender and bubbling.
7. Serve and Enjoy
Remove the Mom’s Apple Crisp from the oven and let it cool slightly. It’s best served warm, either on its own or with a scoop of vanilla ice cream or a dollop of whipped cream.
Tips and Variations
For an extra crunch, consider adding chopped nuts (such as walnuts or pecans) to the crisp topping.
You can adjust the sweetness to your liking by adding more or less sugar in the filling.
Experiment with different apple varieties to find your favorite flavor combination.
Drizzle caramel sauce over the top for an indulgent twist.
Leftover apple crisp can be stored in the refrigerator and reheated in the oven for a warm and comforting treat.
Mom’s Apple Crisp is a timeless dessert that’s perfect for family gatherings, holidays, or just because. It’s a simple yet incredibly satisfying dessert that will fill your home with the aroma of love and nostalgia. So, gather your loved ones and enjoy a slice of this heartwarming treat—it’s a taste of home that’s hard to beat.
This past weekend John, Shelby and I drove down to PA; John spent the weekend with some friends for their annual fantasy baseball draft and I stayed at my parents’ with the pooch.
At a breezy 70°, the weather on Saturday couldn’t have been more perfect, and we took advantage of the spring-like temperatures by taking a walk over to the pond abutting my folks’ property.
Shelby had a blast chasing Zack – my parents’ Bichon – around the pond…
… as well as wading into the mucky pond water. It was a hassle to clean her up, but she had so much fun that I couldn’t really be angry!
We stumbled upon some early signs of Spring along our walk, including this little guy. Does anyone else call these furry brown & black caterpillars “fuzzy wuzzies”?
Just me?
Other sightings included a patch of eggplant-colored skunk cabbage:
A random animal bone:
A horseshoe (horseback riding is huge around where I grew up):
And a dried stalk of fluffy milkweed:
It was so nice to get outside and enjoy the glorious weather, especially since it is now snowing back up in Boston!
A couple of other items from my trip home worth mentioning are these two books given to me by my dad:
The first book is the story of Chef Grant Achatz (of Chicago restaurant Alinea) – awarded the James Beard Foundation Outstanding Chef in America title – and his battle with tongue cancer. After undergoing aggressive chemo therapy, Grant lost all sense of taste. Rather than allowing this misfortune to force an early retirement from his culinary profession, Grant embraced his remaining senses to create unique and incredibly creative dishes. I’m intrigued to read about some of his concoctions!
The second book is a memoir by Chef Gabrielle Hamilton (of New York restaurant Prune). The book follows Gabrielle as she grows up in a multitude of culinary settings throughout the years. From what I’ve heard, she’s as prolific an author as she is a talented chef.
I’m excited to read both of these books, but can’t decide which one to crack open first!
Another highlight of my trip home was a delicious homemade belated birthday dinner, which concluded with my Mom’s apple crisp. She offered to bake a cake or other celebratory dessert, but I absolutely love her healthy apple crisp, so that was my request :).
The recipe is adapted from this cookbook from the ’70s, which has become well-worn over the years. The apple crisp recipe is categorized under a section entitled “Desserts Can Contribute to Health” – which is clearly right up my alley!
I love the stains on these pages; my mom has made this crisp countless times over the past few decades, and here is the visible proof. Most of my cookbooks are in pristine condition, as I rarely use them. The Internet generation has completely changed the way we retrieve recipes, and I’m counting this book as a reminder to flip through my cookbooks more often.
My mom uses the Apple Crisp variation to the Apple Betty recipe, and adds walnuts into the topping for added crunch and flavor.
This crisp embodies home to me.
Tender tart apples are topped with a healthy mixture of wheat germ, whole wheat pastry flour, sugar, cinnamon, walnuts, and a touch of butter.
I enjoyed a hearty serving for dessert topped with vanilla ice cream, as well as a few spoonfuls with Greek yogurt the next morning for breakfast.
Delicious!
Thanks for a wonderful weekend, Mom and Dad. I love you :).
5 tart baking apples (we used unpeeled Granny Smith), cored
1/4 cup water
1/4 cup wheat germ
1/4 cup whole wheat pastry flour
1 tsp ground cinnamon
1/4 cup granulated sugar
1/4 cup brown sugar
1/4 cup chopped walnuts
2 Tbsp chilled butter, cut into small pieces
Estimated Nutrition Per Serving:
Calories:
320 calories
Total Fat:
13g
Saturated Fat:
8g
Cholesterol:
32mg
Sodium:
215mg
Total Carbohydrates:
51g
Dietary Fiber:
4g
Sugars:
34g
Protein:
2g
Directions
Preheat oven to 375°F.
Thinly slice apples and lay them – in an even layer – in a buttered/greased baking pan (we used a 9 x 13 inch pan, but I think an 8 x 8 inch pan is preferable as it will yield a thicker apple crisp). Pour water over sliced apples.
In a medium mixing bowl, combine the wheat germ, flour, cinnamon, both sugars, and walnuts. Whisk until combined.
Sprinkle crisp topping evenly over the apples and dot with pieces of butter.
Bake for 30 minutes, or until the apples are tender and the crisp topping is golden brown.
…the lighting kit I bought works really well! I took these photos at 7:30 p.m. last Saturday night (yep, the night the Nor’easter swept over the East coast) and I couldn’t be happier with the appearance of natural light. This opens up so many more hours for me to photograph food – which means no more making dinner in the middle of the day if I want to post it on the blog ;).
Good new for you…
…this apple crisp rocks, and it can should be on the table in front of you tonight.
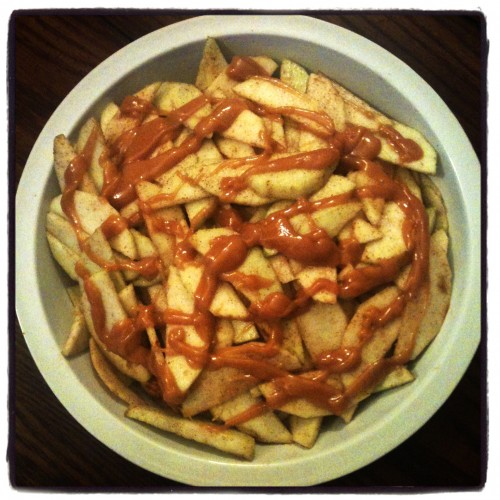
I had been brainstorming ideas for an apple crisp with peanut butter and caramel for a few weeks before I read Isa Chandra’s post for her Peanut Butter Caramel Apples. I loved the sound of a homemade vegan caramel sauce using only peanut butter and brown rice syrup, so I scrapped the idea of using Trader Joe’s Fleur de Sel Caramel Sauce (which is also fantastic… but not exactly healthy) and instead followed Isa’s lead.
Thinly sliced Granny Smith apples are tossed with lemon juice, arrowroot powder, cinnamon, and a bit of sugar before being drizzled with Isa’s peanut butter caramel sauce and topped with a peanut butter crumble.
Is there anything more heart-warming, comforting, and delicious than warm apple crisp? I’m sure I’ve said the same exact thing about mac & cheese, butternut squash soup, rice pudding, and other cold-weather classics… but on that particular snowy evening in October, this crisp was pretty much bliss-on-a-plate.
The peanut butter caramel sauce-laced apples cook down until soft & sweet and the crumble topping crisps up into a rich crunchy crust; all without any butter or oil.
Preheat oven to 350°F. Lightly grease a 9 inch pie plate (you could also use an 8 x 8 inch baking pan).
In a large bowl, combine the sliced peeled apples, arrowroot, lemon juice, sugar, and cinnamon. Use your hands to combine. Pour apple mixture into the prepared baking dish.
In a small nonstick saucepan set over medium-low heat, combine 2 Tbsp peanut butter and brown rice syrup. Heat, stirring slowly but constantly, until the mixture becomes smooth and drippy, about 1-2 minutes; do not let boil. Remove peanut butter caramel from heat and drizzle evenly over the apples.
In a medium bowl, whisk together the flour, brown sugar, rolled oats, chopped peanuts, and salt. Add in the remaining 1/3 cup peanut butter and work it into the dry ingredients using your fingertips. Mixture should resemble coarse sand with pebbles strewn throughout.
Evenly distribute the crisp topping over the peanut butter caramel-drizzled apples.
Bake for 40 minutes, or until the crisp topping is golden brown. Check about halfway through; if crisp topping is browning too fast, tent with aluminum foil for remainder of baking time.
Serve warm topped with vanilla ice cream, or straight from the fridge with Greek yogurt the following morning ;).
Estimated Nutrition per Serving
Please note that these nutrition values are approximate and can vary depending on specific ingredients and portion sizes:
Calories: 330 kcal
Total Fat: 14g
Saturated Fat: 5g
Trans Fat: 0g
Cholesterol: 15mg
Sodium: 160mg
Total Carbohydrates: 48g
Dietary Fiber: 4g
Sugars: 31g
Protein: 5g
Keep in mind that these values are estimates and may vary based on the brands and specific ingredients you use. Enjoy your Peanut Butter Caramel Apple Crisp!