I typically associate pesto with warm weather given the fact that the main ingredient in the traditional version – basil – is in season during the summer, but a simple swap with broccoli turns the classic pasta accompaniment into a winter-friendly recipe.
I also swapped the traditional pine nuts for walnuts because a) they’re healthier and b) they’re less expensive; but the rest of the usual ingredients can be found in this pesto.
If you have broccoli-haters in your house, fear not; the final product does not taste much like broccoli at all, but it is a great way to sneak some of the cruciferous green veggie into a pick eater’s pasta dinner.
I prefer pesto on the thicker side so it’s not overly oily, but you can certainly add more olive oil to the recipe if you like a thinner consistency. Thicker pesto is also better for dipping crudite into or spreading onto bread for sandwiches, which I highly recommend!
Of course, the most popular way to eat pesto is to stir it into pasta, which is how we enjoyed it.
Green in winter!
Broccoli-Walnut Pesto
by Lauren Zembron
Name
Broccoli-Walnut Pesto
Cuisine
Italian
Prep Time
10 minutes
Cooking Time
3 minutes (blanching)
Total Time
13 minutes
Servings
About 8 servings
Yield
Approximately 1.5 cups
Ingredients
1 head broccoli, preferably organic, crowns chopped into 1-inch florets (about 3 cups)
1/2 cup toasted walnuts
1 garlic clove, peeled & chopped
1/4 cup freshly grated parmesan cheese
6 Tbsp extra virgin olive oil, or more depending on desired consistency
1 Tbsp freshly squeezed lemon juice
Kosher salt and freshly ground black pepper, to taste
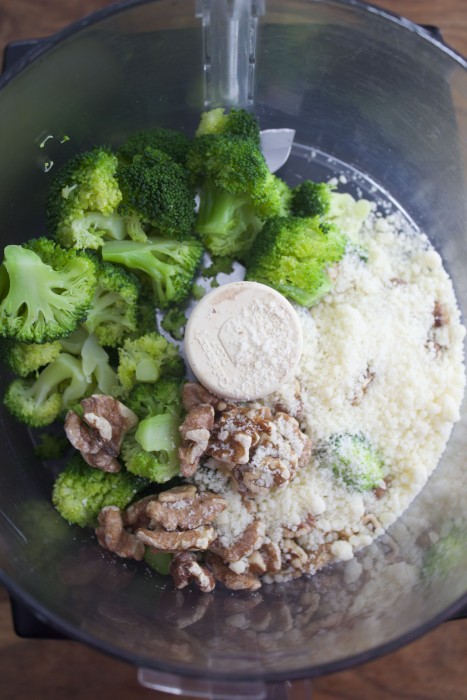
Instructions
Bring a pot of lightly salted water to a simmer. Carefully add the broccoli florets and cook until tender and bright green, about 3 minutes.
Drain cooked broccoli and pat dry with a clean kitchen towel or paper towels; place in the bowl of a food process along with the toasted walnuts, garlic, and parmesan. Process until finely chopped.
With the motor running, stream in the olive oil and lemon juice through the feed tube; process until fully combined. If you prefer a thinner, more runny consistency, stream in additional olive oil (one tablespoon at a time), until desired consistency is reached.
Season to taste with salt and pepper.
Best if eaten immediately.
Estimated Nutrition Per Serving
Calories: 125 calories
Total Fat: 11g
Saturated Fat: 2g
Trans Fat: 0g
Cholesterol: 4mg
Sodium: 114mg
Total Carbohydrates: 3g
Dietary Fiber: 1g
Sugars: 0.5g
Protein: 4g
Vitamin D: 0%
Calcium: 60mg
Iron: 1mg
Potassium: 130mg
Please note that these nutritional values are approximate and can vary based on the specific brands of ingredients used and the serving size.
It should come as no surprise to you when I say that I love almonds. The little nutritional powerhouses are one of my go-to snacks, and I love to incorporate almonds in all of their forms (almond flour, almond butter, almond extract, etc.) to recipes. Case in point. So I – of course – jumped at the chance to join healthyfoodforliving.com in their effort to spread the word about the health benefits of almonds.
Before we get to the recipe, (which, believe me, you want to stick around for), let’s chat for a bit about what makes almonds so fantastic. First of all, they are loaded with vitamins, minerals, protein, and fiber. Including almonds in your diet can help to lower cholesterol and reduce the risk of cancer & heart disease. Second of all, they are delicious and can be enjoyed in a vast variety of ways.
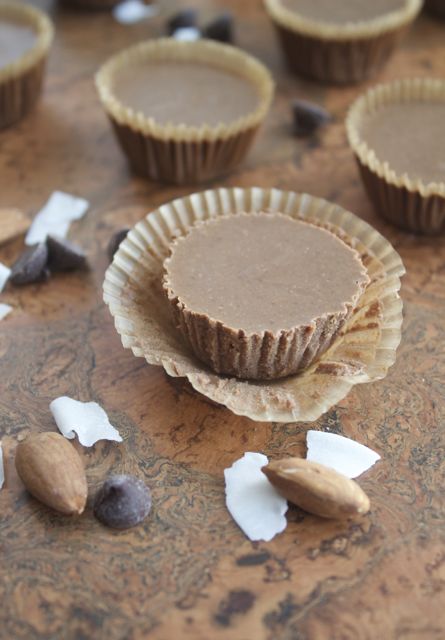
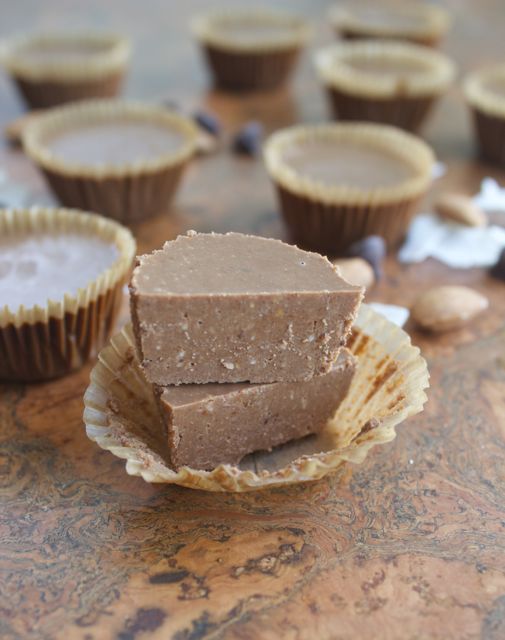
For this recipe, I combined almonds, unsweetened coconut flakes, and dark chocolate to create little two-bite treats that taste like the popular candy bar in fudge form.
The bites require no cooking, and can be whipped up in mere minutes. Straight out of the food processor, the mixture is the consistency of nut butter, but it sets up into a dense fudge-like texture when chilled in the refrigerator.
It is nearly impossible to eat just one of these; you have been warned!
If you have yet to include almonds into your diet, hopefully this recipe will entice you to start; and be sure to check out Nuts.com for their wide (and tempting!) variety of almond offerings by clicking here.
Line a 12 cup mini muffin tin with mini muffin liners.
Combine almonds and coconut flakes in the bowl of a food processor fitted with the steel blade. Process until the almonds and coconut break down into a smooth butter, scraping down the sides of the bowl as necessary, about 5-10 minutes.
Add in the coconut oil, salt, and chocolate chips; process until the coconut oil & chocolate have melted and are fully combined (the heat from the food processor will melt the chocolate).
Evenly divide the mixture amongst the lined muffin cups. Chill in the refrigerator until set, at least 2 hours.
Peel off the muffin liners. Store in refrigerator.
Estimated Nutrition Per Serving
Calories: ~120 calories
Total Fat: ~9g
Saturated Fat: ~4g
Cholesterol: ~0mg
Sodium: ~30mg
Total Carbohydrates: ~10g
Dietary Fiber: ~2g
Sugars: ~6g
Protein: ~3g
Please note that these nutrition estimates are approximate and may vary based on specific ingredients and portion sizes. It’s always a good practice to calculate nutrition based on the exact ingredients and quantities used.
I am beyond excited to share a new (to me) discovery with you: Not Your Sugar Mamas, a Martha’s Vineyard-based store that sells handmade chocolates and other goodies without any refined sugars. The high-quality chocolate bars are:
made with 75% cacao
non GMO
gluten- and dairy-free
made with all-natural ingredients
refined sugar free
handmade
certified organic
comprised of both direct and fair trade ingredients, as well as locally sourced ingredients
The first two ingredients listed on the label of every chocolate bar are organic raw cacao & organic raw cacao butter. There are no emulsifiers, and you can tell not only from the ingredient list but also from the way the silky chocolate melts in your mouth.
The chocolate bars come in a variety of uniquely delicious flavors:
These are not your average chocolate bars; not by a long shot. They are less sweet, but much more flavorful than anything you can find in the checkout line at the grocery store. They are packed with superfood ingredients, and are healthy enough to eat for breakfast (one serving of any of the chocolate bars has less than 6 grams of sugar or less).
Each of the bars boasts one of these little stickers, reminding you that they are handmade with love…
… and are packaged in 100% recycled paper with inspirational quotes (such as the one photographed below) printed on the inside of the wrapper:
Not Your Sugar Mamas
So, that’s the chocolate.
Then there’s the cookies:
Oh, these cookies. I am officially obsessed! Made with nutrient-dense ingredients, these chocolate chip cookies are fan-freakin’-tastic. There’s only one left in the package, and it’s going to be a sad day after that one goes down the hatch (which will probably be tomorrow).
If you’re lucky enough to frequent the Vineyard, be sure you check out one of Not Your Sugar Mamas two Chocolate Cafes (Vineyard Haven & Edgartown) for even more goodies, including fresh smoothies, baked goods, raw treats, cupcakes, truffles, scones, muffins, and coffee. I will be on the Vineyard late this summer, and you can bet I’m going to stop in to at least one of the locations!
If you’re nowhere near Martha’s Vineyard and have no plans to visit, check out their online store here.
I’m thrilled to be a participant in the blog tour for the gorgeous cookbook Love Fed: Purely Decadent, Simply Raw, Plant-Based Desserts by Christina Ross, which is chock full of gluten-free, dairy-free, and refined sugar-free vegan treats.
Christina’s recipes are enticing in name alone, (Triple-Layer German Chocolate Cake, Raspberry and Coconut Glazed Doughnuts, and Maple Banana Tiramisu Trifle to name a few), but add her gorgeous photographs, and I guarantee you’ll be running to the kitchen to make one of her beautiful desserts.
I chose to make her Maple Banana Tiramisu Trifle, and am happy to be able to share the recipe with you!
Maple Banana Tiramisu Trifle
Name:
Love-Infused Quinoa Bowl
Cuisine:
Fusion
Prep Time:
15 minutes
Cooking Time:
25 minutes
Total Time:
40 minutes
Servings:
4 servings
Yield:
4 quinoa bowls
This is my raw-vegan mash-up of two favorite European desserts: English trifle and Italian tiramisu. The result is a sophisticated dessert worthy of any fancy tabletop.
1⁄4 c. cold-brewed coffee or 1 tsp. coffee extract
1⁄4 c. maple syrup
1 tbsp. melted coconut oil
1 tsp. vanilla extract
1 tsp. lemon juice
CHOCOLATE SAUCE DRIZZLE
1 tbsp. cacao powder
1 tbsp. maple syrup
1⁄4 tsp. vanilla extract
3 bananas
11/2 tsp. cacao powder, for garnish
Instruction
To make the cream: Place the cashews, sea salt, almond milk, cold-brewed coffee, maple syrup, coconut oil, vanilla extract, and lemon juice in a blender and blend until very creamy.
Whisk the cacao powder, maple syrup, and vanilla extract together in a small bowl until smooth. Transfer to a squirt bottle, if you have one, or leave in the bowl until ready to use.
Cut each of the bananas into 3 even sections. Slice each section in half lengthwise (you will have 18 total pieces of banana). Place 2 of the banana sections in the bottom of a 33⁄4×41⁄4″ trifle glass or ramekin. Repeat in a second glass or ramekin. Squirt chocolate sauce (or drizzle with a spoon) along the rims of the glasses all the way around, reserving some for garnish. Next, add enough cream to cover the bananas. Layer another 2 bananas sections on top, then the cream.
Stand up the remaining 10 banana sections vertically around the sides of each glass (5 per glass), then pour in the cream to the top. Gently sift cacao powder on top and garnish with a drizzle of chocolate sauce. Serve immediately or let chill in the refrigerator for 30 minutes or until ready to serve. Can be stored in the refrigerator for up to 3 days.
The individual components of this trifle are fantastic all on their own, but when you combine them together, the result is pure bliss. I’m a sucker for coffee & chocolate together, so the coffee “cream” and chocolate sauce are – in my opinion – a match made in heaven.
Using bananas in place of the traditional ladyfingers in this raw version of tiramisu is brilliant. You can’t clearly see them in these photos because I drowned them in coffee cream and chocolate sauce, but there are bananas in there, I promise!
Here’s the image from the cookbook:
Hungry yet? Be sure to follow along with the tour for more of Christina’s scrumptious recipes!
Estimated nutrition per serving
Calories: Approximately 450 kcal
Protein: Approximately 15g
Carbohydrates: Approximately 55g
Dietary Fiber: Approximately 12g
Fat: Approximately 20g
Saturated Fat: Approximately 2.5g
Sodium: Approximately 450mg
Sugar: Approximately 6g
Please note that nutritional values are approximate and may vary based on specific ingredients and portion sizes used.
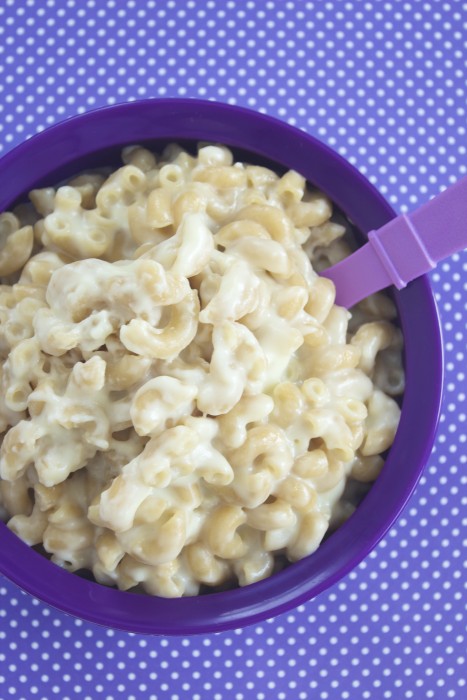
Exciting news, my friends: my second e-cookbook is in the works and I can’t wait to share the recipes with you! This one is all about toddler- and kid- approved food. There are recipes for breakfast, snack, lunch, dinner, and dessert; enough to last a full week.
Of course, all of the recipes will be healthy to appease the parents but delicious to satisfy the kiddos.
Here’s a sneak peak at some of the recipes that will be included in the ebook:
Here’s a sneak peak at some of the recipes that will be included in the ebook:
Be sure to check in with my Facebook page from time to time, as that is where I post the majority of my e-cookbook updates.
Whatever you call it, it is deeeeeelicious; every bit as scrumptious as that Deep-Dish Chocolate Chip Cookie for One that I haven’t been able to get out of my mind over the past couple of weeks.
This version uses oil instead of butter, white chocolate chips instead of grain-sweetened, and gets the added tastiness of cocoa powder for a brownie-like result.
The inside is soft, moist, and studded with melty white chocolate chips; the top is slightly crackly and crisp. In other words: pure decadence in a single-serving cup!
Can this be considered an appropriate (but infrequent) mid-afternoon snack? Because it totally was for me. Or maybe that’s just the pregnancy hormones talking.
In all seriousness, this is clearly an indulgent dessert to be enjoyed every once-in-a-while. But when you do make one of these brownie cookies for one, you’ll be in utter bliss.
That being said, if you’re wondering if there’s a way to make it even more decadent, I’m here to assure you that there most certainly is:
Top your still-warm brownie cookie with a scoop of vanilla ice cream or frozen yogurt!
Any dessert a la mode is fantastic, and this is no exception.
Deep-Dish White Chocolate Chip Brownie Cookie for One
by Lauren Zembron
Name:
Deep-Dish White Chocolate Chip Brownie Cookie for One
1/2 Tbsp unrefined granulated sugar, such as evaporated cane juice
1/2 Tbsp packed light brown sugar
1 Tbsp beaten egg, preferably organic (cover & chill remaining beaten egg for tomorrow’s cookie cup… you will be making another one!)
tiny splash pure vanilla extract
2 1/2 Tbsp whole wheat pastry flour
1 tsp cocoa powder
1/8 tsp baking soda
tiny pinch salt
heaping 1 Tbsp all-natural white chocolate chips, such as Sunspire
Instructions
In a small ramekin or microwavable cup, combine oil and both sugars; stir well with a spoon. Stir in beaten egg and vanilla extract. Stir in flour, cocoa powder, baking soda, and salt just until combined. Stir in chocolate chips.
Microwave on high for 35-40 seconds. Let cookie rest at room temperature for about 10 seconds before devouring.
Estimated Nutrition Per Serving
Calories: Approximately 450 kcal
Total Fat: 28 grams
Saturated Fat: 14-16 grams
Cholesterol: 115-130 mg
Sodium: 150-170 mg
Total Carbohydrates: 39-45 grams
Dietary Fiber: 1-2 grams
Sugars: 28-32 grams
Protein: 5-6 grams
Please note that these nutritional values are estimates and can vary based on the precise ingredients and quantities used. It’s always a good practice to calculate nutritional information based on the exact ingredients and serving sizes you use.
In fact, I used to detest the flavor and texture. As a little girl, I’d bypass all of the Mounds and Almond Joy bars in my Halloween loot and head straight for the Snickers and Twix bars.
Then I discovered the Girl Scout Caramel Delights cookies, (we didn’t call them Samoas down in PA where I grew up), and I changed my tune a bit. It must have been the caramel and chocolate that drew me in ;).
The next step I took towards gaining an appreciation for coconut was a virgin Pina Colada consumed at some point… and then a few years later, a not-so-virgin Pina Colada.
The culminating moment when I finally determined that I actually adored coconut was when I first tasted Thai coconut curry. Spicy and rich; savory with a kick of sweet.
I was sold.
Years after this epiphany, I was handed an individually wrapped coconut macaroon following a delicious French lunch at L’Espalier in downtown Boston. As I bit through the slightly crisp crust and into the soft center, I had one of those closed-eyes-everything-slows-down moments.
I had to recreate these at home!
Well, I finally found a recipe that caught my attention as being worthy of making. I made a half batch of Megan’s Detox Blonde Macaroons, and was ecstatic about how fantastic they were! The only caveat: they are pretty high in saturated fat. Yes, I know coconut is on the path to redemption after spending years on health professionals’ “don’t eat” lists, but I still think moderation is best.
On my second go-around, I attempted to make the macaroons with all reduced-fat coconut. Poor decision. Note to self: you need fat to make butter. Even coconut butter. So, the coconut used to make the coconut butter had to be full-fat. What about the shredded coconut that is folded into the butter? How could I lessen the overall saturated fat content? Ah yes. Use reduced fat shredded coconut and sub out half of it for rolled oats!
My version is lower in fat, but retains the lovely flavor and chewy texture of the original. Vanilla bean paste contributes the aesthetically appealing black vanilla bean flecks more affordably than a whole vanilla bean, but pure vanilla extract can also be used. A touch of almond extract adds depth of flavor, and a bit of salt provides a nice counter balance to the sweet maple syrup.
The first step is to make your own coconut butter – for which you absolutely must use full fat unsweetened shredded coconut.
After a few minutes in the food processor, the flakes should start to break down like so:
A few more minutes of blending, and voila! Smooth, creamy, & silky coconut butter.
Since there aren’t a lot of flavor additions, I recommend using high-quality extracts. I LOVE this vanilla bean paste, and use it in recipes where the flecks of vanilla bean are visible.
I’m also hooked on this almond extract. I’ve considered dabbing it on my wrists and behind my ears as perfume ;).
See the vanilla beans in the macaroon dough?
Love.
As is true for most cookie dough, this one tastes phenomenal! Go ahead and lick that bowl clean – there are no raw eggs to be concerned about, and I say it’s a mandatory step in the baking process.
So there.
These macaroons smell nothing short of intoxicating while baking, and you will not believe how amazing they taste. Coconut is clearly the predominant flavor, and the addition of rolled oats does not detract from its potency. The maple syrup adds not just sweetness, but also a rich flavor that is heightened by the vanilla and almond extracts. The macaroons develop a lovely crisp crust as they cool, while the interior of each golden orb remains chewy.
I can easily say that these are – without a doubt – my new favorite cookie. Although I would still pass by a coconut candy bar without a second glance (who needs all of that artificial junk?), I’ll take a few of these macaroons any day!
Name:
Coconut-Oat Macaroons
Cuisine:
Dessert
Prep Time:
15 minutes
Cooking Time:
20 minutes
Total Time:
Approximately 30 minutes
Servings:
Makes about 24 macaroons
Yield:
24 macaroons
Ingredients
2 2/3 cup full fat shredded unsweetened coconut (one 8 oz package) OR 1 cup of coconut butter
1 cup reduced-fat shredded unsweetened coconut
1 cup old-fashioned rolled oats
3/4 cup pure maple syrup, preferably Grade B
1 Tbsp + 1 tsp pure vanilla bean paste
1/2 tsp pure almond extract
1/2 tsp Kosher salt
Directions
Preheat oven to 300°F. Line a baking sheet with a silicone baking mat or parchment paper.
In a food processor, process 2 2/3 cups full fat shredded coconut for about 5-8 minutes, until a thick, smooth coconut butter forms, scraping down the sides as needed (this will yield about 1 cup of coconut butter).
Combine the coconut butter and all of the remaining ingredients in a bowl. Stir until well-combined.
Using a mini ice cream scoop or a small spoon, scoop the dough onto the prepared baking sheet (no need to leave much room in between as they do not spread out). Bake for about 20-25 minutes, or until the bottoms of the macaroons are lightly browned. The macaroons will be very soft at this point.
Allow the macaroons to sit at room temperature on the baking sheet for about 30 minutes, or until they firm up and cool down.
Estimated Nutrition Per Serving
Calories: ~120 kcal
Total Fat: ~7g
Saturated Fat: ~6g
Cholesterol: ~3mg
Sodium: ~40mg
Total Carbohydrates: ~12g
Dietary Fiber: ~2g
Sugars: ~8g
Protein: ~2g
Keep in mind that these nutrition values are estimates and may vary based on the specific brands and quantities of ingredients used. It’s always a good practice to calculate nutrition based on the precise ingredients you use. Enjoy your delicious Coconut-Oat Macaroons!
I’m not quite sure how I went so long without a macaroon fix, but I decided it was high time to create another variation to what just might be my favorite cookie recipe.
For this go-around I went with a carrot cake flavor profile, using grated carrots, chopped pecans, and a trifecta of warm spices: cinnamon, ginger, and nutmeg.
As with the other macaroons, these cookies are soft and chewy on the inside with a crisp crust on the outside. In other words, they are the texture that all cookies should be! In my cookie-loving opinion, that is.
The orange hue from the carrots didn’t come through in the photos as much as I’d hoped, but the color is definitely apparent when they’re in front of you… as is the enticing aroma! The fragrance of the baking macaroons perfumed our apartment so sweetly that I’m surprised none of our neighbors stopped by for a sample.
Oh wait. The Indian restaurant that resides in the front of our building pretty much envelops you as you step into the hallway, negating any evidence of baking. Don’t get me wrong – I adore the aroma of curry and other exotic spices – but not when they mingle with what I’m cooking.
I digress.
These macaroons boast the kind of cookie deliciousness that makes it nearly impossible to eat just one. They may not be much to look at, what with their non-uniform shapes and bumpy surface, but boy-oh-boy are they tasty.
I would invite you over to enjoy a couple of cookies plateful of cookies with me, but I highly doubt there would be any left by the time you got here ;).
Name:
Carrot Cake Oat Macaroons
Cuisine:
Fusion
Prep Time:
15 minutes
Cooking Time:
20 minutes
Total Time:
30 minutes
Servings:
12 macaroons
Yield:
1 dozen
Ingredients
2 2/3 cup full fat shredded unsweetened coconut (one 8 oz package) OR 1 cup of coconut butter
1 cup reduced-fat shredded unsweetened coconut
1/4 cup very finely chopped toasted walnuts or pecans
1/2 cup finely grated peeled carrot (I used a microplane grater)
1 cup old-fashioned rolled oats
3/4 cup pure maple syrup, preferably Grade B
1 Tbsp + 1 tsp pure vanilla extract
2 tsp ground cinnamon
1/2 tsp ground ginger
1/8 tsp ground nutmeg
scant 1/2 tsp Kosher salt
Directions
Preheat oven to 300°F.
Line a baking sheet with a silicone baking mat or parchment paper.
In a food processor, process 2 2/3 cups full fat shredded coconut for about 5-8 minutes, until a thick, smooth coconut butter forms, scraping down the sides as needed (this will yield about 1 cup of coconut butter).
Using a mini ice cream scoop or a small spoon, scoop the dough onto the prepared baking sheet (no need to leave much room in between as they do not spread out).
Bake for about 20 minutes, or until the bottoms of the macaroons are lightly browned. The macaroons will be very soft at this point.
Allow the macaroons to sit at room temperature on the baking sheet for about 30 minutes, or until they firm up and cool down.
Estimated Nutrition Per Serving
Calories: 120 kcal
Carbohydrates: 15-20 g
Protein: 2-3 g
Fat: 6 g
Saturated Fat: 4-5 g
Fiber: 2-3 g
Sugar: 8-10 g
Cholesterol: 0 mg
Sodium: 40-50 mg
Potassium: 120-150 mg
Vitamin A: 20-25% DV
Vitamin C: 2-4% DV
Calcium: 2-3% DV
Iron: 4-6% DV
Please keep in mind that these values are rough estimates and can vary depending on the exact ingredients and portion sizes used. It’s always a good idea to consult with a nutritionist or use specific tools to calculate precise nutritional information if needed.
As soon as the first hints of fall begin whispering in my ear to crack open the first glorious can of pumpkin of the season, I run to the grocery store and stock up.
Now that it’s officially fall, I can post pumpkin recipes with abandon, right?!
These paleo cookies are seriously tasty.
Super soft, full of autumnal spices, and dotted with rich dark chocolate chips, they are the perfect fall treat. You absolutely do NOT need to follow the Paleo diet to make and enjoy these; anyone who likes pumpkin & chocolate chip cookies will adore them.
1/4 cup melted coconut oil (make sure to melt before measuring)
6 Tbsp pure pumpkin puree
1/4 cup honey
1/4 tsp pure vanilla extract
1/2 cup dark chocolate chips
Instructions
Preheat oven to 350°F. Line a large cookie sheet with a silicone baking mat or parchment paper.
In a large bowl, combine almond flour, salt, baking soda, cinnamon, ginger, cloves, and nutmeg. Whisk, making sure to break up any clumps of almond flour.
In a small bowl, whisk together the melted coconut oil, pumpkin puree, honey, and vanilla extract.
Add wet ingredient to dry and stir with a rubber spatula or spoon until combined.
Fold in chocolate chips.
Using a mini ice cream/cookie scoop or spoon, spoon dough onto prepared cookie sheet. Using the back of a spoon or your fingers, gently press down on the scoops of cookie dough so they form discs.
Bake for 12 minutes, or until cooked through and lightly golden brown around the edges. Cookies will be very soft.
Allow cookies to cool on the cookie sheet for 10 minutes before transferring to a baking rack to cool com
Estimated Nutrition Per Serving
Calories: ~120 kcal
Total Fat: ~9g
Saturated Fat: ~3g
Cholesterol: ~0mg
Sodium: ~90mg
Total Carbohydrates: ~8g
Dietary Fiber: ~2g
Sugars: ~4g
Protein: ~3g
The nutrition information is based on a single serving of one cookie. Keep in mind that actual nutritional values may vary based on the specific brands and quantities of ingredients used.
I’ve made Gina’s Chocolate Chunk {Paleo} Cookies many times; John, Lily, and I all absolutely love them. They’re easy to make, call for healthy ingredients, and taste fabulous. I rarely make a recipe more than once, so the fact that the cookies have become a staple in our house tells you just how awesome they are!
I tossed a couple handfuls of shredded coconut into the dough on a whim the last time I made a batch, and it was a great addition to an already delicious cookie.
The flavor profile is the same as Almond Joy candy bars, but the ingredients are so much cleaner. I adore the chocolate-almond-coconut combination, and each flavor is discernible in these cookies.
The cookies are soft & chewy with just a hint of crispiness around the edges; the perfect cookie texture, in my opinion.
Because there are no eggs in the cookies, you can sneak as many swipes of the uncooked dough as you want. Safe bowl licking for the win (<- I guess the cool kids would write FTW).
6 Tbsp melted coconut oil (make sure to melt before measuring)
1/4 cup honey
1/2 tsp almond extract
2 Tbsp water
1/2 cup chocolate chips
1/2 cup finely shredded unsweetened coconut
Instructions
Preheat oven to 350°F. Line a large cookie sheet with a silicone baking mat or parchment paper.
In a large bowl, combine almond flour, salt, and baking soda. Whisk, making sure to break up an clumps of flour.
In a small bowl, whisk together the melted coconut oil, honey, almond extract, and water.
Add wet ingredients to dry and stir with a rubber spatula or spoon until combined.
Fold in the chocolate chips and shredded coconut.
Scoop out 1/4 cup portions and place on prepared cookie sheet. Using the back of a spoon or your fingers, gently press down on the scoops of cookie dough so they form discs.
Bake for 12 minutes, or until cooked through and lightly golden brown around the edges. Cookies will be very soft.
Allow cookies to cool on the cookie sheet for 10 minutes before transferring to a baking rack to cool completely.
Estimated Nutrition Per Serving (1 cookie)
Calories: ~140 kcal
Total Fat: ~10g
Saturated Fat: ~6g
Trans Fat: 0g
Cholesterol: 0mg
Sodium: ~50mg
Total Carbohydrates: ~10g
Dietary Fiber: ~2g
Sugars: ~6g
Protein: ~3g
Please note that the nutrition values are estimated and may vary based on specific brands of ingredients used and portion sizes. It’s always a good idea to calculate the nutrition based on the exact products and quantities you use.