
I found a healthified recipe for this Tomato Corn Pie, orginially from Gourmet, on my friend Shannon’s site Tri to Cook.
A veritable celebration of summer produce, this savory pie features tomatoes (I used heirloom), corn, scallions, and basil. A whole wheat buttermilk biscuit-like dough is used for the double crust, and the pie gets additional flavor from lemon-scented yogurt and shredded sharp cheddar cheese.
Although delicious warm, I actually liked the pie even better cold, the next day. The bottom crust became a little soggy sitting in the fridge overnight, but I think the nuanced flavors were more pronounced and I enjoyed the texture of the chilled pie. Both for dinner the night I made the pie, and for lunch the day after, I served some organic romaine hearts with a homemade buttermilk blue cheese dressing (2% Greek yogurt, a touch of canola oil mayo, low fat buttermilk, white wine vinegar, blue cheese, salt and pepper) alongside the pie.
| Name | Tomato Corn Pie (Blog Bites III – Late Summer Edition) |
| Cuisine | American |
| Prep Time | 20 minutes |
| Cooking Time | 35 minutes |
| Total Time | 55 minutes |
| Servings | 8 |
| Yield | 1 (9-inch) pie |
Ingredients
- 1 1/4 cups all-purpose flour
- 1/2 teaspoon salt
- 1/2 cup unsalted butter, cold and cubed
- 3-4 tablespoons ice water
- 4 large tomatoes, sliced
- 2 cups fresh corn kernels (about 3-4 ears of corn)
- 1 cup shredded cheddar cheese
- 1/2 cup mayonnaise
- 1/2 cup sour cream
- 1/4 cup fresh basil leaves, chopped
- 1/4 cup green onions, chopped
- 1 teaspoon garlic powder
- Salt and pepper to taste.
I really loved the flavor addition of the blue cheese… so much so that I suggest whipping up some of the homemade dressing and drizzling it over the pie. Might sound strange, but it would be a delicious accompaniment!
2. In keeping with the summer corn theme, I whipped up Joy The Baker‘s Fresh Corn and Goat Cheese Grits (photo courtesy of Instagram via iPhone <– becoming necessary as we lose natural light in the evenings).

Sweet summer corn. Creamy corn grits. Tangy goat cheese. Nutty browned butter (<– so worth the indulgence!). Fresh parsley and scallions.
I served these grits (made with organic 1% milk instead of whole) with Ina’s Zucchini Pancakes, and the former recipe totally stole the show. How is it that I am just discovering the magic of stone ground corn grits (aka polenta)?! I lived in Houston for 1 1/2 years, and never once prepared the classic southern staple. Well, consider me a convert because I adored this dish!
Every. Thing. About it.
From the thick and creamy consistency to the sweet and savory flavors, a serving of these grits is like comfort in a bowl. Just think about all of the flavor profiles you could assign to corn grits – jalapenos, salsa, and monterey jack cheese; pumpkin puree, cinnamon, and maple syrup; marinara sauce, basil, and fresh mozzarella… Thanks to Joy, a whole new gustatory frontier has been opened for me :).
3. When Caroline (from Chocolate and Carrots) posted a recipe for Zucchini Brownies (also see on Two Peas and Their Pod and Food Finery), I knew I HAD to make them before the end of summer.

These eggless (<– yay for batter tasting!) brownies include whole wheat pastry flour, unsweetened applesauce, and a whopping 2 cups of shredded zucchini. I used half evaporated cane juice and half turbinado sugar, and the brownies came out perfectly sweet.
A few things:
- If a loaf of chocolate chip zucchini bread and a pan of fudge brownies had a love child, this would be it.
- If ever there was a brownie that was simultaneously fudgy and cakey, this is it.
- If you’re a brownie fiend (like me) and are looking for a healthier recipe to add to your repertoire, this should be it!
John – a man who rarely follows his meals with something sweet – has been enjoying these brownies as well. I typically portion out and freeze most of whatever baked goods I make and stretch them out over a few weeks or so; but I found myself pulling these brownies out of the freezer just two days after baking them so that we could both continue to devour them!

4. I’ve had Jessica’s Blueberry Breakfast Cakes on my bookmarked recipe list for months (along with many other fantastic creations from her blog, How Sweet It Is).

I cut the sugar in half (used Turbinado sugar), replaced the butter with unsweetened applesauce, used all whole wheat pastry flour, and came close to doubling the amount of blueberries (I just tossed the rest of the wild Maine blueberries into the batter).
Now, clearly my ramekins are on the small side… because the cake could not be contained! It actually resembles a huge muffin, no? Tastes like one too. A giant muffin with a soft crumb and loaded with sweet & juicy blueberries.

Estimated Nutrition Per Serving
- Calories: 425 kcal
- Total Fat: 30g
- Saturated Fat: 14g
- Trans Fat: 0g
- Cholesterol: 62mg
- Sodium: 480mg
- Total Carbohydrates: 31g
- Dietary Fiber: 3g
- Sugars: 4g
- Protein: 9g
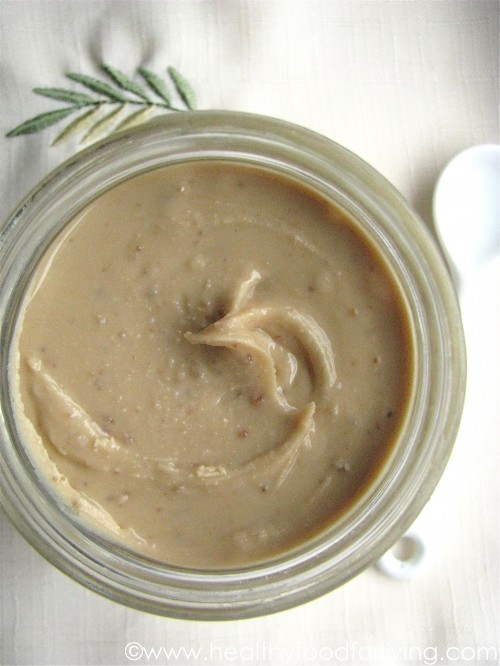
This cashew butter really does taste like cake batter! Both vanilla and almond extract flavor the creamy butter, and coarse Sucanat provides both a subtle sweetness and a nice crunch.
I had to add some canola oil (not measured) to help loosen up the butter a bit; I’m a sucker for that drizzle-able consistency.

And with that, I am exuberantly transitioning into my favorite season; both weather-wise and food-wise. Pumpkin, here I come am!
Instructions
1. Prepare the Pie Crust
In a large mixing bowl, combine the all-purpose flour and salt. b. Add the cold, cubed butter to the flour mixture. c. Using a pastry cutter or your fingers, work the butter into the flour until the mixture resembles coarse crumbs. d. Slowly add ice water, one tablespoon at a time, mixing until the dough just comes together. e. Shape the dough into a disk, wrap it in plastic wrap, and refrigerate for at least 30 minutes.
2. Preheat the Oven
- Preheat your oven to 375°F (190°C).
3. Prepare the Filling
- In a mixing bowl, combine the mayonnaise, sour cream, garlic powder, chopped basil, and green onions. Mix until well combined. This will be your creamy filling.
4. Assemble the Pie:
Roll out the chilled pie crust on a floured surface to fit a 9-inch pie dish. b. Place the pie crust in the dish and crimp the edges. c. Layer the sliced tomatoes and corn kernels in the pie crust. d. Season with salt and pepper to taste. e. Spread the creamy filling evenly over the tomatoes and corn. f. Sprinkle the shredded cheddar cheese on top.
5. Bake
- Place the Tomato Corn Pie in the preheated oven and bake for 30-35 minutes, or until the crust is golden brown, and the filling is bubbly.
6. Serve
Remove the pie from the oven and let it cool for a few minutes before slicing. b. Garnish with additional fresh basil if desired. c. Serve your Tomato Corn Pie warm and enjoy!
This Tomato Corn Pie is a wonderful way to make the most of summer’s bounty. Its combination of juicy tomatoes, sweet corn, and creamy filling will leave your taste buds satisfied. Whether you serve it as a main dish or a side, it’s sure to become a family favorite. Give this recipe a try and savor the flavors of the season.


