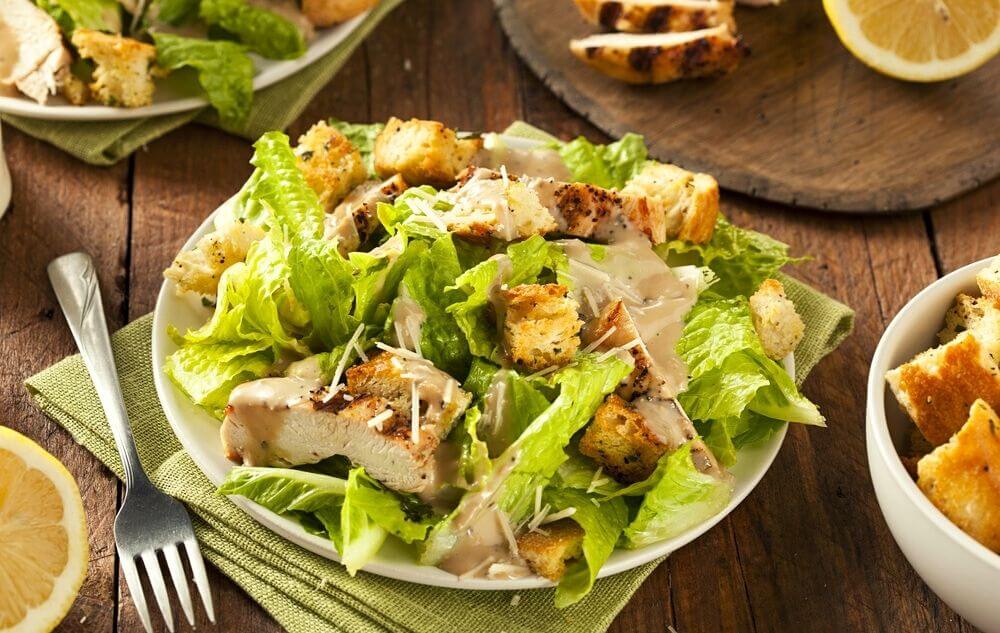
Many restaurants use Caesar salad as a typical side dish. Its great flavor, texture, and color make it so beloved to people. But just because something looks good and tastes delicious does not necessarily mean that it is good for you. So, how to know if that is the case for Caesar salad?
If you consume this dish regularly, you might ask yourself — is Caesar salad healthy? You may have found many different answers to this question that have always confused you.
Well, we are here to get rid of your confusion and answer your question about whether or not Caesar salad is healthy once and for all.
Some people believe that the word Caesar in Caesar salad comes from the Roman emperor Julius Caesar. But this is a misconception. Its name came from its inventor, Caesar Cardini, an immigrant in America.
He was the one who started to make it during rush hours in his restaurant. Caesar tossed all the ingredients besides the dinner tables to make it captivating to his customers.
You will be surprised to know that Caesar Cardini did not use anchovies to make Caesar salad, but chefs later added it to make their version. Cardini used more Italian dressing in his salad, but nowadays, the chefs do not follow this.
Caesar salad is one of the widely eaten and most popular salads. One will find several flavors at once from having one serving of Caesar salad, like tangy, smokey, salty, umami-like, and creamy flavor.
Along with these, the croutons and lettuce will also give you a satisfying crunch. Caesar salad is also pretty straightforward to make at home. One can add different types of dressing to make the flavor of Caesar salad elevate.
All of these characteristics, along with its freshly used ingredients and its colorful visual, is what make it so appealing to everyone.
A Caesar salad can be perfect for you if made in the right way. But it can also be bad for you if you use too many fat-rich products in your Caesar salad.
If your Caesar salad is rich in proper proteins, healthy carbs, fats, vitamins, and minerals, then there is no doubt there the Caesar salad is healthy. Whereas, if there are too many unhealthy fats, sodium, and sugar, it will be terrible for your health.
So, it depends on you which version of Caesar salad you will have.
The Ingredients in Classic Caesar Salad
You can add many ingredients according to your wish, but the recipe for classic Caesar salad remains the same. This classic Caesar salad is the one that restaurants mainly serve, and people prepare on occasions.
The components that go into the classic Caesar salad are:
These are the overall ingredients that go into making the classic Caesar salad. You can see some elements suitable for you and some bad for you.
Caesar Salad Dressing
One of the many things that makes Caesar salad taste good is its dressing. However, if you are not careful, the sauce can cause many health issues for you. So, we will mention the harmful effects of some of the ingredients used to prepare the classic Caesar salads and their alternatives.
Eggs:
Everyone commonly knows that eggs are a great source of protein and other nutrition. But when you add a raw egg to the Caesar salad, it can cause salmonella.
Moreover, egg yolks are high in cholesterol which is trouble for your body as a high amount of cholesterol leads to many deadly diseases.
So, the advice is to use pasteurized eggs to prevent yourself from getting seriously ill.
To thicken your Caesar salad, you can use cornstarch instead of egg yolks, a great ingredient to make your salad dressing dense.
Salt:
Classic Caesar salad is full of sodium, and most of this sodium comes from salt and other ingredients.
Salt is one of the significant sources of sodium for your body. Too little sodium can disrupt your thyroid function, and too much sodium will cause high blood pressure.
So, it is better to use salt in the correct amount so that you do not have to suffer from these health issues.
Vegetable Oil:
Like butter, vegetable oil is a high source of LDL, the bad cholesterol for your body. You can use sesame seed oil,olive oil, or flaxseed oil as an alternative to vegetable oil. These are great for your health, and they will not give you the bad heavy, bloated feeling you get from consuming foods made with vegetable oil.
Moreover, olive does not increase your weight; it is full of antioxidants has an anti-inflammatory, anti-cancer, and anti-bacterial function. It protects you against heart diseases, type II diabetes, and stroke.
Dijon mustard contains no essential vitamins or minerals. It is low in calories but high in sodium, and high sodium leads to high blood pressure.
As a substitute for Dijon mustard, you can use yellow mustard, which is low in calories and sodium.
Anchovies:
Anchovies are considered a Superfood. They contain many essential minerals and vitamins needed to develop your health. Anchovies are also an excellent source of omega-3 fatty acids, which improve your heart and brain function.
However, anchovies are high in sodium and can also be contaminated. So, be extra careful when using it.
Black Pepper:
Black paper is rich in manganese, and manganese help with your metabolism, healing your wounds, and bone health. It is rich in antioxidants and contains anti-inflammatory functions.
There is evidence that Black pepper helps develop and improve your brain functions, control your blood sugar level, and lower your cholesterol level.
Moreover, black pepper is beneficial for your gut health and has pain relief properties.
You do not have to worry about adding black pepper to your Caesar salad with all these advantageous properties.
Garlic:
We are all aware of all the ways garlic helps out body. It helps us to fight harmful microorganisms.
Garlic can also help cure a common cold, decrease your blood pressure, reduce heart disease risk, remove toxic substances from your body, and improve bone health.
So, it can be rewarding to add garlic to your Caesar salad.
Store-Bought Dressing:
Caesar salad dressings sold in stores and markets are high in fats and calories. So, it would be better for you to make your dressing at home.
Caesar Salad Toppings
The toppings of Caesar salad give it extra flavors and increase its nutritional value. But not all the toppings in Caesar salad are as healthy as you might think they are.
So, here is how some of the toppings might be bad for you and how you can healthily use them.
Croutons:
The croutons in your Caesar salads are what give you the crunch. Also, who does not love foods that come from bread? But most of the time, your croutons are made from refined wheat or refined flour.
Consuming refined flour for an extended period will cause inflammation, and high blood sugar levels, ultimately leading to type II diabetes.
So, instead of croutons, you can use roasted vegetables, chickpeas, toasted seeds, toasted nuts, kale chips, and as a bonus, with these being a great source of nutrition, they will elevate and enhance the flavor of your Caesar salad.
However, if you are determined to use croutons, it is better to use whole grain wheat to prepare it. It will give you vitamins and keep you full for a more extended period.
Butter:
Butter is never good for your health. Sure, it can make your food taste better, but regular butter will cause clogging in your arteries.
As an alternative for butter, you can use olive oil or sunflower oil, a great source of HDL and good cholesterol. You can also use applesauce or butter made from nuts instead of dairy butter to cut the calories from your salad.
Chicken:
You will find that many restaurants use chicken cubes or pieces in their Caesar salad. Maybe you have done this too when you make Caesar salads in your home.
However, the thick batter and deep frying of the chicken make it very unhealthy. Deep frying the chicken will make it full of trans fat, which leads to coronary disease, diabetes, obesity and might even cause some types of cancer.
If you want to add chicken to your Caesar salad, it is better to put it on a grill or barbecue them. These grilled or barbecued chickens will add extra flavor to your salad and increase its level of nutrition.
Parmesan cheese is high in proteins and micronutrients and has a significant amount of omega-3 fatty acids. It is also rich in vitamins and minerals such as calcium, phosphorus, etc.
If you are lactose intolerant, then the good news is that parmesan cheese is lactose-free even though it comes from milk.
As a result, you can add parmesan to your Caesar salad without any worry.
The Main Ingredient: Lettuce
Since the primary product used in Caesar salad is lettuce, it is natural for you to think whether or not the lettuce you are using in our salad is good for you.
Everyone commonly uses Romaine lettuce to make Caesar salad. This type of lettuce is full of crucial vitamins and minerals which are great for your body.
Another common type of lettuce is iceberg lettuce. It is lower in nutrition than Romaine lettuce, and its texture causes it to absorb the oils and become soggy.
So, as a recommendation, use the typical Romaine lettuce in your Caesar salad instead of iceberg lettuce.
The Ruling
After analyzing all these, we think it is safe to say whether Caesar salad is healthy or not depends on your recipe. The classic and typical Caesar salad recipe has some great ingredients, but if you tweak some of the other elements, it will be very beneficial.
Extra Ingredients to Make Your Caesar Salad Healthier
Grilled fish or chicken in your Caesar salad mix will keep you full for an extended period.
Adding different leafy greens such as spinach and kale in your salad makes it more nutritious.
Add vegetable carrot cucumber, broccoli, tomato, or bell papers to increase flavor and sustenance.
Beans and avocadoes will make your Caesar salad tastier and healthier.
Try to add nuts and fresh fruits to your Caesar salad if possible.
FAQs
Where did the name Caesar Salad come from?
Contrary to popular belief, it came from its inventor, Caesar Cardini.
What are the nutritional components of the Caesar Salad?
It is high in fats and sodium, moderate in carbohydrates, vitamins, and minerals, and very low in proteins.
Is Caesar Salad healthy for my body?
This depends on how you prepare it. If you keep the trans fat products low and use healthier ingredients, it can be full of good nutrients.
What effects does Caesar Salad have on my health?
This salad can cause you heart diseases and high blood pressure.
Is there any way to make Caesar Salad healthy?
If you add some extra healthy components, such as more greens, nuts, and fruits, and get rid of the harmful elements, then you can make it healthy.
Final Words
is Caesar salad healthy? Not all of them. Follow our healthier substitute and make the healthier version of Caesar salad. Within a few weeks, all the health benefits will become evident to you.
Moreover, you do not have to be a professional chef to make a healthy version of Caesar salad. You can make it in your home with ingredients always in your pantry.
So, do not wait anymore. Make the healthy Caesar salad for yourself and your family and see all the good results.
With an overpacked schedule or extreme disinclination to cooking, canned foods may be both a time and lifesaver for you. But many people will tell you that canned chicken is “gross” and “unhealthy”. So naturally, at some point you may have wondered — is canned chicken healthy?
The controversy surrounding canned poultry is neither new nor entirely baseless. However, it is also an entanglement of facts and misconceptions. This article breaks down all of them for you, so sit tight and keep reading!
As the name suggests, it is basically chicken in an airtight aluminum can or glass container. To remove harmful microorganisms, the chicken is cooked before it’s canned, presumably at 165°F as mandated by the U.S. Food and Drug Administration.
Canning the chicken builds a protective barrier against malign bacteria, removing bacteria’s nourishment source, i.e., oxygen from it. So, as long as it’s inside the sealed container, the chicken is in perfect, edible condition. It has a much longer shelf-life than your usual cooked meat — you can literally store it for up to 3-5 years!
You can also store it for years without refrigeration, as you’d do for any other canned food. This makes it a great storable protein source, especially if there are frequent power cuts where you live.
But you might want to eat it within a few days after unsealing the can as it loses its freshness soon after.
Why Canned Chicken Gets a Bad Rep?
We’re not deducing that it is bad for you; we’re just getting the negatives out of the way before letting you in on the good parts. Let’s see what major issues canmake canned chicken bad for you.
High Sodium Content:
If you’ve ever tasted canned chicken, the first thing your tastebuds caught was probably the extreme saltiness. Apparently, removing bacteria from canned food involves processing it in a way that the flavor is removed as well. Salt is a low-cost way to compensate for this loss of flavor.
Excessive salt intake attributes to bloating, inflammation, high blood pressure, cardiac arrests, and stroke. A can of chicken may contain from 500-1,000 milligrams of sodium, while your daily intake of sodium should be limited to 2,300 milligrams.
Preservatives:
Sodium Phosphate:
A potentially harmful preservative used in chicken is sodium phosphate. Health experts suggest avoiding foods with sodium phosphate additives as it can be damaging for those with kidney issues as well as for your heart health.
Modified Food Starch:
Made from common foods such as wheat, potato, corn, etc., modified food starch is used to prevent the chicken meat from getting damaged due to external temperature and the harsh canning process.
However, this additive is linked to health complications such as bloating, diarrhea, allergies, headache, chest pain, fatigue, palpitations, etc.
BPA:
Bisphenol-A, more commonly known as BPA, is a chemical found in small amounts in the inner lining of canned food products to prevent corrosion in it.
BPA, if consumed at high levels, increases the risks of diabetes and cardiovascular diseases. Also, this chemical mingles with hormones in the body, messing up cell repair, fetal growth, energy levels, fertility, etc.
Industrial Chicken Source:
One major flip side of canned meat is that it may come from industrial chicken that was raised in an awful, inhumane environment, subject to infections and antibiotic treatments. When you eat that chicken, its diseases are passed on to you.
Furthermore, consuming meat that has been treated with antibiotics may cause your body to develop antibiotic resistance in addition to child development issues.
A metal coin has two sides, and so does a metal can of chicken. It’s not all bad, as many people may think. Now that we’ve explained the major downsides of canned meat, let’s take a look if they are reason enough for you to completely reject this particular food item.
Canning Doesn’t Mean All Nutrition Is Lost:
Even though canned meat undergoes processing, canning still conserves most of the nutrition elements of the unprocessed chicken. That means much of the vitamins, minerals, fats, and proteins of the chicken stay intact in this preservation method.
As said before, high levels of sodium found in the canned chicken are linked to various health issues. However, not all cans have oversalted, overprocessed abominable meat.
You just need to be a smart shopper and look for the best ones in your vicinity. Do some research on the best-canned chicken brands, read the labels on the can before buying, and you’re good to go.
Suspicious Additives Aren’t that Alarming:
Remember we mentioned a harmful additive used in canned chicken called sodium phosphate? Well, its purpose is to prevent the chicken from turning mushy after the canning process.
Sodium phosphate also aids in balancing the pH levels of processed meat, which in turn helps to make the chicken stay fresh inside the can for longer. It is actually a regular preservative that is approved by FDA.
A 5oz can of chicken typically contains no more than 2% sodium phosphate, which is safe to consume if it’s not forbidden in your diet. In fact, to develop the health issues caused by sodium phosphate, you need to eat only canned chicken over an extremely long period.
Just like sodium phosphate, modified food starch is also not catastrophic for your body as long as it’s not overconsumed. It’s used to preserve the meat’s texture, as nobody would like to eat soggy chicken sitting in a pool of broth. You’re good to go unless you have dietary restrictions.
BPA Usage Has Decreased:
BPA is still used in canned foods regardless of its associated health risks, but industry representatives claim that the percentage of cans with BPA has reduced below 10% over the years. Also, most canned food manufacturers have switched to acrylic and polyester to line the cans.
So, it would be misleading to conclude that all chicken cans are lined with BPA and, therefore, come with massive health risks. Also, to be extra safe, check if the can is labeled “BPA free” before buying.
Final Thoughts
Is canned chicken healthy? The answer is somewhere between yes and no. To some extent, it is a healthy protein source that helps your muscle up and appeases your meat craving. But to ensure it’s healthy, you have to shop really smart: find trustworthy brands and inspect the labels on the can.
Baking healthy treats have become very popular in modern times. However, home cooks often find it confusing when it comes to choosing the right flour.
The ingredients of tapioca starch and flour are mostly similar, and their abilities are more or less the same too. Their real differences lie in the smaller details that novice chefs don’t usually detect.
Our tapioca starch vs flour analysis will provide you with a thorough dissection of both products. You will be able to identify them on the basis of their qualities and characteristics by the end of this article.
Therefore, let’s dive right in and find out all there is to know about them so that you can make an informed decision the next time you plan to start baking.
Tapioca starch is the dried version of a yuca root and is famous for serving multiple purposes. People who prefer to eat healthy will get a kick out of using it in their food as 100 grams of it only has 360 calories.
Furthermore, it is a perfect choice for those who have medical conditions as it has a couple of healing properties and health benefits.
One thing that plays the most defining role in the case of tapioca starch is the fact that it’s gluten-free. When it comes to other nutritional factors, it has little to provide in terms of minerals, proteins, or fatty acids. It’s wildly popular in South America, its area of origin, and countries in Asia, including Thailand, Indonesia, and Vietnam.
What Is Flour?
Any person who has the most basic knowledge about baking is familiar with flours. From savory items to sweet treats, there’s a high chance that this ingredient is involved in the recipe.
It primarily consists of wheat, grains, beans, or roots. People around the world, especially in America and Europe, consider it to be pivotal to their daily meal.
A significant quality of flour is the presence of gluten in it. Many people tend to have a gluten allergy, and the popularity of alternatives is increasing day by day due to awareness being raised about it.
However, it still remains the majorly popular variation to date, and the milling of flour is one of the most significant parts of agriculture globally.
Finding the difference between tapioca starch and flour can feel like an impossible task to the untrained eye. However, here are a few major factors that separate the two from each other –
Ingredients:
The very first thing you will find noticeable when differentiating between tapioca starch and flour is how they are made. Tapioca starch’s main ingredient is the cassava root.
Its properties are almost equal to that of potatoes in terms of being a root vegetable with starch. They’re commonly known as the bread of the tropics due to the calories they provide.
On the other hand, regular flour is the more conventional and commercial option. Wheat is its primary ingredient, and its wide availability is what makes this variation so popular among most people. Countries like the USA and the UK that consume bread consider it a staple.
Nutritional Content:
Tapioca starch has a plethora of different qualities that you will not find in conventional starch. For starters, diabetic patients will find it more suitable for them as they can help lower insulin levels. People with Celiac disease will also prefer it as its gluten-free quality makes it perfectly safe for their consumption.
Conventional flour has none of the qualities present in tapioca starch which makes the latter a great option for many ailing patients. It’s very high in calories and has tons of fat packed into it.
Therefore, eating proper portions of them can help energize the body. This reason makes it one of the perfect ingredients to be present in your breakfast items.
Uses:
Regular flour is usually found among bakeries. Items like cakes, pastries, and bread are primarily made from it. It plays a huge role in ensuring that these baked items have a good structure and that the flavor turns out to be full and satisfying. They are perfect for both sweet and spicy palettes, making them extremely versatile.
While tapioca starch effortlessly functions in almost all meals that require conventional flour, it is exceptional in terms of liquid drinks. A popular drink among millennials happens to be bubble tea.
Tapioca starch is often used to create the pearls that go into making them. The presence of this ingredient ensures that the pearl has the right texture.
Thickening Liquid:
Tapioca starch is often considered an excellent option for getting liquid items to thicken. Chefs use it to increase the density of various dishes like puddings and soup. One thing that sets it apart when it comes to this process is that its condition remains untarnished even if it’s frozen.
Although flour is also suitable to use as a liquid thickener, there are lots of risks involved in this case. Among them, the highest risk lies in the possibility of it causing clumps which can really ruin your eating experience. Furthermore, it stands a greater chance of affecting the texture and taste of the food too.
Frequently Asked Questions (FAQs)
Can tapioca flour completely replace regular flour for everyday use?
Although tapioca flour is perfectly suitable for accomplishing numerous tasks of regular flour, it’s not an exact nutritious alternative. You can use it perfectly for making gravy or sauce, but it’s not suitable for baked items like cookies and biscuits.
How can you differentiate starch and flour?
There are a couple of noteworthy factors that separate starch from flour. Unlike conventional flour, starch doesn’t have any smell or taste, and it’s also solid while the prior is powdery.
Will adding tapioca starch during baking help me in any way?
Using tapioca starch while baking can make the entire process relatively easier for you. Although it’s free from gluten, it works brilliantly when it comes to binding together all the ingredients and making the food feel fluffier.
Conclusion
Bakers and chefs have often found themselves at an impasse when discussing the superiority between tapioca starch and flour. The differences are so small and difficult to identify that many people believe that they are identical.
As a final verdict, it can be concluded that tapioca starch is the ideal choice for those who want healthier food with more nutrition for themselves. On the other hand, if you’re looking for energy to kick off your day, conventional flour will serve your needs well. Either way, both will live up to their qualities admirably.
Whether you’re a student or have a busy routine, frozen meals tend to be a lifesaver. By getting frozen meals, you save the time you would spend cooking and probably get some time to relax.
Frozen dinners taste good, but you can’t compare them to a freshly cooked meal. But has the question, “are frozen dinners healthy” ever crossed your mind? Ever thought about what side effects this might cause your body?
This article answers these questions with a clear view of its benefits and harmful effects. So, keep reading until the end.
In this era of technology, frozen meals prove to be a blessing to people who don’t usually find time to cook a fresh meal from scratch. But it is important to remember that excess of everything becomes poison.
Speaking of frozen meals, it is incredibly convenient for someone to grab and microwave a meal. Frozen meals can be a blessing if you have a hectic day. But if you continue doing this every day, the whole process may backfire. Therefore, even though frozen meals are a blessing, it has a few disadvantages.
Although frozen food has similar nutrients and minerals as fresh food, the added substances and additives are detrimental. An enormous number of counterfeit flavors and added substances used to improve the usability of frozen food are not beneficial for health well-being.
Frozen meals are great and solid, assuming you eat them as appropriately controlled portions alongside vegetables to make a satisfying meal to stay full for long.
When you are thinking about how healthy frozen meals are, you must consider three things, which are:
Saturated Fats:
Saturated fat in a frozen supper should not be higher than 4.5 g. This fat is an awful type that expands the LDL or horrendous cholesterol level in our body.
Sodium:
The sodium content level is why a ton of brands get an awful standing. To save the nourishment for a more drawn-out shelf period, they add a high amount of sodium that is hurtful to well-being. Sodium content in your frozen food should not be higher than 700 mg.
Fiber:
Fiber is vital to keep you satisfyingly full longer. The optimal amount of fiber ought to be 4g or higher. Many people recommend that if the frozen dinners need more fiber content, you need to eat them alongside a bowl of vegetables.
Frozen meals that tend to maintain these few parameters are healthy to consume, and one must always check if the meal they are having is healthy or not.
Helps in Weight Loss
Having frozen meals might also help you to reduce how much you weigh. That means having a balanced diet plan or eating according to portion control can help you to reduce your weight even if you eat frozen meals.
As far as you might be concerned, it is all about calories. Assuming you eat fewer calories than you spend, you can get more fit. Many frozen dinners are under 400 calories.
There is no need to measure the proper food portion. An American researcher has shown that eating frozen meals can help portion control. They are pre-packaged with set portions, and exact calorie counts.
You may also like:
Frozen Meals are Affordable
Frozen meals are an excellent option for low-income families because they are not costly. Through such suppers, they can get the kinds of food that affluent individuals eat. Numerous fascinating and worldwide food sources become accessible to everybody at sensible expenses.
Besides the low expenses, likewise, think of the time that can be saved. This makes frozen suppers more attractive to the standard purchaser.
When Can Frozen Dinners be Bad for You?
Frequently eating frozen dinners can be bad for you if they are high in sodium and saturated fats. Sodium can cause high blood pressure and other hypertension-related diseases such as stroke.
Cooking a fresh meal once or twice and taking care of your physique is a good practice. If you’re doing that, you can cook a little extra and store the new food in a refrigerator.
Are Healthy Frozen Food and Freshly Cooked Food the Same?
The vitamins and minerals in frozen food and fresh food remain the same. Still, the nutritional difference arises from the amount of sodium and preservatives that are mixed to improve the shelf life of packaged food. These preservatives, sodium, and frozen food are less healthy than fresh food.
Popular Frozen Dinner Reviews
One must look at how good the most commonly purchased frozen meals are. The best ones with the best reviews are recommended to be selected.
Lean Cuisine:
Lean cuisine is a sesame chicken supper. Assuming we talk about the health benefit of one package, it has 330 calories, 9 grams of fat, 14 grams of protein, 25 mg of cholesterol, 650 mg sodium, 48 grams of carbs, 3 grams of fiber, and 15 grams of sugar.
So, 14-gram protein is not a huge amount, but it is okay. The only problem is it has a lot of sodium and additives that are not good for health. Otherwise, it is suitable for weight loss because of the extraordinary amount of protein.
Amy’s Frozen Meals:
Amy’s frozen dish contains Mexican meal bowls having 380 calories that are exceptionally similar to genuine dinner. So, you don’t nibble on other undesirable food sources in the wake of eating it.
It has 16 grams of fat, cholesterol 20 mg, sodium 780 mg, 48 grams carbs, 8gram fiber, 4 grams sugar, and 12 grams protein. It is high in sodium, but at the same time, Amy’s also offers other light sodium choices.
Hungry Men’s Meals:
Hungry Men’s meals have very high sodium, so they are not suitable for a healthy meal. It has 708 calories, 26 grams fat, 1440 mg sodium, 92-gram carbs, 6g fiber, and 53-gram protein.
Although it has a good amount of fiber, 1440 mg of sodium is an excessive amount that can interfere with blood pressure and the cardiovascular system.
Smart One’s Frozen Meals:
This savvy brand has a sesame chicken dish. One bundle has 250 calories, 6-gram fat, 15 mg cholesterol, 480 mg sodium, 39 grams of carbs, 5-gram sugar, and 11 grams of protein.
It isn’t intelligent for weight reduction as it doesn’t contain sufficient protein; however, it is excellent for low added sugar and low sodium content.
Merrie’s Callender’s Meals:
Merrie’s Callender’s Mealsis most elevated in fats and calories. So, it isn’t great for the individuals who need to shed pounds. In any case, best of all, it contains vegetables. There are no other vegetables in some other frozen food brand aside from Merrie’s Callender suppers.
Frequently Asked Questions (FAQs)
Is it okay to eat frozen meals every day?
Eating frozen meals every day won’t be good for your health as most of them are rich in sodium and saturated fat.
Is frozen lasagne healthy?
It contains around 310 calories and is not one of the healthiest foods. However, it’s comparatively better than other frozen meals.
Is Lean Cuisine good for weight loss?
Though the small portions might make many believe that it’s good for weight loss, I don’t think so, as it has a good amount of sugar.
Final Words
So, are frozen dinners healthy? It can be if you choose the right food. You’ll need to carefully select what frozen meals to eat. After all, excess of anything becomes poison. Even though it is frozen, having a light dinner will help you lose weight.
Fish are high in nutrients that are beneficial to your health. Fish markets, on the other hand, are scarce, making them generally inaccessible. Frozen fish sticks, on the other side, are a common sight in the frozen food section of any supermarket. The nutrients in frozen fish are preserved, but are fish sticks healthy?
Naturally, deep-fried, oily food is terrible for health, so fish sticks are unhealthy, but there are healthier ways to consume the fish sticks.
Fish sticks are usually made from white fish such as tilapia, cod, pollock, or haddock. These fish have one thing in common: they have high protein and are packed with delicious nutrients.
However, processed food coated in preservatives, refined starch, and breaded to give you that crunch is usually deep-fried. Deep frying the fish sticks strips them of any good nutrients that your body can benefit from. However, they are a good protein source that you can add to diversify your diet.
Fish sticks are not healthy as they are usually deep-fried in oil. This can increase cholesterol and make you bloated. However, frying them with olive oil or a pan can make them healthier.
So ultimately, if you wonder if fish sticks are healthy, it boils down to how you prepare your fish sticks.
Fish sticks are a staple in a household as they are affordable and readily available.
Ease of Access:
Fish markets are usually crowded and have a potent smell that is not for the faint-hearted. Furthermore, the congestion and stench of fish can make the market unnerving.
On the flip side, fish sticks are readily available in the frozen section of any market. Such supermarkets are open throughout cities. Moreover, there are varieties of brands with different price ranges that produce fish sticks, making them more accessible.
Well, mostly! Whichever brand you consume your fish sticks from, it is bound to be delicious. If your fish stick has a brown tint or smells funky, it is best not to consume it. Also, always check the expiration date before buying any fish sticks from supermarkets.
High in Protein:
Fish sticks are high in protein. They make you feel full, so it is excellent for weight management as you won’t entertain frequent food cravings. Additionally, proteins help muscle repair, so it is a perfect addition to your diet if you work out often.
Versatility of Use:
Fish sticks are fantastic finger foods suitable for cocktail parties, small gatherings, parties, etc. They pair well with other kinds of food. Instead of serving as a solo dish, you can chop fish sticks and add them to saucy pasta, flavorful chow mein, bland rice, vegetables, or cheese.
The crunchy fish sticks will add an element of fun, flavor, and texture that many will love. Indeed, their versatility is why it is so loved among college students and children. They are a great way to introduce some protein in a carb-rich food.
Disadvantages of Fish Sticks
Let’s look at the disadvantages of eating fish sticks.
Deep Frying Fish Sticks Can Eliminate the Nutrients:
Fish are high in protein and minerals, so they are great for your body, brain, and overall health.
Generally, fish sticks have a thick coat of refined starch, preservatives, and artificial ingredients to improve the taste. Unfortunately, adding additional preservatives and deep-frying the sticks will omit the excellent omega acids, vitamin B-12, and all the yummy minerals fish is known to have.
High Sodium Content:
Sodium is excellent for our health as it is a catalyst for our nervous system. However, too much of something is always troublesome. Some fish sticks have high sodium levels, increasing your pressure. This is detrimental to health.
Fried in Oil:
Apart from having additional additives, fish sticks are fried in saturated, refined oil, which is terrible for you. It is delicious-yes-but very unhealthy.
Also, beware of the brands that offer extra crunchy fish fingers because additional crunch means that fish sticks have more breading and require more deep-fried.
Alternative to Fish Sticks
Fish sticks can be unhealthy, but if you make fish sticks at home using natural substances, that omits many cons of fish sticks.
01. Pan-Frying:
Pan-frying can be done using less oil which is the healthier option to its counter alternative. Prepare fish sticks by cutting them into appropriate proportions and covering them with breadcrumbs. Add lemon and a tasty sauce or dip to enjoy the end product.
02. Olive Oil:
Instead of deep-frying the food in processed oil, you can deep fry the food in olive oil, which is healthier. Olive oil does not alter the taste as much, making it an ideal alternative.
03. Bake or Grill the Fish Sticks:
Baking the fish sticks or grilling them can be a great alternative to healthily eating the fish sticks.
Frequently Asked Questions (FAQs)
Are fish sticks processed food?
They are processed food found in the frozen aisle of any supermarket. They are generally made from tilapia, cod, haddock, and other white fish.
Can you gain weight from eating fish sticks?
One serving of frozen fish can have 78 calories, so it is a high-calorie snack. Hence, you can gain weight if you consume more than one fish stick.
Are the frozen fish we buy healthy?
When you freeze the fish, it retains its nutrients, so frozen fish is just as good as the fresh fish as they maintain the nutrients.
Final Verdict
So, are fish sticks healthy? The short answer is it depends on how it is fried and consumed. Deep frying it in oil is undoubtedly an unhealthy way of eating it as it strips away any nutrients it has.
However, pan-frying, grilling or baking fish sticks at home can be a great way of consuming the fish sticks healthily.
Honey Nut Cheerios are generally not considered a healthy everyday breakfast choice due to their high added sugar and sodium content, despite being made from whole grain oats and fortified with essential vitamins.
Aspect
Summary
Key Fact
Pros
Good source of whole-grain oats, providing fiber for heart and gut health. Fortified with essential nutrients like iron and calcium.
High in added sugar (12g per serving, nearly half the daily recommendation) and sodium (around 200mg per bowl).
The sugar content is almost nine times higher than plain Cheerios per serving.
Conclusion
They are acceptable as an occasional treat, but regular consumption is discouraged due to risks related to high sugar intake (weight gain, type 2 diabetes). Plain Cheerios are the healthier alternative.
Are Honey Nut Cheerios healthy as a breakfast choice? That’s a question that has been asked time and again. And, the answer is…it depends. Sure, Cheerios are fortified with essential vitamins and minerals, but they also contain added sugar and high fructose corn syrup.
So, while they may not be the worst breakfast option out there, they’re definitely not the healthiest. Let’s dive into the details.
Among the six ingredients found in Honey Nut Cheerios top three elements are different forms of sweeteners. Mostly white sugar, brown sugar, and honey. Honey Nut Cheerios contains almost nine times the sugar found in ordinary Cheerios per serving.
The sugar concentration is much higher than most other sugar-laden bowls of cereal for kids. It’s almost like you’re eating a big bowl of sugar!
What is the specialty of Honey Nut Cheerios? Honey with a hint of nutty flavor makes this cereal suitable for breakfast and dessert. You can enjoy this cereal with or without milk.
The crunchiness of this cereal is terrific. However, remember that the cereal gets soggy quite fast after pouring in the milk.
Are Honey Nut Cheerios Healthy – Potential Health Benefits
Before jumping to the negative side of the Honey Nut Cheerios, we must look at the nutrient side of this cereal. As promised, the company delivered some nutritional elements in their Cheerios.
Has a Moderate Calorie Count Per Serving and Provides a Healthy Mix of Fats:
Cheerios are low in calories and fat, which is a plus. A single serving of Honey Nut Cheerios contains the exact recommended amount of fat: 15 g.
Fiber is good for your gut health, keeping your bowel movements active and regular. It also keeps your cholesterol in check, which can also help your heart. They also include several vital minerals, like fiber and vitamin D, that many individuals do not get sufficient amounts of.
And the calcium content in this Cheerio flavor also meets most of your daily value of calcium (10 percent of the daily value).
Iron is Abundant in this Food:
One cup (28 grams) of Cheerios contains 45 percent of the Daily Value for iron, which is a mineral in which many individuals are deficient. This mineral is essential in the transportation of oxygen throughout the body.
However, remember that many of these minerals, such as iron, vitamin B12, and vitamin D, are added during the cooking process and are not found naturally in the cereal.
Excellent Source of Whole Grain:
We already know that all the Cheerios are made of whole grain oats. Given that whole grains contain all of the grain’s components, they tend to include more nutrients than processed grains.
Oats, the primary and distinctive ingredient in General Mills’ Cheerios cereal, are a nutritionally well-balanced source of fiber and iron. In terms of carbs, raw oats have around 66 percent carbohydrates, 15 percent fiber, 7 percent fat, and just 1.5 percent sugar.
Furthermore, consuming whole grains high in fiber may help lower cholesterol levels and minimize your chance of developing heart disease.
Can Honey Nut Cheerios Be Bad for You?
It was discovered that this cereal included the following harmful elements, which may result in adverse health consequences!
High Salt Content:
Honey Nut Cheerios cereal is not a low-sodium product and should never be considered one. It is recommended that one should not consume more than 115 mg of salt every 100-125 calories on a typically balanced diet. And Honey Nut Cheerios contains around 200 mg of sodium in each bowl!
According to research, a high-sodium diet raises blood pressure, a known risk factor for heart disease and stroke. For heart health, many sources suggest consuming foods with a salt content of 5 percent or less of the daily value.
Carbohydrates are Abundant:
Yes, we just talked about how the oat in this cereal is a good source of whole grains and carbs. Carbohydrates are essential for good health; however, Honey Nut Cheerios appear to have excessive amounts of it for the number of calories in each serving.
It is also suggestive that maintaining good blood sugar levels, a healthy weight, and a healthy heart. While eating a generally nutritious diet should consist of 15-20 grams of total carbs every 100-125 calories.
It contains a lot of Added Sugars:
Honey Nut Cheerios cereal has 12 grams of added sugar (24 percent of the daily value) per serving, almost half of the daily sugar requirement. The American Heart Association advises no more than 25 grams of sugar per day for women and 36 grams per day for men.
Chronic intake of a high-sugar diet can result in various health concerns. Some of the most drastic ones are weight gain, type 2 diabetes, and cardiovascular disease.
On a typically balanced diet, you should not consume more than 2.5 grams of added sugar (5 percent of the recommended value) for 100-125 calories.
Changes Happened to Honey Nut Cheerios:
Before 2009, the serving size of Honey Nut Cheerios was one cup, weighing 30 grams and having 11 grams of sugar. These days, a serving is three-quarters of a cup, weighing just 28 grams and containing nine grams of sugar.
The majority of individuals are unlikely to measure out precisely the new serving size of cereal before consuming it. Despite the changes, the serving size of ordinary Cheerios mostly remains at one cup. So, using the same one-cup serving size as before, the sugar content of Honey Nut Cheerios is likely to be in the double digits.
According to the Food and Drug Administration (FDA), a cereal’s density can vary the amount of grain that should be consumed in one serving. It appears that General Mills changed the ingredients in Honey Nut Cheerios.
The company did this so that the total weight per serving was reduced, which lowered the claimed sugar level. But it was impossible to determine by how much sugar it decreased.
Cheerios Vs Honey Nut Cheerios: Which One is the Best Option?
Cheerios are a nutritious cereal that is high in vitamins and minerals. With an excellent, rich oat flavor and a cup of milk, this cereal is something you will be looking for in the morning. You can even have this crispy cereal as an option for your snacks.
Sugar content is minimal in the regular Cheerios. From Cheerios, you are also receiving some oat fiber, which can help decrease your cholesterol levels slightly. So, Cheerios are healthier than Honey Nut Cheerios.
They taste like 100% whole grain oats with a hint of sweetness. On the other hand, honey and sugar taste with a slightly nutty flavor are the main characteristics of Honey Nut Cheerios.
Plain cereals, such as original Cheerios, are good since their relatively high fiber levels impede digestion. According to the American Diabetes Association, the slower you digest it, the less violent the blood sugar will be.
It is suggested that you consume no more than the recommended amount of added sugar each day. This is usually six tablespoons or 25 grams.
One serving of Honey Nut Cheerios has already surpassed one-third of your daily sugar allowance, putting you above the limit. Additionally, Honey Nut Cheerios has the potential to lead to childhood obesity. In addition, it will cause the child’s health to deteriorate further.
Frequently Asked Questions (FAQs)
Can I eat Honey Nut Cheerios every day?
No, you should not eat Honey Nut Cheerios every day. The cereal is high in added sugar (12 grams per serving, nearly half the daily recommendation) and sodium, which outweighs the benefits of its whole grain and fortified vitamins.
Yes, you can eat Honey Nut Cheerios without milk. They are safe to eat dry and can serve as a crispy snack.
Does Honey Nut Cheerios use real nuts?
Honey Nut Cheerios currently does not use real nuts. The cereal previously contained real nuts but has since replaced them with a natural almond flavor.
How much sugar is in one serving of Honey Nut Cheerios?
What are the main sweeteners in Honey Nut Cheerios?
The top three ingredients in Honey Nut Cheerios are different forms of sweeteners: white sugar, brown sugar, and honey.
Is Honey Nut Cheerios heart-healthy?
While the cereal contains whole grain oats which are good for heart health, the high salt and high added sugar content make it a poor choice for people actively seeking a heart-healthy daily breakfast option.
Conclusion
Cereals are now the preferred option for us for breakfast. But in the name of taste, we must not compromise our health. We want a tasty cereal to include in our meal.
Maybe eating Honey Nut Cheerios once in a while will not affect much, but eating this cereal frequently will have repercussions. Whenever your hand reaches for the Honey Nut option, remind yourself, Is Honey Nut Cheerios healthy?
Should you have your kids take this amount of sugar? Of course, not! Go for the healthier cereal option.
Bread is the perfect choice for an energy-packed meal while also being highly affordable and broadly available.
However, many people believe that consuming bread is not a wise decision as it largely contributes to their body becoming obese over time. So, it’s a common question, is bread healthy? The answer is both yes and no.
Processed bread is some of the worst food items you can ever put into your body. Therefore, it’s best to avoid it if you have the opportunity.
On the other hand, there are a lot of natural bread variations that can help nourish your body without any side effects.
There are a lot of benefits to bread, and they vary according to their types. Here are the most noteworthy ones:
01. Conventional White Bread:
Carbohydrates happen to be one of the main elements of white bread. Mass sold loaves of bread are typically made with grains that go through heavily processing, causing them to have carbohydrates the most.
This variation is meant to act as fuel without making you feel full. It helps the dish fulfill its primary purpose of providing energy and strength to the body.
All types of bread usually have a high level of carbohydrates in them. Therefore, having a slice or two during breakfast is what you need to jump into your everyday tasks. But gorging on too much of it can be counterproductive as it will lead to lethargy, and you won’t get any work done.
Whole grain bread is one of the most popular alternatives because of its nutritional superiority. It can be a treasured addition to your diet if you suffer from obesity or just want to lose a lot of weight. Furthermore, it can help you stay away from various health complications and lead an active life.
Unlike commercially produced bread, the ones made of whole grain have a lot of different nutritional elements to them. The most notable ones include vitamin B, which is vital for protection from diseases like anemia.
Furthermore, it’s also crucial for preventing mental illnesses. Magnesium, iron, and dietary fibers are also included in it.
Adults should opt for wholegrain bread than mass-produced ones. It is especially fruitful for safeguarding you from lethal ailments that can occur during old age. Some of the most noteworthy include heart diseases, colon cancer, and high blood pressure. In short, you should opt for it simply to not end up in an early grave.
03. Ezekiel Bread:
Never heard of Ezekiel bread? We don’t blame you. It’s only recently developed and is famous mainly among health enthusiasts and very cautious people about their diet. However, you will do well to switch to it due to all the goodness it can do to your body. Its ingredients and nutritional content make it worth eating.
Compared to regular loaves, the ingredients involved in making the Ezekiel bread are unique. Whereas most variants mainly consisted of wheat, this product is made of millet, soybeans, barley, and lentils. Therefore, eating just a slice of it can give you more health benefits than commercial ones.
Integrating natural and preservative-free ingredients into Ezekiel bread causes it to have significantly lesser anti-nutrients that can harm your body. It also makes it easier to digest, causing you no discomfort after consuming it.
The presence of no sugar makes it perfect for cutting off overconsumption of calories and helping you have a balanced diet.
Rye bread should be the first choice for people who want a high-fiber meal. As the name suggests, its main ingredient is rye, a sort of grain that is quite similar to wheat. However, the loaves tend to be denser and darker than the regular ones, causing you to feel the texture with every bite and experience its rich flavor fully.
If you’re someone who feels that rye bread can be a bit too daunting for breakfast, you can always tone it down by adding wheat to the mixture. Don’t try to eat it if you prefer a gluten-free diet as it has some amounts of that. Furthermore, its flavor is relatively different, so you’ll need some getting used to it initially.
Despite the outlandish flavor of rye bread, it is worth eating simply because of how much good it can do to your health. Eating it will help you lower your blood pressure and ensure that you don’t collapse due to stress or overwork. It can be especially beneficial if you suffer from heart complications.
05. Corn Tortillas:
Mexicans love eating corn tortillas, and it is a vital staple in their everyday diet. It’s light and the texture can be changed to pair up with a plethora of different items. Some popular Mexican dishes that involve this sort of bread include nachos and tacos. Furthermore, it’s relatively easier to eat and packs a good nutrition value.
Corn happens to be the main component of this bread variation. Therefore, each slice contains a lot more protein than the traditional loaves while also carrying a healthy amount of calories. Chowing down on one of them is an excellent option if you’re planning to have a light meal, as it’s easy to digest and will not weigh you down.
Unlike most alternatives, the corn tortilla can easily compete with conventional bread due in terms of energy content. People with gluten energy can safely eat it, and it can function as fuel for the day due to its high amounts of fiber.
It’s also extremely vital, as it can be used as an ingredient for various fast-food items like pizzas and burgers.
06. Pizza Crust:
Italy is acknowledged globally by foodies for introducing the world to pizza bread. Its unique shape, which is similar to a pie, and its light body make it perfect for various meals. Furthermore, it is widely customizable, allowing you to enjoy it in many ways. You will rarely find yourself getting bored of it.
Those looking to get into a diet will want to include the pizza crust in your diet. It’s delicious, unlike most low-carb items, and it won’t fill you up—popular items used for making it include egg, cheese, and spices. You can also add cauliflower to gain more health benefits and not guilt about chowing down on this delicacy.
Maximum risks related to consuming bread come from the ones made of processed flour and contain preservatives. The artificial ingredients make it lose most of its nutritional value while also adding a lot of harmful substances. Furthermore, the addition of artificial sugar also makes them more dangerous.
The most evident and widespread issue that arises from eating bread is obesity. Eat too many of these, and you will feel lethargic eventually, and your body will bloat up over time. Therefore, you must check if you choose to consume them daily.
Suppose obesity itself doesn’t discourage you from eating processed bread. In that case, it’s also worth knowing that too much of it can lead to a plethora of life-threatening diseases.
The most noteworthy one is type 2 diabetes which can drastically ruin your life. This variety has very little fiber, which causes you to overeat too.
Heart diseases are also a significant problem caused by eating processed bread. The long-term damage it can do to your body is staggering. If you don’t remain aware of its fallbacks, it can even contribute to an untimely death. Therefore, it’s vital to eat at an exemplary level.
Bread is perfectly capable of daily consumption as it works as an excellent energy source. Therefore, feel free to eat it frequently and kick-start your day with it.
How many slices of bread can I have in a day?
Overeating bread can lead to your body becoming lethargic. It’s best not to eat more than four bread slices daily.
Can you get belly fat from eating bread?
Carbohydrates in bread do not necessarily cause belly fat. You can only get bloated if you have the processed variation daily.
Conclusion
There you have it! All the information that you can know about bread and its variations. So, is bread healthy? It depends on what type of bread you’re eating.
Choose the one that will fit into your diet the best and start eating without any guilt! Your body will thank you for it, and you can start all your days full of energy and vigor!
Winter is a season that makes us excited since many seasonally exclusive fruits and vegetables grow during that time. Among them, the most popular one is undoubtedly butternut squash.
It’s easily recognizable, and many people make it a part of their daily diet during this time. However, many people still have doubts about whether it is worth eating.
So, is butternut squash healthy? Yes, it is. This fruit has a lot of value and gains to offer to the human body, and our article will help you learn about them in detail.
Furthermore, it will also take you through the possible benefits your body can gain from eating it. Hopefully, you’ll be able to decide whether it’s worth eating or not in the end.
Butternut Squash: An Overview
Butternut squash is easily recognizable due to its iconic color. It belongs to the Cucurbitaceae family, host to other winter vegetables, pumpkin, and summer squashes like zucchini.
Its skin has a soft orange color which is easily distinguishable as no other fruits or vegetable has it. Once your cut it open, you will find the interior to have a more intense shade of orange.
The shape of the butternut squash is also unique. The structure is very similar to that of a pear if its shape is wider than usual. It is considered one of the oldest crops in recorded human history. Its cultivation goes back to as much as 10,000 years. The country of origin of this fruit is thought to be Mexico.
Another exciting feature of the butternut squash is its incomparable flavor. Although it isn’t intense in its flavoring, it contains a mix of nutty and sweet, making it one of the unique taste palettes among fruits. A mouthful of this fruit will have you experiencing a plethora of different tastes simultaneously.
Nutritional Values
Butternut squashes are not just rich in flavor, but they also have a lot to offer in terms of nutrition. It can be considered as one of the most valuable fruits due to the versatility it has to offer in this regard.
Unlike most fruits, butternut squashes can perform exceptionally well as an energizer for the body. One cup of this fruit can provide you with 16 grams carbohydrates and proteins worth 1.4 grams, ensuring that you get an instant boost and growth for your bones.
It also has a rich array of vitamin offerings, including 100% and 40% of the daily requirement of vitamin A and C, respectively.
This fruit also has a lot of minerals that can nourish your body and keep it in optimal condition throughout the day. The most crucial ones include sodium, magnesium, and potassium. Consuming it daily can help you strengthen yourself while also staying free from many diseases caused by mineral deficiencies.
Benefits of Eating Butternut Squash
Many people value butternut squashes as a welcome addition to their winter diet due to their multiple functions; it helps to enhance their health. Here are some of the most noteworthy ones you can gain from eating them.
An Excellent Hydrator:
Staying hydrated is an absolute necessity if you plan to go outside. During a trip or just a typical day out, dehydration can cause your body to shut down suddenly and painfully. Thankfully, eating butternut squashes can help in this regard. Adding it to your diet can help you pull through without drinking eight glasses of water.
Water happens to be one of the significant elements that help make up butternut squash. Each serving of this fruit comprises approximately 87% of the fluid. Therefore, adding it to your diet can help ensure that your body is sufficiently hydrated throughout the day, which also helps to take care of your skin.
Boosts Your Immunity:
Immunity is vital for your body if you intend to live a long and healthy life. Eating well can help maintain the sanctity of your body. Unfortunately, most foods nowadays cause your health to deteriorate due to preservatives. However, butternut squashes are incredibly effective in enhancing your overall immunity.
This fruit has the same quality as the other alternatives, with an orange-colored exterior. It’s rich in two different types of carotene, which the body automatically converts into vitamin A. This element is crucial for your overall immunity. Therefore, you can consider adding it to your diet to prolong your good health.
Retaining Overall Eye Strength:
Fruits and vegetables are vital food types that can help enhance your overall eye strength and ensure that you have 20/20 vision. In this regard, very few of them are as helpful as butternut squash. Consuming it daily can ensure that your eyesight is in peak condition without any performance losses.
Vitamin A is one of the significant nutritional elements present in butternut squashes. It combines with the beta-carotene within the fruit to protect your eyes from UV rays. Drizzle some olive oil on it before eating it so that you can receive these benefits properly, thanks to the healthy fat.
Holistic Health Improvement:
Eating fruits like butternut squashes rich in antioxidants is perfect for keeping your mental faculties in check. Long-term studies show that eating such fruits can help maintain a strong memory, eye power, and speech fluency. It also has a high amount of vitamin E, which helps keep you safe from Alzheimer’s disease.
Butternut squash is also an excellent fruit that can save you from many lethal diseases. Chances of fatal disorders like heart disease and lung cancer can be drastically reduced by adding them to your daily diet.
Assistance in Losing Weight:
Unlike a lot of popular food, butternut squash is not fatty, and you will not feel bloated if you consume a lot of it. Its nutritional content is minimal and free from fatty elements to ensure that it digests quickly while remaining easy on the stomach. It can help you maintain a healthy body and prevent you from getting overweight.
Both soluble and insoluble fibers are present in butternut squashes, of which the prior is helpful for weight loss. It also helps to deduct your appetite to prevent you from overeating. Long-term consumption of this fruit can be an excellent option for diet control as it helps to stop the body from taking on more weight over time.
Delicious Butternut Squash Meal Options
Butternut squash is a fruit that you can use in multiple ways to make the most delicious meals. It makes the entire process of going on a diet fun and exotic experience.
Many people love to have this fruit as a side dish. Its preparation process is relatively simple. You have to cut it up into cubes and roast it in olive oil with pepper and salt for taste.
Unlike most fruits or veggies, the butternut squash is extremely versatile when cooking. You can use it as a substitute and add it to various dishes to make it tastier. It can function as a healthy alternative to potatoes when cooking fries. Furthermore, it can work as a fiber booster if you roast and add it to salads.
A unique fact about the butternut squash is its ability to be integrated into bakery items. You can make a puree out of them and apply it to muffins to integrate its flavors into them. Furthermore, making soup from this fruit is an excellent choice as it is both a delicious and nutritious treat.
Lastly, butternut squashes also pair exceptionally well with various proteins and veggies. It works as an excellent stuffing alongside acorns and can be a fantastic filling for pies.
Furthermore, you can also make curry using it to pair with beef and chicken, making it a great item during lunch or dinner. From breakfast to supper, it is perfect for every meal and occasion.
Frequently Asked Questions (FAQs)
Is overconsuming butternut squash bad for your body?
It’s best to eat butternut squash in a balanced amount during meals. Overeating can harm your body by drastically increasing the chances of lung cancer.
Are butternut squashes a good option for losing weight?
Butternut squashes are an extremely light yet nutritious food. It has significantly fewer calories and has a lot of fiber to offer. Furthermore, eating one of them is enough to fulfill your daily Vitamin-A needs for the day.
Can butternut squash cause bloating?
Fiber is one of the main components of butternut squash. However, the probability of it causing gas in your body is very slim.
Conclusion
If anything is conclusive from this article, it’s the fact that the butternut squash is a highly delicious and versatile fruit. The flavor alone is enough to consider buying it whenever you find it available. Stocking your pantries with it during winter will let you cook and enjoy many different dishes.
But, is butternut squash healthy? The answer is undoubtedly, yes! Its richness of fiber, vitamins, and other elements makes it highly beneficial for various aspects of your body. So, feel free to eat it without any hesitation!
The morning routine often starts with a single, crucial decision: what should I eat for breakfast? For those who crave a warm, comforting start to the day, two hot cereals frequently dominate the pantry landscape: Cream of Wheat vs Oatmeal.
These two options, staples in kitchens across the country, both offer warmth and fuel, yet they diverge significantly in their composition, preparation, and profound health impacts. Understanding these core differences is essential for making the choice that best aligns with your specific nutritional needs, dietary goals, and flavor preferences.
We will meticulously unpack their nutritional value of cream of wheat vs oatmeal, analyzing calories, fiber, protein, and their respective effects on blood sugar. By the conclusion, you will possess all the necessary information to determine which grain deserves a permanent spot on your breakfast table.
What Is Cream of Wheat?
The Essence of Cream of Wheat: Farina
Cream of Wheat is a popular hot cereal, instantly recognizable by its smooth, soft texture and mild flavor. Its identity is rooted in its primary ingredient: farina. This grain is produced from the endosperm of milled hard wheat, and it serves as the foundational element of the porridge.
The name farina itself derives from the Latin word for flour or meal, defining the finely ground nature of the product. The final product is a wheat semolina, which is essentially the purified middlings of durum or hard wheat.
Milling Process and Distinctive Texture
The history of Cream of Wheat is tied closely to industrial milling in the late 19th century, when it was introduced as a palatable and easily digestible food source. Because the milling process strips away the bran and germ from the wheat grain, the resulting product is naturally low in fat and fiber; this is why it cooks quickly and presents such a clean, light color.
The fine grind and absence of the rougher outer parts of the grain create a distinctive creamy mouthfeel when cooked properly. Cream of Wheat nutrition is therefore largely dictated by its refined nature and subsequent fortification.
Cream of Wheat vs. General Porridge
The primary difference between Cream of Wheat and a general what is porridge definition lies in the grain type. Porridge is an umbrella term for any hot cereal made from boiling grains (such as oats, rice, corn, or barley) in water or milk.
Cream of Wheat is explicitly a wheat-based porridge, while grits are a corn-based porridge, and oatmeal is an oat-based porridge. This distinction is subtle but important.
Varieties and Product Types
Historically, Cream of Wheat was primarily sold in the “Original” or “10-minute” stovetop format. Today, the brand offers several distinct types: the Original (enriched), Quick (3-minute), and Instant (1-minute) varieties, which vary mainly in particle size and cooking time.
It’s crucial to examine the Cream of Wheat nutrition facts on the package, especially since the instant, flavored options often include significant added sugars.
The Nutritional Advantage: Fortification
The major nutritional advantage of Cream of Wheat is its enrichment. Manufacturers significantly fortify the cereal, making it an excellent source of several key micronutrients. This process adds back essential B-vitamins, including thiamin, niacin, and folate, which are often lost during the milling of the wheat.
Most significantly, Cream of Wheat is an exceptional vehicle for iron, frequently providing over 50% of the daily recommended value per serving. This high iron content makes it a powerful food for combating iron deficiency and anemia, especially in children and pregnant women.
Cream of Wheat Nutrition Facts (1/3 cup dry, enriched, cooked with water)
Nutrient
Amount (Approximate)
Daily Value (%)
Calories
140
–
Total Fat
0 g
0%
Sodium
100-120 mg
4-5%
Total Carbohydrates
31 g
11%
Dietary Fiber
1 g
4%
Protein
4 g
8%
Iron
9 mg
50%
Folate (B9)
125 mcg DFE
30%
Calcium
260 mg
20%
Magnesium
10 mg
2%
Note: Data for enriched variety, cooked without salt or sugar.
What Is Oatmeal?
Oatmeal, a globally beloved breakfast staple, is a porridge made specifically from processed oat groats. The foundational grain, the oat, is a whole grain that differs significantly from wheat in its structure and nutritional profile.
Unlike Cream of Wheat, the oat grain contains a higher concentration of the nutrient-rich bran and germ, even after processing, which results in its superior fiber and protein content. This composition is key to understanding the various oatmeal vs cream of wheat health outcomes.
There are three primary types of oatmeal widely available, and the processing method fundamentally dictates the cooking time and textural experience:
Steel-Cut Oats: These are oat groats sliced into two or three pieces using steel blades. They are the least processed type, retaining a dense, chewy texture and requiring the longest cooking time (up to 30–40 minutes). They have the lowest glycemic index.
Rolled Oats (Old-Fashioned): These groats are steamed and then rolled flat into flakes. This process stabilizes the healthy oils and decreases cooking time (about 5 minutes). Rolled oats are the most versatile type, suitable for baking, overnight oats, and stovetop cooking.
Instant Oats: These are the most processed form, steamed longer and rolled thinner than old-fashioned oats. They cook almost instantly with hot water or milk, creating a mushier consistency. While convenient, this processing increases their glycemic index compared to the less-processed forms.
Oatmeal easily qualifies as a porridge because it is a hot dish made from boiling a grain (oats). What sets oat porridge apart is the presence of beta-glucans. This specific type of soluble fiber is abundant in the oat grain; it forms a thick, gel-like substance in the digestive tract.
The satiety benefits of oatmeal are a direct result of the high soluble fiber content. The slow digestion of beta-glucans keeps individuals feeling full for extended periods, a crucial component for effective hunger management.
This prolonged digestion also means that the carbohydrates are released gradually into the bloodstream, avoiding the sharp blood sugar spikes associated with more refined cereals.
Oatmeal Nutrition Facts (1/2 cup dry, rolled oats, cooked with water)
Nutrient
Amount (Approximate)
Daily Value (%)
Calories
150
–
Total Fat
3 g
4%
Sodium
0 mg
0%
Total Carbohydrates
27 g
10%
Dietary Fiber
4 g
14%
Protein
5 g
10%
Iron
2 mg
11%
Folate (B9)
14 mcg
3%
Calcium
20 mg
2%
Magnesium
56 mg
13%
Note: Data for plain, old-fashioned rolled oats cooked without salt or sugar.
Nutritional Comparison: Cream of Wheat vs Oatmeal
The nutritional differences between these two cereals are substantial and stem primarily from the type of grain used and the degree of processing. A thorough review of the cream of wheat vs oatmeal nutrition reveals two distinct nutrient profiles, each optimized for different health requirements.
This side-by-side analysis, focusing on the nutritional value of cream of wheat vs oatmeal and cream of wheat vs oatmeal macros, is the foundation for an informed dietary choice.
Naturally Gluten-Free (but often cross-contaminated)
Cream of Wheat is unsuitable for Celiac
Sodium
100-120 mg
0 mg
Cream of Wheat contains added sodium
Macro Balance Analysis
When examining cream of wheat vs oatmeal macros, the most striking difference is the fiber content, which significantly influences the quality of the carbohydrates.
Carbohydrates: Cream of Wheat possesses a slightly higher total carbohydrate count per serving, approximately 31 grams, compared to oatmeal’s 27 grams; this difference is insignificant on its own. The real distinction lies in the fiber breakdown, where Cream of Wheat contains only 1 gram of fiber, making most of its carbs simple starches. Oatmeal, conversely, features 4 grams of fiber, which slows the absorption of its 27 grams of carbohydrates. This disparity means the Cream of Wheat is a faster-digesting carb source, whereas the oatmeal vs cream of wheat nutrition profile favors slow, sustained energy release.
Protein: Oatmeal offers a modest, yet noticeable, edge in protein, boasting 5 grams per serving compared to Cream of Wheat’s 4 grams. While neither cereal is a protein powerhouse, this 25% difference in protein content contributes to oatmeal’s overall better satiety profile, helping you feel full longer.
Fats: Oatmeal contains approximately 3 grams of healthy, unsaturated fat per serving, while Cream of Wheat is virtually fat-free. These fats in oats are beneficial for heart health and can enhance the absorption of fat-soluble vitamins, demonstrating another advantage for the whole grain.
Micronutrient Dominance: Fortification vs. Natural Content
The cream of wheat nutrition facts emphasize its role as a fortified food, designed to address nutrient deficiencies prevalent decades ago. This enrichment process gives it an undeniable advantage in specific micronutrients.
Iron: Cream of Wheat is overwhelmingly superior in iron content, often delivering 50% or more of the Daily Value in a single serving. This makes it a critical tool for those combating iron deficiency, particularly individuals with specific dietary restrictions or high iron requirements.
B-Vitamins and Folate: Similarly, the fortification process ensures that Cream of Wheat is rich in B-vitamins, especially Folate, which is essential for cell growth and is particularly important during pregnancy.
Magnesium: Oatmeal naturally contains higher levels of magnesium, a mineral vital for muscle and nerve function, blood sugar control, and energy production.
In summary, the comparison reveals a trade-off: Oatmeal is naturally superior in heart-healthy fiber, protein, and healthy fats, while Cream of Wheat excels due to powerful industrial fortification, providing concentrated amounts of iron and B-vitamins.
Fiber Comparison: Which Has More Fiber?
The fiber content is the most significant nutritional factor separating these two breakfast cereals. When analyzing cream of wheat vs oatmeal fiber, the conclusion is clear: oatmeal is the undisputed winner.
A standard serving of rolled oats typically provides 4 grams of dietary fiber, whereas enriched Cream of Wheat typically contains only 1 gram. This fourfold difference has profound implications for digestive health, cardiovascular wellness, and appetite control.
Oatmeal’s fiber is primarily soluble fiber, specifically the potent compound known as beta-glucan. This compound is responsible for the unique, slightly sticky texture of cooked oats and its tremendous health benefits. Beta-glucan dissolves in water to form a viscous gel inside the stomach and intestines.
This gel actively slows the movement of food through the digestive tract, which has several health implications. The mechanical slowing effect is directly responsible for prolonged satiety, which is crucial for those focused on weight management.
The health implications of oatmeal’s high fiber content are extensive:
Cholesterol Reduction: Soluble fiber binds to cholesterol-rich bile acids in the gut, preventing their reabsorption and promoting their excretion. This process forces the liver to pull more cholesterol from the bloodstream to produce new bile, effectively lowering LDL (“bad”) cholesterol levels.
Blood Sugar Regulation: By slowing down the rate at which food leaves the stomach, beta-glucan delays the absorption of glucose into the bloodstream. This leads to a smoother, more gradual rise in blood sugar, preventing sharp spikes.
Digestive Health: Fiber adds bulk to stool, promoting regular bowel movements and preventing constipation. This contributes significantly to overall gut health, reinforcing the argument that oatmeal is the superior choice for digestive regularity.
Conversely, Cream of Wheat is classified as a low-fiber food. The refining process, which removes the wheat bran to create the smooth, fine farina, also removes most of the grain’s natural fiber.
While low-fiber foods are sometimes medically necessary for individuals recovering from surgery or suffering from specific gastrointestinal illnesses, the lack of fiber makes Cream of Wheat a less effective tool for chronic disease prevention and long-term satiety. Therefore, those prioritizing fiber for cholesterol, blood sugar, or digestive health must select oatmeal.
Glycemic Index & Blood Sugar Impact
For individuals managing blood sugar levels, particularly those with diabetes, understanding the cream of wheat vs oatmeal glycemic index is absolutely non-negotiable. The glycemic index (GI) measures how quickly a food causes blood glucose levels to rise after consumption. Foods with a high GI (70 or more) cause rapid spikes, while foods with a low GI (55 or less) lead to a slow, steady rise.
The typical GI values for the plain, water-cooked versions of these cereals differ significantly:
Cream of Wheat: Regular, quick-cooking varieties of Cream of Wheat (farina) generally have a medium-to-high GI, ranging from approximately 56 to 70. The instant, enriched version often lands on the higher end of this scale. This higher GI is a direct result of the lack of fiber and the fine milling process; the starch is easily accessed by digestive enzymes, leading to rapid conversion into glucose.
Oatmeal: Traditional rolled oats or steel-cut oats, due to their high fiber and lower processing, typically have a low-to-medium GI, ranging from 55 to 60. Steel-cut oats are always the lowest, providing the slowest energy release. Instant oats, however, are an exception, often having a higher GI closer to the quick Cream of Wheat due to the extensive pre-cooking and flattening.
This comparison demonstrates a clear advantage for oatmeal when blood sugar stability is the primary concern. Since the high soluble fiber content of oats slows gastric emptying, the absorption of glucose is regulated over a longer time period. This sustained release is preferable for sustained energy and maintaining euglycemia.
The question of which is better for a diabetic, oatmeal or Cream of Wheat? is best answered by recommending the low-GI whole grain. For people with diabetes, steel-cut or old-fashioned rolled oats are overwhelmingly the safer and healthier choice.
However, preparing these cereals correctly is paramount to controlling the glycemic load (GL, which factors in serving size). To lower the glycemic load of any hot cereal, especially Cream of Wheat, follow these nutritional tips:
Add Protein: Incorporating a scoop of protein powder, a dollop of Greek yogurt, or an egg white mixed into the hot cereal will significantly buffer the blood sugar response. Protein requires more time to digest and minimizes the carb spike.
Add Healthy Fats: Stirring in nut butter (almond or peanut butter), chia seeds, or ground flaxseed introduces healthy fats and additional fiber. Fat further slows gastric emptying, thereby reducing the glycemic impact.
Choose Unsweetened: Always choose plain, unflavored varieties, avoiding the packets of instant Cream of Wheat or oatmeal that contain high levels of added sugars and syrups.
Incorporate Spices: Natural spices like cinnamon are known to have properties that may improve insulin sensitivity, making them a delicious and healthy addition.
Health Benefits Comparison
Both Cream of Wheat and oatmeal are fundamentally healthy foods; they provide complex carbohydrates for energy and essential vitamins and minerals. However, their unique processing and fortification status result in distinct clusters of cream of wheat vs oatmeal health benefits.
Oatmeal Health Benefits: The Whole Grain Champion
Oatmeal’s benefits are driven by its whole-grain status and its unique soluble fiber. These advantages are widely supported by decades of scientific research:
Cardiovascular Health: The key benefit is cholesterol lowering. The beta-glucan fiber efficiently reduces LDL cholesterol, which is a significant factor in reducing the risk of heart disease. The Food and Drug Administration (FDA) specifically permits heart-health claims for products containing sufficient amounts of beta-glucan from oats.
Weight Management: The high fiber content promotes remarkable satiety. Because it takes a long time to digest, it helps suppress appetite, contributing to overall calorie control and making it a powerful tool for weight loss.
Blood Sugar Control: As previously noted, the slow digestion of the entire grain leads to a lower and more gradual post-meal glucose response, aiding in the management and prevention of Type 2 diabetes.
Antioxidant Power:Oats contain avenanthramides, a unique group of antioxidants found almost exclusively in oats. These compounds possess anti-inflammatory and anti-itch properties, adding another layer to oatmeal’s systemic health benefits.
Cream of Wheat Health Benefits: The Gentle Digest and Nutrient Delivery System
The question, is cream of wheat good for you, can be answered affirmatively, although its benefits serve a different purpose than those of oatmeal. Its smooth composition and fortification are its defining health assets:
Exceptional Source of Iron: Cream of Wheat’s most notable health claim is its high fortification with iron. For individuals with iron-deficiency anemia or those struggling to consume sufficient red meat, Cream of Wheat provides a highly accessible, vegetarian-friendly source of this critical mineral. Iron is essential for oxygen transport in the blood and neurological development, especially in infants and young children.
Rich in B-Vitamins and Folate: The enriched product is packed with B-vitamins, including Niacin, Riboflavin, and Thiamin. These micronutrients play vital roles in energy metabolism and nervous system function, helping to convert food into usable energy. Folate, or folic acid, is particularly important for DNA synthesis and preventing certain birth defects.
Easy to Digest: The processing removes the hard bran layer, making Cream of Wheat exceptionally gentle on the stomach. This low-residue, easily digestible quality makes it an ideal food for people recovering from gastrointestinal illnesses, those on soft-food diets, or seniors and toddlers who struggle with chewing or digesting high-fiber foods.
Low-Fat Option: With essentially zero fat per serving, it is a clean, simple carbohydrate source for those monitoring dietary fat intake.
In essence, while oatmeal provides robust, long-term chronic disease protection through its fiber, Cream of Wheat functions as a powerful, rapid nutrient delivery system for specific vitamins and minerals, all delivered in a highly palatable and gentle format.
Which Is Healthier: Oatmeal or Cream of Wheat?
When considering the comprehensive health benefits and long-term wellness implications, the final determination of which is healthier oatmeal or Cream of Wheat? generally favors the whole grain. For most people and general population health goals, oatmeal is the superior daily choice.
The rationale for oatmeal’s general superiority rests on three pillars:
Fiber and Heart Health: The high beta-glucan content provides unique, powerful, and scientifically proven benefits for lowering LDL cholesterol and stabilizing blood sugar. No amount of fortification can replicate the function of this dietary fiber.
Whole Grain Status: Oats are a complete whole grain, offering a richer matrix of naturally occurring nutrients, including manganese, magnesium, and phosphorus, that are present even before fortification.
Satiety and Weight Control: Oatmeal’s ability to promote fullness for longer periods is an invaluable asset in a world struggling with obesity and poor dietary habits.
However, a sweeping generalization ignores the specific situations where Cream of Wheat is not just good, but necessary. There are three key scenarios where Cream of Wheat may actually be the preferred food:
Sensitive Stomachs and Low-Fiber Diets: Individuals with Crohn’s disease, ulcerative colitis during a flare-up, diverticulitis, or those preparing for colonoscopies require low-residue, gentle foods. In these cases, the low-fiber, bland nature of Cream of Wheat is far superior to fibrous oatmeal.
Iron Deficiency: For people (especially young children and those following vegetarian or vegan diets) who require a high, concentrated dose of readily available iron, the fortification level in Cream of Wheat makes it a vital part of the diet.
Bodybuilding and High-Intensity Training: As discussed in a later section, Cream of Wheat’s high glycemic index and easy digestibility make it an optimal choice for rapid pre-workout glycogen replenishment, a niche but important application.
Ultimately, the choice is highly contextual. If you are prioritizing heart health, steady energy, and natural fiber, choose oatmeal. If you need highly fortified iron, B vitamins, or a gentle, easily digested meal, Cream of Wheat is the pragmatic and appropriate choice.
Weight Loss vs Weight Gain Comparison
The comparison of cream of wheat vs oatmeal weight loss and cream of wheat vs oatmeal weight gain reveals how their macro profiles can be leveraged for highly specific caloric goals. The distinct fiber and digestion rates of these two cereals make them suitable for opposite ends of the weight spectrum.
Superior Satiety: The high fiber content, particularly the soluble beta-glucan, absorbs water in the digestive system, expanding and creating a profound sense of fullness. This satiating effect lasts for hours, reducing the likelihood of mid-morning snacking and overall daily calorie consumption.
Lower Calorie Density: A serving of plain oatmeal cooked in water is relatively low in calories (around 150-170 kcal). Furthermore, its texture naturally discourages overeating.
Low Glycemic Index: The steady release of glucose prevents blood sugar crashes, which often trigger intense cravings for simple carbohydrates and sugars, thereby stabilizing appetite and mood.
Cream of Wheat for Weight Maintenance or Weight Gain
Conversely, Cream of Wheat is often a better tool for achieving neutral weight maintenance or targeted weight gain goals. Its rapid digestibility is the key characteristic:
Lower Satiety: Because Cream of Wheat is low in fiber, it offers minimal resistance to digestion. It moves quickly through the gut, leading to a faster return of hunger. This characteristic is valuable for those who need to consume more meals or calories throughout the day without feeling excessively full.
Easy to Increase Calories: The smooth, mild flavor and texture are ideal for “hiding” calorie-dense additions. You can easily stir in full-fat milk, butter, cream, coconut oil, or protein powder without significantly altering the volume, thereby creating a highly caloric, nutrient-dense meal.
Quick Digestion: This is an advantage for athletes who need a carbohydrate source that empties the stomach quickly before a second meal or a workout, preventing digestive distress during activity.
Recipe Idea for Weight Gain (Bulking): Prepare Cream of Wheat with whole milk or half-and-half. Stir in a tablespoon of butter, two tablespoons of brown sugar, and a scoop of unflavored whey protein powder. The resulting porridge is significantly higher in calories, protein, and fat than the oatmeal counterpart, making it an efficient cream of wheat weight gain option.
Bodybuilding Comparison
The fitness community, particularly bodybuilders, has a unique and practical perspective on the cream of wheat vs oatmeal bodybuilding debate. For athletes, the choice is not simply about which is “healthier,” but which cereal best supports the timing and intensity of their training phases: bulking (calorie surplus) versus cutting (calorie deficit).
Cream of Wheat: The Pre-Workout Carb King
Why do bodybuilders eat Cream of Wheat? The primary reason is its high-GI, low-fiber, easy-to-digest profile.
Perfect Pre-Workout Carbs: During the crucial pre-workout window (30-90 minutes before a session), the goal is to load muscles with glycogen for immediate use without taxing the digestive system. Fiber-rich foods like steel-cut oats can feel heavy and cause gastrointestinal distress (bloating, gas) during intense lifting. Cream of Wheat, being a simple, refined starch, digests quickly and efficiently, floods the bloodstream with glucose, maximizing available energy for the training session.
Rapid Glycogen Replenishment (Bulking): During a bulking phase where consuming large quantities of food is required, Cream of Wheat serves as an excellent vehicle for “clean calories.” Bodybuilders can easily consume a high volume of carbohydrates from farina without the uncomfortable fullness and satiety associated with high-fiber oats, allowing them to quickly prepare for the next meal.
Oatmeal: The Slow-Burn Endurance Fuel
Oatmeal remains the staple for general health and long-term energy release in bodybuilding, particularly during the cutting phase.
Slower, Sustained Energy: Oatmeal is a superior choice for non-training days, post-workout recovery, or meals consumed 2-3 hours before a workout. Its complex structure ensures a slow release of energy, preventing the post-meal crash often experienced after high-GI foods.
Cutting Phase Advantage: When an athlete is in a caloric deficit (cutting), maximizing satiety is key to managing hunger. Oatmeal’s high fiber keeps the athlete feeling full, making it easier to stick to a restricted calorie budget.
Nutrient Density: For sustained health, oatmeal delivers more naturally occurring vitamins and minerals (like magnesium) and the vital beta-glucan fiber that aids in cholesterol management, which is important when consuming high-protein, often higher-fat, bodybuilding diets.
The cream of wheat vs oatmeal protein content difference is minor, making supplementation mandatory regardless of the choice. Both cereals should be paired with a scoop of whey or casein protein to make it a complete anabolic meal. For maximum training performance, Cream of Wheat wins the pre-workout sprint, but oatmeal is the long-term cutting and endurance fuel.
Taste Comparison
The divergence in taste and texture is perhaps the most subjective, yet influential, factor when choosing a daily hot cereal. The cream of wheat vs oatmeal taste experience is fundamentally different, appealing to different sensory preferences.
Cream of Wheat: Smooth, Milder, and Velvety
Cream of Wheat is defined by its simplicity and luxurious mouthfeel. The finely milled farina dissolves into an almost purely liquid suspension when cooked, resulting in a perfectly smooth, velvety porridge, devoid of any significant lumps or chewiness.
Texture: Ultra-smooth, creamy, and soft. It is often described as “comfort food” because of its gentle, almost baby-food consistency.
Flavor: It is remarkably mild. The taste of wheat semolina is very neutral, acting as a blank canvas. This neutrality allows added flavors, whether savory or sweet, to dominate completely. This is why it pairs so well with strong flavors like chocolate, cinnamon, or maple syrup.
Oatmeal: Nuttier, Chewier, and Hearty
Oatmeal offers a much more rustic, hearty, and texturally complex experience, particularly in its less-processed forms like steel-cut and rolled oats.
Texture: Chewy, hearty, and slightly gritty. Rolled oats retain their flake shape, providing resistance to the bite, while steel-cut oats are firm and almost rice-like. The soluble fiber creates a slightly sticky, gelatinous coat that adds to the dense, full-bodied feel.
Flavor: Oats naturally possess a distinctly nutty, earthy flavor that is more pronounced than the neutral wheat taste of farina. This natural flavor profile provides a deeper base, complementing toppings like fruit, spices, and darker sweeteners.
Ultimately, if you prefer a subtle flavor and a baby-soft, gentle texture, Cream of Wheat is your choice. If you desire a robust, chewy texture and a nutty, wholesome base for your toppings, oatmeal is the clear winner. The flavor profile of both is highly customizable with additions like fresh fruit, honey, nuts, and spices.
Cream of Wheat vs Oatmeal for Dogs
The question of feeding hot cereals to pets is common, and the comparison of cream of wheat vs oatmeal for dogs involves important distinctions regarding digestive sensitivity and toxicity. While neither should be a primary component of a dog’s diet, they can be safe and useful additions in moderation, provided they are prepared correctly.
Oatmeal for Dogs
Oatmeal (plain, rolled oats or steel-cut) is generally considered safe and beneficial for dogs in small quantities.
Safe in Moderation: Oats are a whole grain and a good source of soluble fiber, which can help regulate canine bowel movements, especially when a dog is experiencing mild diarrhea.
Skin and Coat Health: The natural oils and B-vitamins in oats can promote a healthy coat and may help soothe dry or itchy skin.
Preparation is Key: Oatmeal must be cooked with only water, avoiding all additions. Dogs must not consume sweeteners, cinnamon, nutmeg, xylitol (highly toxic to dogs), chocolate, or large amounts of dairy.
Cream of Wheat for Dogs: Caution is Advised
Cream of Wheat contains wheat, which is a gluten-containing grain.
Gluten Content: Since Cream of Wheat is wheat-based, it is not suitable for dogs that have been diagnosed with wheat allergies or gluten sensitivities, which are relatively common in certain breeds.
Digestibility: The low fiber content makes it highly digestible, which can be useful when feeding a dog that is recovering from digestive upset and requires a bland diet. However, the high sodium and heavy fortification (especially iron) in some enriched varieties could be problematic if overfed.
Recommendation: If you choose to offer Cream of Wheat, it should be the plain, original (unenriched/unflavored) variety, cooked with water, and given in very small amounts. Plain, cooked rice or plain pumpkin puree are often better and safer bland diet alternatives than Cream of Wheat. Always consult with a veterinarian before making significant changes to your dog’s diet.
Cream of Wheat vs Oatmeal Reddit Opinions
The online fitness and nutrition communities, particularly threads discussing cream of wheat vs oatmeal Reddit, provide a fascinating, real-world perspective that often mirrors the scientific data but adds layers of preference and practicality. Summarizing the themes seen across these Reddit threads reveals a few consistent trends.
Texture Preferences and Nostalgia: Many users choose Cream of Wheat primarily for its texture. It is often referred to as “comfort food” or “childhood nostalgia” due to its soft, velvety mouthfeel. Those who dislike the “goopiness” or “chewiness” of oats frequently gravitate toward farina.
Oatmeal for Fitness and Health: The overwhelming consensus in threads focused on macros, cutting, and general health heavily favors oatmeal. Users consistently praise oatmeal for its superior fiber and satiety, noting its effectiveness in helping them manage hunger while in a caloric deficit.
The Bodybuilding Exception: When discussing pre-workout nutrition, the tide turns dramatically in favor of Cream of Wheat (or often its close cousin, Cream of Rice). Bodybuilders and performance athletes consistently state that Cream of Wheat is easier to digest, allowing them to train harder without feeling bloated or risking mid-workout gastrointestinal issues. This highlights the practical application of the high-GI/low-fiber profile.
Diabetic Community Input: Within the diabetes-focused subreddits, the preference is strongly for steel-cut or rolled oats. There is general caution expressed about the high-GI of instant Cream of Wheat, with users often advising fellow diabetics to prioritize the high fiber content of oats and to add protein/fat buffers regardless of their cereal choice.
These community opinions reinforce the core conclusion: personal health goals and lifestyle dictate the “better” option, with texture and training timing being the most influential deciding factors for many everyday users.
Is Farina Healthier Than Oatmeal?
The question is farina healthier than oatmeal requires a direct definitional clarification before it can be answered accurately. Farina is simply the name for the milled, refined wheat product from which Cream of Wheat is made. Therefore, the question is synonymous with comparing Cream of Wheat and oatmeal.
As established, oatmeal is generally healthier for the general population because of its classification as a whole grain. Whole grains, by definition, retain the bran, germ, and endosperm, ensuring that the final product contains the natural, synergistic mix of fiber, healthy fats, antioxidants, and naturally occurring micronutrients. The high concentration of beta-glucan fiber in oats is an irreplaceable component for its heart-protective, cholesterol-lowering, and blood-sugar-stabilizing effects.
The advantages of farina/Cream of Wheat are specific and powerful, but do not override the overall benefits of a daily whole grain:
Farina Advantages (Digestibility): Farina is much easier to digest because the tough bran layer is completely removed. This makes it an ideal choice for the medically restricted or sensitive digestive system, which cannot handle the bulk and roughage of high-fiber oats.
Farina Advantages (Fortified Nutrients): The heavy fortification of commercial farina products with iron and B-vitamins ensures that it delivers essential nutrients far more efficiently than the natural levels found in a bowl of oats. A person with a genuine iron deficiency would receive far more therapeutic benefit from an enriched serving of Cream of Wheat than from plain oatmeal.
If your primary health goal is minimizing the risk of chronic disease (heart disease, Type 2 diabetes) and promoting general digestive regularity, oatmeal is the healthier long-term choice. If your primary goal is maximizing iron intake or avoiding digestive distress, then farina (Cream of Wheat) is the healthier choice for your specific circumstance. Health is not one-size-fits-all, and the better option is always the one that meets your unique physical requirements.
Cream of Wheat vs Porridge
The discussion surrounding cream of wheat vs porridge is often a source of mild confusion, but the distinction is simple and based purely on semantics. Understanding the relationship between these terms clarifies the fundamental differences between hot cereals globally.
Porridge: The Umbrella Term: Porridge is a universal culinary term. It is defined as a dish made by boiling ground, crushed, or chopped cereal grains (or legumes) in water or milk. This definition encompasses a vast array of global dishes, including the aforementioned oatmeal, corn grits, the traditional rice congee of Asia, and even polenta. Porridge is an ancient food, simple to make, and has provided warm sustenance across every major culture for millennia.
Cream of Wheat: A Type of Porridge: Cream of Wheat fits neatly under this umbrella definition; it is a type of porridge made specifically from wheat semolina. It is not an exclusive food category but a particular brand and preparation of farina porridge.
Oatmeal: Oat Porridge: Similarly, oatmeal is simply a type of porridge made exclusively from oats.
The clarification simply states that both Cream of Wheat and oatmeal are examples of porridge. However, the texture differences are immense. Cream of Wheat porridge is characterized by its exceptionally smooth, fine, and even texture. Oat porridge is characterized by a heartier, thicker, and chewier consistency, especially when prepared with steel-cut or rolled oats. The texture of the grain, not the cooking method, defines the difference between these two famous bowls of porridge.
How to Make Cream of Wheat Healthier
While Cream of Wheat (farina) is undeniably lower in fiber than oatmeal, its primary health weakness, this is easily remedied through strategic additions. Since the cereal is a neutral base, it is highly receptive to nutrient-dense toppings and mix-ins, allowing you to boost the cream of wheat nutrition profile and gain additional cream of wheat benefits.
Follow these tips to transform a low-fiber, refined carbohydrate into a complete, balanced, and energy-sustaining meal:
Add Protein for Satiety: This is the most crucial step. Stir a scoop of unflavored or vanilla-flavored whey or casein protein powder directly into the hot, cooked cereal. Alternatively, fold in a tablespoon or two of Greek yogurt or cottage cheese after removing it from the heat. This step triples the protein content, significantly lowering the glycemic impact and improving satiety.
Add Fiber via Seeds: Since the grain itself is low in fiber, manually introduce soluble and insoluble fiber. Stir in one tablespoon of ground flaxseed, chia seeds, or hemp seeds. These additions are nearly tasteless but provide a massive boost of dietary fiber and heart-healthy omega-3 fatty acids, addressing the cereal’s main deficit.
Use Fresh Fruit: Always top the cereal with fresh or frozen berries (blueberries, raspberries, or strawberries). These fruits are naturally high in fiber and antioxidants, which complement the iron and B vitamins already present in the enriched farina.
By treating Cream of Wheat as a clean carbohydrate base and strategically layering in protein and fiber, you can create a highly nutritious and balanced meal perfectly tailored to your dietary needs.
Cream of Wheat Recipes
Cream of Wheat’s mild flavor makes it incredibly versatile. It seamlessly adapts to various health goals, from high-protein meals to fiber-boosted, diabetic-friendly options. These quick, SEO-rich, and health-focused cream of wheat recipes demonstrate how to maximize the cereal’s nutritional potential.
High-Protein Cream of Wheat Power Bowl
This recipe transforms the classic low-protein cereal into a muscle-building powerhouse, ideal for post-workout recovery or a sustained morning meal.
Ingredients: 1/3 cup dry Enriched Cream of Wheat, 1 cup water (or milk alternative), 1/2 tsp vanilla extract, 1 scoop (25g) vanilla or chocolate whey protein powder.
Instructions: Cook Cream of Wheat with water/milk according to package directions. Once cooked and thick, remove from heat. Stir in the vanilla extract. Immediately whisk in the protein powder until fully dissolved and smooth. Top with a tablespoon of peanut butter for healthy fat and sprinkle with sliced almonds.
Focus:Cream of Wheat protein content is dramatically boosted, making it a complete meal that aids muscle recovery.
Cream of Wheat with Berries and Chia Fiber Boost
This recipe specifically targets the low-fiber deficit by integrating high-fiber seeds and fruit, making it more satiating and gut-friendly.
Ingredients: 1/3 cup dry Original Cream of Wheat, 1 cup water, 1 tbsp chia seeds, 1/2 cup fresh mixed berries, dash of cinnamon, 1 tsp maple syrup (optional).
Instructions: Cook Cream of Wheat as directed. During the last minute of cooking, stir in the chia seeds and cinnamon. Pour into a bowl, then top generously with the fresh berries. The chia seeds will expand, dramatically increasing the cream of wheat vs oatmeal fiber comparison to a more competitive level, and the berries add crucial antioxidants.
Focus: Natural flavor and high fiber, leveraging the cream of wheat benefits of fortification while adding necessary bulk.
Diabetic-Friendly Cream of Wheat Recipe
While steel-cut oats are preferred for diabetics, this preparation makes Cream of Wheat a much safer occasional alternative by minimizing its glycemic impact.
Ingredients: 1/3 cup dry Original Cream of Wheat, 1 cup water, 1/4 cup unsweetened soy or almond milk, 1/4 cup cottage cheese, non-caloric sweetener (e.g., stevia) to taste.
Instructions: Cook the Cream of Wheat with the water until creamy. Remove from heat and stir in the unsweetened milk and cottage cheese. The protein and fat from the cottage cheese will significantly slow down the digestion of the carbohydrates. Sweeten carefully.
Focus: High protein and high fat inclusion to lower the cream of wheat vs oatmeal glycemic index impact.
Final Verdict
The comprehensive comparison between Cream of Wheat and oatmeal shows that both cereals are foundational, complex carbohydrate sources, yet their health profiles are tailored for different needs. The selection between them should be driven by a clear understanding of your personal dietary goals and biological requirements.
If your primary focus is cardiovascular health, effective cholesterol reduction, sustained energy, and hunger control, oatmeal is the clear choice. Its intrinsic beta-glucan fiber makes it the ultimate whole grain champion for heart and blood sugar stability.
Conversely, if you require a low-residue, easily digestible meal, are dealing with iron-deficiency anemia, or need a rapid-digesting pre-workout carbohydrate source for a training session, Cream of Wheat is the preferred choice. Its intensive fortification with iron and B vitamins provides an important micronutrient advantage.
Both cereals offer a low-fat, customizable base that can be optimized with healthy additions of protein (yogurt or powder) and healthy fats (nuts or seeds). The best breakfast is the one you will consistently eat, prepared in a way that aligns with your specific needs—be that weight loss, fitness performance, or managing diabetic needs. Use this knowledge to customize your morning fuel for optimal results every single day.
Very few people dislike mashed potatoes. It has always been a favorite dish among the public. With its creamy and fluffy texture and its rich flavor, it is a popular staple dish on many occasions.
You might be thinking that surely it cannot be all good? Nobody can deny mashed potatoes‘ flavorsome taste, but are mashed potatoes healthy? Can I consume it daily, considering it needs many fatty products to prepare?
Well, worry no more. We are here to tell you all about the mashed potato’s effects on your health.
Its flavor and texture are some of the many features that have made this delicacy so popular.
However, the regular mashed potato, made with lots of milk, cream, and butter, is not healthy if consumed in a large amount. The fats in the butter can cause heart diseases. And if you are lactose intolerant, milk is not a good choice for you!
On the other hand, getting rid of saturated fat when preparing your mashed potatoes will benefit your health. But more on that later.
Are Mashed Potatoes Healthy?
Whether mashed potatoes will be healthy or not depends on the products used to prepare them. If you use too many fatty products in your mashed potato, it is a sure-fire way to become seriously ill.
So, you have to learn how to make mashed potatoes healthy.
A healthy version of mashed potato can have a massive impact on your health, and this mashed potato tastes just as good as regular mashed potatoes, if not more so.
Replace Trans Fats:
First, try to avoid adding too much-saturated fats and trans fats to your mashed potatoes while preparing. Use olive oil instead of butter. Butter is a high source of saturated fat and contains bad cholesterol – LDL.
The increased amount of saturated fats and low-density lipoprotein will clog your arteries and cause heart diseases such as cardiac arrest, heart attack, and heart failure. A high amount of cholesterol will also cause extreme fatigue, shortness of breath, and high blood pressure.
On the other hand, olive oil has many healthy features. It has unsaturated fats and is filled with good cholesterol – HDL. Olive oil is full of anti-inflammatory and antioxidant properties. This oil can also reduce your chances of getting type 2 diabetes.
Better Dairy Substitutes:
Instead of cream, try using Greek yogurt or cottage cheese. Cream, like butter, contains a high amount of saturated fats and LDL. On the other hand, Greek yogurt is a rich source of protein, and it also has few calories.
For your dairy milk substitute, use almond milk or other non-dairy milk. You can also use eggs instead of milk to make the mashed potatoes fluffier.
More Ingredients for More Nutrition:
Add cauliflower with your potato. You will get extra nutrition with fewer carbs.
Chopped green onion and parsley – add these to your garnish, and if you want, you can serve the mashed potato with bell peppers and sauteed mushrooms.
If you follow all these, your mashed potato will indeed become its healthiest and, not to say, its tastiest version.
Unhealthy Mashed Potato:
When you use fatty products such as milk, butter, and cream, there is a high probability for your mashed potato to become very unhealthy and deadly too.
Increases Cholesterol:
High saturated fats and LDL-containing products in mashed potatoes cause many serious health issues such as coronary diseases and weight gain.
Causes Weight Gain:
Unhealthy, fat-containing ingredients, which are used to prepare mashed potatoes, will increase your weight. Weight gain leads to various other diseases like type 2 diabetes, stroke, high blood pressure, gallbladder issues, osteoarthritis, etc.
Thus, to make your mashed potatoes healthier, try getting rid of these products and using healthy alternatives.
Impact of Potato on Your Body
Potato is a nutritious vegetable. But like everything, potato also has pros and cons for your health.
Health Benefits of Potatoes:
It is considered a starchy vegetable, and professionals recommend you have 5 to 6 cups of starchy vegetables per week.
Since it is a very easily attainable vegetable, you can make many tasty dishes using potatoes. Potato is one of the primarily eaten starchy vegetables in every household.
Great Source of Energy:
Potatoes are one of the primary sources of carbohydrates, and we all know that brain can only use carbohydrates for its metabolic function. Carbohydrate is also the most readily available energy source for you. If there is a shortage of carbohydrates in your body, you are sure to face many diseases.
Improves Metabolic Functions:
Other than carbohydrates, potatoes also contain vitamin B6, vitamin C, and potassium, and your body needs these vitamins and minerals for its metabolism.
Health Detriments of Potatoes:
Too much of something is never good, which is also the case for potatoes. If you consume too many potato dishes, it will undoubtedly lead to weight gain.
According to a study, if you consume an extra serving of potato chips daily, you will gain around 1.8 pounds in four years. The result was 3.5 pounds for French fries, and it was 1.5 pounds on average for any other potato dishes.
Try The Healthiest Mashed Potato Today!
So, the answer to your question, are mashed potatoes healthy, is that it depends on how you prepare them.
Follow the healthy version of the mashed potato recipe, make it for your friends and family, and receive all the praise. Since it is effortless to make and needs very few, easily attainable ingredients, it will not take much time to make the mashed potato.
If you are still wondering whether mashed potatoes are healthy or not, try the healthy version and see the improvement in your health.