Home Blog Page 91

Cookies & Cream Frozen Yogurt

0

Memorial Day has come and gone, and with it the unofficial start to summer. The weather here in New England certainly contributes to the summer mindset, as does the fact that my school lets out for summer vacation in a mere three weeks!

Cookies & Cream Frozen Yogurt

Given the warm near sweltering temperatures we’ve had in the Boston area for the past couple of weeks, it was a no-brainer to whip up a frosty treat to beat the heat (<– yes, I am THAT person… the one who rhymes three words out of five).

Cookies & Cream Frozen Yogurt

The idea for cookies & cream frozen yogurt had been brewing in the back of my mind for a while, so I was excited to finally bring the concept to fruition.

Cookies & Cream Frozen Yogurt

I opted for less sugar than I’ve used in other frozen yogurt recipes, as the cookies contribute quite a bit of sweetness.

Cookies & Cream Frozen Yogurt

The 2% Greek yogurt contributes a creaminess that I love, but don’t expect this to take just like ice cream.

Cookies & Cream Frozen Yogurt

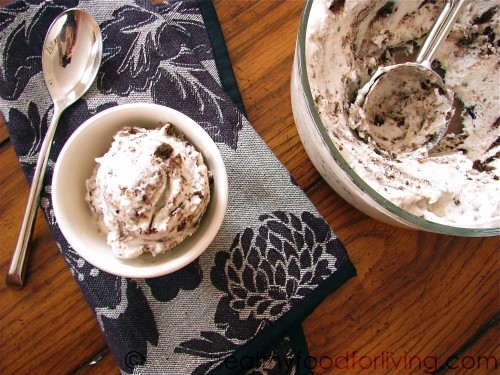
I adore frozen yogurt for its slightly tangy flavor, and this one delivers on that front. As noted above, the chocolate sandwich cookies are very sweet; thus they are the perfect compliment to the tart yogurt.

Cookies & Cream Frozen Yogurt

Perfectly smooth frozen desserts certainly have their place, but there’s something about crunchy cookie pieces mixed throughout the creamy frozen yogurt that make eating it just that much more fun.

Cookies & Cream Frozen Yogurt

If you don’t have an ice cream maker, you could most likely get away with just combining the ingredients together and freezing the mixture in a freezer-safe container.

The churning process helps to whip air into the frozen yogurt, leading to a lighter end result… but the mixture is thick enough to freeze without first dumping it into an ice cream maker.

Cookies & Cream Frozen Yogurt

This frozen yogurt is a lighter way to enjoy the classic cookies & cream flavor combination; I’m thinking that a few drops of peppermint extract would be pretty darn delicious, as well!

Cookies & Cream Frozen Yogurt

Want a scoop?

Cookies & Cream Frozen Yogurt
NameCookies & Cream Frozen Yogurt
Cuisinefroyo
Prep Time15 minutes
Cooking Time25 minutes
Total Time3 hours and 40 minutes
Servings6 servings
Yield1 quart (4 cups)

Ingredients

  • 3 cups plain 2% fat Greek yogurt, such as Fage or Chobani
  • 1/3 cup evaporated cane juice (or granulated sugar)
  • 1/2 Tbsp pure vanilla bean paste or extract
  • 8 all-natural chocolate sandwich cookies, such as Newman-O’s, chopped (about 1 cup)

Directions

  1. In a large bowl, combine yogurt, evaporated cane juice, and vanilla bean paste (or extract). Stir until the evaporated cane juice is completely dissolved.
  2. Freeze according to ice cream maker manufacturer’s instructions; adding in the chopped cookies during the last few minutes of churning… OR place mixture into a freezer-safe container and freeze.
  3. Serve immediately as soft serve, or spoon into a freezer-safe container and place in freezer until “ripened” (hardened).

Nutrition Facts (Per Serving)

  • Calories: 240
  • Total Fat: 10g
    • Saturated Fat: 4g
    • Trans Fat: 0g
  • Cholesterol: 15mg
  • Sodium: 140mg
  • Total Carbohydrates: 31g
    • Dietary Fiber: 1g
    • Sugars: 21g
  • Protein: 9g
  • Vitamin D: 1mcg (5% DV)
  • Calcium: 196mg (15% DV)
  • Iron: 1mg (6% DV)
  • Potassium: 294mg (6% DV)

Please note that these nutrition facts are approximate and can vary based on the specific brands and ingredients used. Adjustments may be needed depending on your dietary preferences and any ingredient substitutions. Enjoy your homemade Cookies & Cream Frozen Yogurt responsibly!

Cookies & Cream Frozen Yogurt

Avocado Egg Salad

0

Back when I posted my Tofu Egg Salad, Caroline from The Broccoli Hut mentioned that she makes a vegan “egg” salad with avocado… an idea that I just couldn’t get out of my head after I read her comment.

Name:Avocado Egg Salad
Cuisine:Various
Prep Time:15 minutes
Cooking Time:0 minutes
Total Time:15 minutes
Servings:4 servings
Yield:About 4 cups

Ingredients

  • 4 hard-boiled eggs, peeled and chopped
  • 2 ripe avocados, peeled, pitted, and diced
  • 1/4 cup red onion, finely chopped
  • 1/4 cup celery, finely chopped
  • 2 tablespoons fresh cilantro, chopped (optional, for added freshness)
  • Salt and pepper to taste
  • 1/4 cup Greek yogurt (you can also use mayonnaise or sour cream)
  • 1 tablespoon Dijon mustard
  • 1 tablespoon lemon juice (freshly squeezed)
  • 1 clove garlic, minced
  • Salt and pepper to taste
Avocado Egg Salad

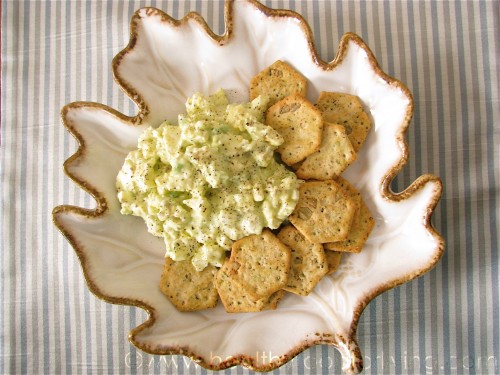
The very next time I made egg salad, I added some avocado to the Greek yogurt/canola oil mayo mixture before folding in the boiled eggs.

Avocado Egg Salad

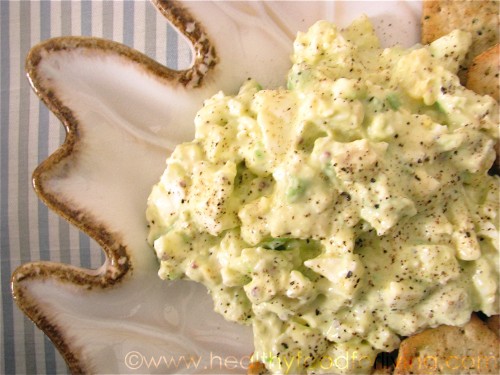
As expected, the avocado made the egg salad even more rich and creamy, because let’s face it – avocado makes everything better!

Avocado Egg Salad

Instructions

1. Prepare the Eggs

Start by hard-boiling the eggs. Place the eggs in a saucepan and cover them with water. Bring the water to a boil, then reduce the heat to low and simmer for 9-12 minutes. After that, transfer the eggs to a bowl of ice water to cool quickly. Once cooled, peel and chop the eggs.

2. Dice the Avocado

While the eggs are cooling, dice the ripe avocados and place them in a large mixing bowl. You can mash them slightly with a fork if you prefer a creamier texture.

3. Add the Vegetables

To the same bowl, add the finely chopped red onion, celery, and fresh cilantro. These ingredients will add a wonderful crunch and flavor to the salad.

4. Make the Dressing

In a separate bowl, combine the Greek yogurt, mayonnaise, Dijon mustard, minced garlic, and lemon juice. Mix until the dressing is smooth and well combined. Season with salt and pepper to taste.

5. Combine and Toss

Pour the dressing over the diced avocados and vegetables. Gently fold in the chopped hard-boiled eggs, being careful not to mash the avocados too much. The creaminess of the avocado and the dressing will naturally coat the eggs and veggies.

6. Season to Taste

Taste the salad and adjust the seasoning with salt and pepper if needed. You can also add a bit more lemon juice for a tangier flavor if desired.

7. Serve and Enjoy

Transfer the Avocado Egg Salad to a serving bowl or individual plates. Garnish with a few extra cilantro leaves for a burst of color. This salad is delicious on its own, but you can also enjoy it on whole-grain toast, in a wrap, or as a side dish to your favorite main course.

Estimated Nutrition Per Serving

Calories: 290 calories

Protein: 10g

Carbohydrates: 11g

Dietary Fiber: 7g

Sugars: 2g

Fat: 24g

Saturated Fat: 4g

Cholesterol: 192mg

Sodium: 220mg

Please note that these nutritional values are approximate and can vary based on the specific brands and ingredients you use. The values provided are for a single serving of the Avocado Egg Salad. Enjoy your healthy and delicious meal.

Individual Sweet Potato Breakfast Pizzas

0

When I found out about the 2012 North Carolina Sweet Potato “No More ‘Mallows” Blogger Recipe Contest, my mind went in a dozen different directions with ideas of what to make.

My initial instinct was to make something sweet, but I eventually decided to push the envelope by going the savory route.

Name:Individual Sweet Potato Breakfast Pizzas
CuisineBreakfast
Prep Time15 minutes
Cooking Time30 minutes
Total Time45 minutes
Servings2 servings
Yield2 individual pizzas
Individual Sweet Potato Breakfast Pizzas

I settled on a sweet potato version of my Individual Breakfast Pizzas, and decided that in order to fully pay homage to my very favorite food, I had to incorporate the orange vegetable into the recipe in not one, but two ways.

Individual Sweet Potato Breakfast Pizzas

Pureed:

Individual Sweet Potato Breakfast Pizzas

Roasted:

Individual Sweet Potato Breakfast Pizzas

I baked and pureed one sweet potato to use as the pizza “sauce” and diced & roasted another spud with my favorite home fries spice blend: garlic powder, onion powder, paprika, cayenne pepper, salt, & pepper.

Individual Sweet Potato Breakfast Pizzas

Rich & creamy gouda cheese, eggs, and chopped fresh chives completed the individual pizzas, which are perfect for breakfast, lunch, or dinner.

Individual Sweet Potato Breakfast Pizzas

The pizzas are baked long enough so that the crust gets crisp and golden brown on the bottom but not long enough to fully cook the egg yolk; so you’re gifted with a crunchy crust topped with a velvety smooth sweet potato “sauce”, gooey melted cheese, pillowy sweet potato home fries, and an egg with a luscious golden runny yolk.

Individual Sweet Potato Breakfast Pizzas

Whether or not this recipe ends up winning the contest, I’m thrilled with the way these sweet potato breakfast pizzas turned out!

Individual Sweet Potato Breakfast Pizzas

Estimated Nutrition Per Serving

  • Calories: 340
  • Total Fat: 19g
    • Saturated Fat: 7g
    • Trans Fat: 0g
  • Cholesterol: 255mg
  • Sodium: 450mg
  • Total Carbohydrates: 21g
    • Dietary Fiber: 3g
    • Sugars: 5g
  • Protein: 22g

Ingredients

  • 2 large sweet potatoes (you’ll end up using 1 cup puree and 2 cups diced)
  • 1 Tbsp olive oil + 1 tsp for drizzling
  • 1/4 tsp garlic powder/granulated garlic
  • 1/4 tsp onion powder/granulated onion
  • 1/4 tsp paprika
  • 2 pinches cayenne pepper
  • 1 lb whole wheat pizza dough, at room temperature, divided into 4 equal portions (4 oz each)
  • flour, for rolling out dough
  • 1 cup freshly shredded gouda cheese
  • 4 large eggs, preferably organic
  • Kosher salt and freshly ground black pepper, to taste
  • 1/4 cup diced chives

Instructions

Prepare the Sweet Potato Crust

Preheat your oven to 400°F (200°C) and line a baking sheet with parchment paper.

In a mixing bowl, combine the grated sweet potato, egg, Parmesan cheese, almond flour, garlic powder, salt, and pepper. Mix well until everything is evenly incorporated.

Shape the Crusts

Divide the sweet potato mixture into two portions. Place each portion onto the prepared baking sheet and shape them into two round crusts, about 1/4-inch thick. You can make them as thin or thick as you like.

Bake the Crusts

Place the baking sheet in the preheated oven and bake for about 15-20 minutes, or until the edges are golden brown and the crusts have firmed up.

Prepare the Toppings

While the crusts are baking, prepare your toppings. In a small bowl, beat the eggs and season them with salt and pepper. Dice the bell peppers and red onion and set them aside. If you’re using bacon or sausage, make sure it’s cooked and crumbled.

Assemble the Pizzas

Once the sweet potato crusts are ready, remove them from the oven. Sprinkle half of the shredded mozzarella cheese on each crust, leaving a small well in the center for the eggs.

Add the Eggs and Toppings

Carefully pour an egg into the well of each pizza crust. Then, sprinkle the diced bell peppers, red onion, and cooked bacon or sausage (if using) evenly over the top.

Bake Again

Return the pizzas to the oven and bake for an additional 10-12 minutes, or until the egg whites are set, but the yolks are still slightly runny.

Serve

Once out of the oven, garnish your Sweet Potato Breakfast Pizzas with fresh herbs like parsley or chives. Add more salt and pepper to taste if desired.

Enjoy

These individual breakfast pizzas are best enjoyed hot and fresh out of the oven. Dig in and savor the combination of sweet potato goodness, cheesy goodness, and savory toppings.

Fresh Salmon Caesar Salad Sandwich

0

I hope you all enjoyed the healthy heart breakfast recipes shared by Cara, Nicole, Amy, & Natalie last Wednesday!

This week is all about lunch, and Nicole is hosting today’s giveaway. Up for grabs are The Pure Kitchen cookbook by Hallie Klecker, our own Amy Roskelly’s Healthy Kids Plates, and both a 32 oz. jar of Gold Label Virgin Coconut Oil & a 2.2 lb bag of coconut flour from Tropical Traditions. Be sure to click over to Nicole’s blog to enter this fantastic giveaway!
Also be sure to check out all of the hearty-healthy lunch recipes featured today:

  • Cara’s Creamy Asparagus and Walnut Soup
  • Nicole’s Chipotle Black Bean and Shrimp Quesadillas with Edamame Guacamole (this week’s hostess)
  • Amy & Natalie’s  Heart Healthy Turkey Panini

My heart-healthy offering for a mid-day meal is this Fresh Salmon Caesar Salad Sandwich.

Fresh Salmon Caesar Salad Sandwich

Clearly the star of the recipe is salmon. Fresh wild Alaskan salmon, to be precise.

Packed with omega-3 fattty acids, (specifically EPA and DHA), salmon is one of the healthiest seafood options out there. This flavorful fish may reduce high blood pressure, as well as inflammation that could lead to a heart attack.

The salmon salad is laid atop a bed of spinach, a powerhouse veggie loaded with potassium – which is a mineral that can act as a defense against hypertension (high blood pressure) – and lutein, an antioxidant carotenoid that may prevent or reduce atherosclerosis (hardening of the arteries, which leads to heart attack).

Finally, whole grain bread adds fiber – which plays a role in regulating blood pressure and heart health – to the sandwich.

Fresh Salmon Caesar Salad Sandwich

I cut way down on the saturated fat of a typical fish salad by subbing in Greek yogurt for the traditional mayonnaise; the salmon salad still has a creamy, luxurious texture, but a drastically reduced amount of fat.

I also decided to add a flavor profile similar to that of a ceasar salad. Garlic, anchovy paste (sounds gross, but adds a fantastic briny flavor), Worcestershire sauce, and Dijon mustard combine to replicate the flavors the classic salad.

This sandwich was SO GOOD! It really blows your regular old tuna fish sandwich right out of the water. Meaty, salty, creamy, and satisfying… I could easily eat this once a week. At least.

Name:Fresh Salmon Caesar Salad Sandwich
Cuisine:Seafood
Prep Time:15 minutes
Cooking Time:10 minutes
Total Time:25 minutes
Servings:4
Yield:4 sandwiches

Ingredients (sandwich)

  • 4 oz cooked wild Alaskan salmon, chilled, skin removed, and flaked
  • 1/4 cup 2% plain Greek yogurt
  • 1 small garlic clove
  • 1/2 tsp anchovy paste
  • 1/4 tsp Worcestershire sauce
  • 1/4 tsp country Dijon mustard
  • Kosher salt and freshly ground black pepper to taste
  • 1 handful baby spinach, washed & dried
  • whole grain bread (I used 1 slice of Trader Joe’s Whole Wheat Pane, cut in half)

Instructions

Place yogurt, garlic clove, anchovy paste, Worcestershire sauce, and mustard in a blender or small food processor. Blend until smooth, season to taste with salt and pepper, & transfer to a small bowl.

Fold in flaked salmon.

Sandwich spinach and salmon caesar salad between bread slices.

*To cook the salmon:

Preheat the oven to 400°F.

Pat the salmon dry, (any moisture on the fish will keep it from searing properly), and season with Kosher salt and freshly ground black pepper.

Heat a bit of extra virgin olive oil in an oven-proof nonstick skillet over medium-high heat. When pan is hot, add the salmon flesh (non-skin) side down to the hot skillet and cook, undisturbed, for 2 minutes, or until crisp.

Flip salmon over so the skin side is down and transfer the skillet to the oven. Roast the salmon for 3-4 minutes, or until the fish flakes easily with a fork. Remove skin and bones.

Chill until cold.

Nutritional Information

  • 251.7 calories
  • 10.3 grams fat
  • 2.2 grams saturated fat
  • 0.7 grams fiber
  • 34.2 grams protein
Fresh Salmon Caesar Salad Sandwich

No-Bake Blueberry Almond Oat Bars

0

What with the stifling heat wave we experienced on the East coast last week, there was no way I was turning on the oven.

No way.

No-Bake Blueberry Almond Oat Bars

So I ignored a craving for homemade fudge brownies and instead opted for these no-bake bars… the idea for which had been brewing in my mind ever since I made (and fell in love with) Angela’s 5 Ingredient No Bake Vegan Date Squares.

No-Bake Blueberry Almond Oat Bars

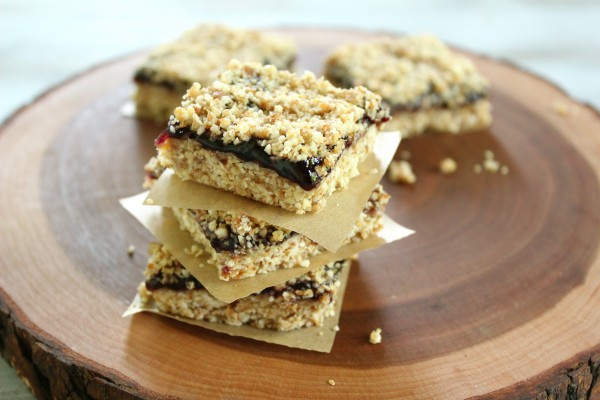
The crust is comprised of rolled oats, raw almonds, Medjool dates, coconut oil, & salt, and the filling is all-fruit (no sugar added) blueberry jam.

Pure. Simple. All-natural. Easy.

Oh, and of course delicious! And not sweat-inducing.

No-Bake Blueberry Almond Oat Bars

Oats, almonds, and salt are pulverized in a food processor until finely ground.

No-Bake Blueberry Almond Oat Bars

Plump and sweet Medjool dates and melted coconut oil are added for moisture and natural sweetness.

No-Bake Blueberry Almond Oat Bars

The crust is pressed into a pan…

No-Bake Blueberry Almond Oat Bars

… and then topped with an almond extract-infused blueberry jam (sub in any no sugar added jam you like! I love the St. Dalfour brand).

No-Bake Blueberry Almond Oat Bars

The reserved crust mixture is crumbled over top of the jam, and the whole shebang is chilled until set.

No-Bake Blueberry Almond Oat Bars

I’ve said it before about other recipes and I’ll say it again: these are perfect for dessert OR breakfast… or as a snack! Sure, dates and all-fruit  jam are loaded with natural sugar, but that just means that you don’t need even a bit of added sugar to make these bars perfectly sweet.

No-Bake Blueberry Almond Oat Bars

You’ll want to store these bars tightly wrapped in the fridge (or freezer) as they’re on the soft and crumbly side when room-temperature.

No-Bake Blueberry Almond Oat Bars

They really do taste like a blueberry crisp/blueberry pie hybrid!

Portable and healthy blueberry crisp pie that you don’t need to bake… what’s not to love?

No-Bake Blueberry Almond Oat Bars

I think I’ll need a constant stash of these bars on hand this summer ;).

No-Bake Blueberry Almond Oat Bars

by Lauren Zembron (inspired by 5 Ingredient No Bake Vegan Date Squares by Oh She Glows)

NameNo-Bake Blueberry Almond Oat Bars
CuisineNorth America
Prep Time15 minutes
Cooking Time7 minutes
Total Time2 hours and 15 minutes
Servings12 bars
Yield8×8-inch (20×20 cm)

Keywords: dessert breakfast snack vegan sugar-free vegetarian almonds blueberries oatmeal almond butter

Ingredients (16 bars)

  • 2 cups old-fashioned rolled oats
  • 1 cup whole raw almonds
  • scant 1/4 tsp Kosher salt
  • 1 lightly packed cup pitted soft Medjool dates (about 10 large)
  • 1/4 cup melted coconut oil
  • 1 10-ounce jar all-fruit blueberry jam, such as St. Dalfour
  • 1/2 tsp almond extract, or more to taste

Instructions

Line an 8-inch square pan with parchment paper going both ways.

In a food processor fitted with the steel blade, process oats, almonds, and salt until finely ground. Add in the pitted dates and pulse until crumbly. Add in the melted coconut oil and process until the mixture comes together. The mixture should hold together when pinched.

Remove date-oat mixture from the food processor, set aside 3/4 cup for topping, and press the remaining mixture firmly and evenly into the prepared pan.

In a small bowl, stir the almond extract into the blueberry jam.

Spoon the almond extract-infused blueberry jam evenly over the crust in the pan. Sprinkle the remaining 3/4 cup crust mixture evenly over the jam; press down lightly.

Chill in the refrigerator until firm, at least 1 hour. Cut into 16 squares; store individually wrapped in the refrigerator or freezer.

Nutritional Information per bar:

200.0 calories, 8.6 grams fat, 3.5 grams saturated fat, 4.5 grams fiber, 20.3 grams sugar, 3.5 grams protein

Estimated Nutrition Facts (Per Serving)

  • Calories: 196 calories
  • Total Fat: 10g
    • Saturated Fat: 4.5g
    • Trans Fat: 0g
  • Cholesterol: 0mg
  • Sodium: 36mg
  • Total Carbohydrates: 24g
    • Dietary Fiber: 3g
    • Sugars: 11g
  • Protein: 4g

Note: Nutrition facts are approximate and may vary based on specific ingredients used.

These No-Bake Blueberry Almond Oat Bars are not only delicious but also relatively healthy, making them a great option for a quick and satisfying snack or dessert. Enjoy!

Baked Sweet Potato Oatmeal for One

0

Baked oatmeal.

It’s warm, comforting, filling, delicious, and perfumes the air with an irresistible aroma.

In other words, it is pretty much cold-weather breakfast perfection.

NameBaked Sweet Potato Oatmeal for One
CuisineFusion
Prep Time10 minutes
Cooking Time40-45 minutes
Total Time75-80 minutes
Servings1 serving
Yield1
Baked Sweet Potato Oatmeal for One

This version is different than other varieties I’ve made in the past; whereas other baked oatmeals can be somewhat dense, (like a soft granola bar), this one is light and almost souffle-like.

Freshly baked sweet potato puree and low-fat milk ensure that there is enough moisture to keep the oatmeal from drying out, and the addition of both an egg white & a bit of baking powder yields a fluffy and airy texture.

Baked Sweet Potato Oatmeal for One

Think oatmeal meets muffin…

Baked Sweet Potato Oatmeal for One

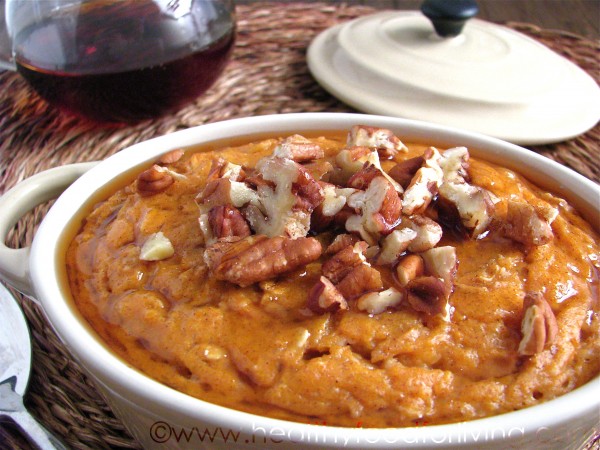
… drizzled with sweet maple syrup and sprinkled with crunchy toasted pecans.

Baked Sweet Potato Oatmeal for One

This is precisely the kind of winter breakfast that I want to dive into when the sun hasn’t quite risen and there is a distinct chill in the air.

Baked Sweet Potato Oatmeal for One

I am more than satisfied with the outcome of this for-one recipe, and different fall/winter oatmeal flavor profiles are already ricocheting around in my head.

Pumpkin. Eggnog. Apple cinnamon. Gingerbread. Cranberry.

Needless to say, there is a lot of baked oatmeal in my very near future!

Baked Sweet Potato Oatmeal for One

Ingredients

  • 1/3 cup old fashioned rolled oats
  • 1/2 tsp brown sugar
  • 1/2 tsp ground cinnamon
  • pinch of ground nutmeg
  • 1/4 tsp baking powder
  • pinch of salt
  • 1/3 cup milk (I used organic 1%)
  • 1/3 cup sweet potato puree
  • 1 egg white
  • 1/4 tsp pure vanilla extract
  • maple syrup for serving, optional
  • chopped toasted pecans for serving, optional

Estimated Nutrition Per Serving

Calories: 350-400 kcal

Protein: 9-10g

Carbohydrates: 70-75g

Dietary Fiber: 9-10g

Sugars: 18-20g

Fat: 5-6g

Saturated Fat: 1-2g

Cholesterol: 5-10mg

Sodium: 100-150mg

Potassium: 400-500mg

Vitamin A: 350-400%

Vitamin C: 15-20%

Calcium: 20-25%

Iron: 10-15%

Instructions

1. Preheat the Oven

Preheat your oven to 375°F (190°C). This will ensure your baked sweet potato oatmeal cooks evenly.

2. Prepare the Sweet Potato

Wash and pierce the sweet potato with a fork in a few places to allow steam to escape during baking. Place it on a baking sheet and bake for about 40-45 minutes or until it’s soft and easily pierced with a fork.

3. Scoop and Mash

Once the sweet potato is cooked, remove it from the oven and let it cool slightly. Then, scoop out the flesh into a mixing bowl and mash it until smooth.

4. Mix Ingredients

To the mashed sweet potato, add the rolled oats, milk, maple syrup or honey, ground cinnamon, ground nutmeg, vanilla extract, and a pinch of salt. Mix everything together until well combined.

5. Bake

Transfer the oatmeal mixture into an oven-safe ramekin or baking dish. Place it back in the oven and bake for 25-30 minutes or until the oatmeal is set and the top is slightly golden.

6. Serve

Remove the baked sweet potato oatmeal from the oven and let it cool for a few minutes. You can choose to top it with chopped nuts, fresh berries, or a dollop of yogurt for added flavor and texture.

Carrot Cake Bundt Bread

0

As soon as I read through Emily‘s post on her Guilt-Free Carrot Bundt Cake, I knew I had to make it. Carrot cake is without a doubt my favorite kind of cake, as is evidenced in the many carrot-cake inspired recipes I’ve posted (see end of this post for links).

NameCarrot Cake Bundt Bread
CuisineAmerican
Prep Time15 minutes
Cooking Time45-55 minutes
Total Time1 hour 10 minutes (approx)
Servings12 servings
Yield1 Bundt Bread
Carrot Cake Bundt Bread

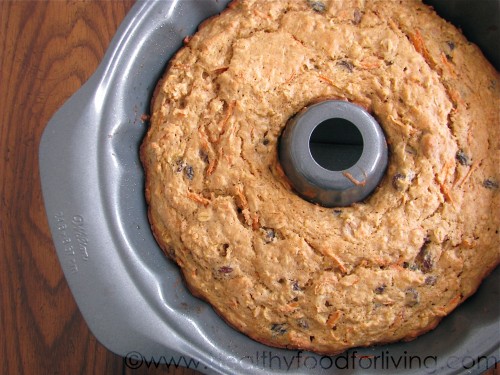
My initial intention of making Emily’s cake morphed into a desire to make a breakfast bread, but I loved the idea of baking the bread in a bundt pan.

Carrot Cake Bundt Bread

My poor, unused bundt pan has been collecting dust for… years.

Carrot Cake Bundt Bread

I think it was waiting for this recipe to come along!

Carrot Cake Bundt Bread

It was worth the wait.

Carrot Cake Bundt Bread

This bread is delicately sweetened with Sucanat, which is unrefined sugar cane that tastes faintly of molasses, and crushed pineapple. I don’t always include raisins and nuts in carrot cake, but this bread would not be nearly as good without them as they add both flavor and texture.

Carrot Cake Bundt Bread

Sifting the whole wheat pastry flour ensures a light consistency, and a modest amount of canola oil combined with buttermilk, carrots, and pineapple keep the bread moist.

I found that the bread tasted even better after a few day of resting (tightly wrapped) in the fridge. The flavor intensified, and the texture softened even further.

Carrot Cake Bundt Bread

The best aspect of this bread? You can eat it for breakfast, snack, or dessert… or even all three in one day 🙂

Carrot Cake Bundt Bread

Carrot Cake Bundt Bread

Ingredients

  • 2 cups all-purpose flour
  • 1 teaspoon baking powder
  • 1/2 teaspoon baking soda
  • 1/2 teaspoon salt
  • 1 1/2 teaspoons ground cinnamon
  • 1/2 teaspoon ground nutmeg
  • 1/4 teaspoon ground cloves
  • 1/2 cup unsalted butter, softened
  • 1 cup granulated sugar
  • 2 large eggs
  • 1 teaspoon pure vanilla extract
  • 1 1/2 cups grated carrots
  • 1/2 cup unsweetened applesauce
  • 1/2 cup crushed pineapple, drained
  • 1/2 cup chopped walnuts or pecans (optional)
  • Cream cheese glaze (see instructions below)

Estimated Nutrition (per serving)

Calories: 280 kcal

Fat:12g Saturated

Fat: 6g

Cholesterol: 57mg

Sodium: 230mg

Carbohydrates: 40g

Fiber: 2g

Sugar: 26g Protein: 4g

Instructions

1. Preheat the Oven

Preheat your oven to 350°F (175°C). Grease and flour a Bundt pan to ensure the cake comes out easily.

2. Mix the Dry Ingredients

In a mixing bowl, whisk together the flour, baking powder, baking soda, salt, cinnamon, nutmeg, and cloves. Set this dry mixture aside.

3. Cream the Butter and Sugar

In a separate large bowl, cream together the softened butter and granulated sugar until light and fluffy.

4. Add Eggs and Vanilla

Beat in the eggs, one at a time, followed by the pure vanilla extract. Mix well after each addition.

5. Incorporate Carrots and Wet Ingredients

Stir in the grated carrots, applesauce, crushed pineapple, and chopped nuts (if using).

6. Combine Dry and Wet Mixtures

Gradually add the dry ingredient mixture to the wet ingredients, mixing until just combined. Be careful not to overmix.

7. Bake the Bundt Bread

Pour the batter into the greased and floured Bundt pan. Smooth the top with a spatula. Bake in the preheated oven for 45-55 minutes or until a toothpick inserted into the center comes out clean.

8. Cool and Glaze

Allow the Carrot Cake Bundt Bread to cool in the pan for about 15 minutes before transferring it to a wire rack to cool completely. Once cooled, drizzle with cream cheese glaze.

Carrot Cake Bundt Bread

Other carrot cake-inspired recipes from Healthy Food For Living:

Pumpkin Banana Gingerbread with Chocolate Chips

0

Another Thanksgiving full of food, family, and fun has passed, and attention has now shifted to the winter holidays. Along with gift shopping, holiday music-listening, and apartment decorating this time of year, I look forward to cooking & baking the foods I associate with winter – one of which is gingerbread.

I munched my way through the Autumn Date and Walnut Bread in no time, and soon thereafter found myself craving another seasonal loaf. One glance at Jessica’s Chocolate Banana Gingerbread on her blog How Sweet It Is, and I knew that an adapted version of that bread had to be the next baked good that I pulled from the oven.

As many of you know, I like to substitute some or all of the butter and oil called for in bread/muffin recipes with fruit or vegetable purees. I had an open can of pumpkin puree in the fridge (no big surprise there), and decided to add a fall-inspired ingredient to the wintery quick bread.

The pumpkin puree took the place of the butter, and I also subbed in white whole wheat flour for the all-purpose. I omitted the sugar, opting instead to rely on the robust flavor of the molasses and the inherent sweetness of the overripe bananas. I used a combination of low-fat buttermilk and 2% plain Greek yogurt, both of which contributed moisture to the butter-less bread. My final alteration was to use a modest amount of grain-sweetened chocolate chips, which have 1/4 the sugar of semi-sweet chocolate chips (4 grams of sugar for 2 Tbsp of grain-sweetened versus 16 grams of sugar for 2 Tbsp of semi-sweet).

This bread welcomes a smear of pumpkin butter:

NamePumpkin Banana Gingerbread with Chocolate Chips
CuisineAmerican
Prep Time15 minutes
Cooking Time55-60 minutes
Total Time1 hour 15 minutes
Servings12 servings
Yield1 loaf
Pumpkin Banana Gingerbread with Chocolate Chips

… or a dab of butter. If you’re wondering what the heck I’m doing spreading butter on a butter-less bread, it’s because I like to use butter when I can really appreciate its rich taste and creamy consistency. Just the tiniest bit of butter melting on top makes the bread taste decadent for a minimal amount of added calories and fat.

Pumpkin Banana Gingerbread with Chocolate Chips

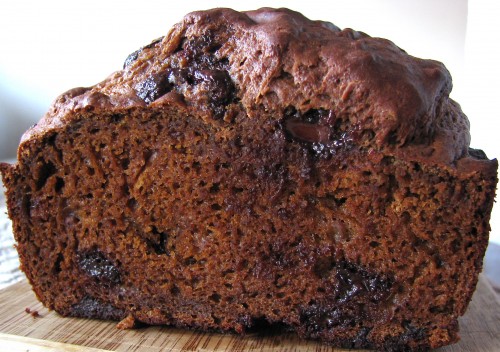
I need to take a moment and thank Jessica for creating a recipe that brings together the delicious trifecta of banana, gingerbread, and chocolate! You can’t really taste my addition of pumpkin puree, but it does add moisture, nutrients, and a dark amber hue to the bread. This loaf is one that actually gets even better after a few days in the refrigerator. The bold flavors meld together and the texture remains moist and cake-like. The scattered bits of chocolate could almost fool you into thinking you’re eating dessert, but this bread is definitely healthy enough to fuel you through the morning rush or afternoon slump.

What with the inevitable food hangover from Thanksgiving still lingering, and the promise of holiday treats galore over the next few weeks, this Pumpkin Banana Gingerbread with Chocolate Chips is a great loaf to have on hand as a healthy way to enjoy the flavors of the season.

Pumpkin Banana Gingerbread with Chocolate Chips

Ingredients

  • 2 1/4 cups white whole wheat flour
  • 1 1/2 tsp baking soda
  • 1/2 tsp salt
  • 2 tsp ground ginger
  • 1 tsp ground cinnamon
  • 1/4 tsp ground nutmeg
  • 1/4 tsp ground cloves
  • 1/4 cup pumpkin puree
  • 1 egg
  • 1 tsp pure vanilla extract
  • 1/2 cup unsulphured molasses
  • 2 medium overripe (almost black) bananas, mashed
  • 3/4 cup low-fat buttermilk
  • 1/4 cup 2% plain Greek yogurt
  • heaping 1/2 cup grain-sweetened chocolate chips (such as Sunspire)

Estimated Nutrition Per Serving

Calories: 260 calories

Total Fat: 12g

Saturated Fat: 7g

Cholesterol: 55mg

Sodium: 295mg

Total Carbohydrates: 35g

Dietary Fiber: 2g

Sugars: 19g

Protein: 3g

Instructions

1. Preheat Your Oven

Preheat your oven to 350°F (175°C) and grease a 9×5-inch loaf pan.

2. Combine Dry Ingredients

In a mixing bowl, whisk together the flour, granulated sugar, brown sugar, baking soda, baking powder, salt, and all the spices (cinnamon, nutmeg, cloves, and ginger).

3. Cream the Butter

In another bowl, using an electric mixer, cream the softened butter until it’s smooth and creamy.

4. Add Eggs and Puree

Add the eggs, one at a time, to the butter mixture, ensuring each egg is fully incorporated. Then, mix in the pureed pumpkin and mashed bananas until well combined.

5. Combine Wet and Dry Mixtures

Gradually add the dry ingredient mixture to the wet ingredients, stirring until just combined. Be careful not to overmix; it should be a thick batter.

6. Fold in Chocolate Chips

Gently fold in the chocolate chips. You can use semi-sweet or dark chocolate chips for a richer flavor.

7. Bake

Pour the batter into the greased loaf pan and spread it evenly. Bake in the preheated oven for approximately 55-60 minutes, or until a toothpick inserted into the center comes out clean.

8. Cool and Enjoy

Allow the Pumpkin Banana Gingerbread to cool in the pan for about 10 minutes before transferring it to a wire rack to cool completely. Once cooled, slice, and serve. It’s fantastic when enjoyed warm with a cup of coffee or tea.

Strawberry Banana Bread

0

When the warm and sunny days of summer roll around, there’s nothing quite like a slice of Strawberry Banana Bread to capture the essence of the season. This delightful twist on traditional banana bread adds the fresh, vibrant flavor of strawberries, making it a perfect treat for breakfast, brunch, or a sweet snack.

We’ll share a simple yet scrumptious Strawberry Banana Bread recipe that will have your taste buds dancing with delight.

Although perhaps not quite as earth-shattering a flavor combination as peanut butter and chocolate, strawberries and bananas do make a delicious pair.

NameStrawberry Banana Bread
CuisineAmerican
Prep Time15 minutes
Cooking Time70 minutes
Total Time1 hour 15 minutes
Servings12 slices
Yield1 loaf
Strawberry Banana Bread

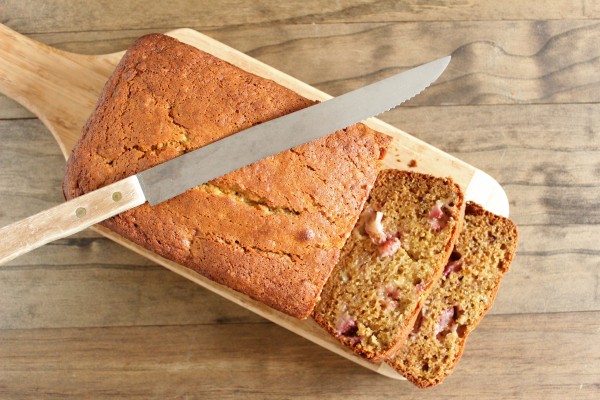
So when a carton of ripe summer strawberries joined a bunch of quickly blackening bananas on our kitchen counter, their fate was sealed: strawberry banana bread was a given.

Strawberry Banana Bread

I started with a modified version of Joanne Chang’s banana bread, (from her cookbook, not the Food Network website; the recipes are slightly different), which has become my go-to recipe. I swapped in whole wheat pastry flour (for the all-purpose), cut down on the sugar (from over 1 cup to 3/4 cup), subbed in Greek yogurt (for the sour cream), and added in chopped fresh strawberries.

Strawberry Banana Bread

The pockets of sweet red berries add both moisture and flavor to an already tender and tasty quick bread, which gets even better after sitting at room temperature (tightly wrapped, of course) for 24 hours.

Strawberry Banana Bread

If you’re an add-in junkie, I bet a few handfuls of white chocolate chips, peanut butter chips, or semi-sweet chocolate chips tossed into the batter would yield a fabulous result.

I haven’t actually tried it yet, but a smear of peanut butter slathered on top of a toasted slice of this bread would also be a welcomed addition.

Strawberry Banana Bread

That being said, a nice thick slice unadorned is perfectly delectable!

Strawberry Banana Bread

Strawberry Banana Bread

by Lauren Zembron [adapted from Flour’s Famous Banana Bread by Joanne Chang (slightly different than the recipe posted on Food Network)]

Strawberry Banana Bread

Ingredients

  • 1 1/2 cups whole wheat pastry flour
  • 1 tsp baking soda
  • 1/2 tsp Kosher salt
  • 3/4 cup unrefined granulated sugar, such as evaporated cane juice
  • 2 large eggs, preferably organic
  • 1/2 cup neutral-flavored oil
  • 3 1/2 overripe medium-sized bananas, peeled & mashed (about 1 1/3 cups mashed)
  • 2 Tbsp plain yogurt (I used 2% Greek)
  • 1 tsp pure vanilla extract
  • 1 cup finely chopped hulled strawberries, preferably organic

Estimated Nutrition Per Serving

Calories: 250 calories

Total Fat:10 grams

Saturated Fat: 4-5 grams

Cholesterol: 50 milligrams

Sodium: 250 milligrams

Total Carbohydrates:40 grams

Dietary Fiber: 2 grams

Sugars: 22 grams

Protein:4 grams

Vitamin C: 15%

Calcium: 4%

Iron: 6%

Instructions

Preheat and Prepare

Preheat your oven to 350°F (175°C).

Grease a 9×5-inch (23×13 cm) loaf pan or line it with parchment paper for easy removal.

Mash the Bananas

In a mixing bowl, mash the ripe bananas with a fork until they are smooth and creamy.

Add the Wet Ingredients

Stir the melted butter into the mashed bananas.

Add the sugar, beaten egg, and vanilla extract, and mix well.

Combine Dry Ingredients

In a separate bowl, whisk together the flour, baking soda, and a pinch of salt.

Combine Wet and Dry Mixtures

Gradually add the dry mixture to the wet mixture, stirring until just combined. Be careful not to overmix; a few lumps are okay.

Add Strawberries

Gently fold in the diced strawberries. The strawberries will add a burst of fresh, fruity flavor to your bread.

Bake

Pour the batter into the prepared loaf pan.

Bake in the preheated oven for approximately 60-70 minutes, or until a toothpick inserted into the center comes out clean or with a few moist crumbs.

Cool and Serve

Allow the Strawberry Banana Bread to cool in the pan for about 10 minutes before transferring it to a wire rack to cool completely.

Once cooled, slice and serve. Enjoy your delicious Strawberry Banana Bread!

Pear Arugula Salad with Dates and Parmesan

0

Last week was Restaurant Week in Boston, and you can rest assured that John and I took full advantage of the 3 course prix fixe menus offered throughout the city and surrounding suburbs.

The first on our list was Rialto, a regional Italian-themed restaurant nestled into the Charles Hotel in Harvard Square.

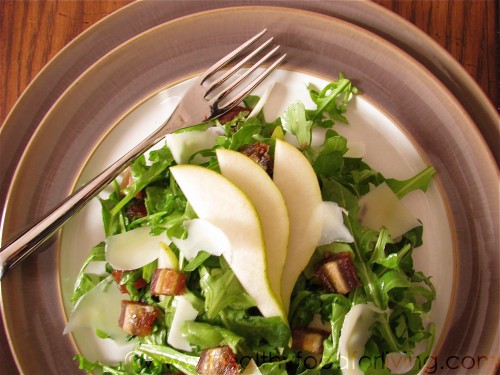
The meal overall was pretty good – but my first course selection was stellar! The salad consisted of tender fresh greens, sweet chewy dates, salty parmesan cheese, and a rich maple dressing.

After relishing in the delicious combination of flavors and textures, I chastised myself for not coming up with something similar on my own. Clearly, I had to recreate this masterpiece at home.

Pear Arugula Salad with Dates and Parmesan

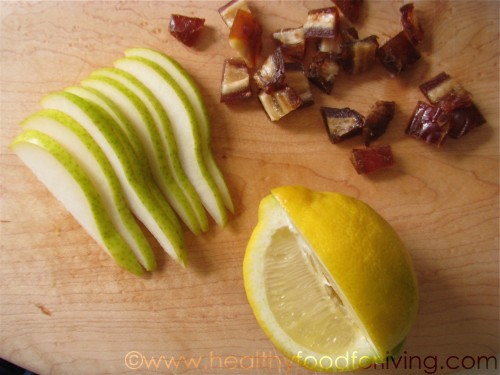
As I was gathering together the necessary ingredients, a bowlful of beautiful ripe pears on the counter caught my eye, and inspiration struck; I knew they would make the salad not only even tastier, but more filling as well.

Name:Pear Arugula Salad with Dates and Parmesan
Cuisine:Mediterranean
Prep Time:15 minutes
Cooking Time:0 minutes (no cooking required)
Total Time:15 minutes
Servings:4 servings
Yield:Approximately 4 servings

Ingredients

  1. 2 ripe pears, thinly sliced
  2. 4 cups fresh arugula leaves
  3. 1/2 cup dates, pitted and chopped
  4. 1/2 cup Parmesan cheese, shaved
  5. 1/4 cup walnuts, toasted and chopped
  6. 1/4 cup extra virgin olive oil
  7. 2 tablespoons balsamic vinegar
  8. 1 tablespoon honey
  9. Salt and pepper to taste

Instructions

Prepare the Dressing
Start by making the dressing. In a small bowl, whisk together the extra virgin olive oil, balsamic vinegar, honey, salt, and pepper until well combined. Set the dressing aside.

Toast the Walnuts
Preheat a dry skillet over medium heat. Add the walnuts and toast them for a few minutes until they’re lightly browned and fragrant. Be sure to toss them frequently to prevent burning. Remove from heat and let them cool before chopping.

Prepare the Salad
Wash and dry the arugula leaves thoroughly. Place them in a large salad bowl. Add the thinly sliced pears, chopped dates, and toasted walnuts.

Toss the Ingredients
Gently toss the ingredients together to combine. Be careful not to crush the pears or arugula. The combination of textures and flavors should be evenly distributed.

Drizzle the Dressing
Drizzle the prepared dressing over the salad. Start with a little and add more as needed, ensuring the salad is evenly coated.

Add Parmesan
Scatter the shaved Parmesan cheese over the top of the salad. The salty and creamy notes of Parmesan will complement the sweetness of the pears and dates.

Toss Again and Serve
Give the salad one final gentle toss to incorporate the dressing and Parmesan. Serve the Pear Arugula Salad immediately on individual plates or in a serving dish.

Estimated Nutrition Per Serving

  • Calories: 250 kcal
  • Total Fat: 15g
    • Saturated Fat: 3g
    • Trans Fat: 0g
  • Cholesterol: 10mg
  • Sodium: 180mg
  • Total Carbohydrates: 25g
    • Dietary Fiber: 5g
    • Sugar: 16g
  • Protein: 5g
  • Vitamin D: 0%
  • Calcium: 20%
  • Iron: 10%
  • Potassium: 310mg

Please note that nutritional values are approximate and can vary based on specific ingredients used and portion sizes. It’s always a good practice to calculate nutrition based on the exact products you use. Enjoy your delicious Pear Arugula Salad!

Pear Arugula Salad with Dates and Parmesan

Medjool dates, how I love thee! Plump, chewy, and unbelievably naturally sweet – medjool dates are one of my favorite foods. Why have I not been adding them to salads? I will be from now on.

Pear Arugula Salad with Dates and Parmesan

After slicing the pears and chopping the dates, I whipped up a simple vinaigrette consisting of olive oil, lemon juice, maple syrup, and mustard. This is one of my go-to homemade salad dressings, but I play around with the ratios depending on what type of salad I’m making. I went a bit heavy on the maple syrup for this particular dressing, as this salad is meant to be a sweet one.

Pear Arugula Salad with Dates and Parmesan

The shavings of parmesan cheese provide the perfect salty flavor counterpoint to the sweet maple syrup, dates, and pears; and I love the aesthetic value they give to the salad.

Pear Arugula Salad with Dates and Parmesan

Oh! I almost forgot to mention the base of the salad, which is my newest edible obsession: arugula. The peppery bite adds so much flavor to salads. If you’re not a fan, you can sub in baby spinach or romaine lettuce; but I urge you to give arugula a try.

Pear Arugula Salad with Dates and Parmesan

Indulge in the perfect blend of sweet and savory with our Pear Arugula Salad. Juicy pears, peppery arugula, sweet dates, and Parmesan shavings create a delightful melody for your taste buds. Tossed in a balsamic vinaigrette, this salad is a symphony of flavors and a treat for your senses. Quick, easy, and utterly delicious!