Home Blog Page 87

Tex Mex Mac & Cheese

0

Perhaps it’s my inner child – hanging on for dear life as I rapidly approach the third decade of my life – that is responsible for my love of macaroni & cheese; melty cheese and carb-y pasta are a match made in heaven, if you ask me. That being said, my palate yearns for a more sophisticated flavor profile than is offered by the typical cheese sauce.

Here’s where tonight’s meal comes into play.

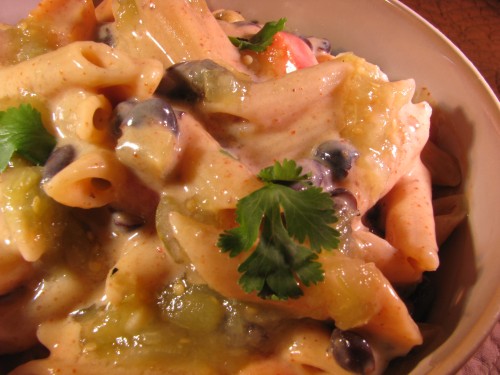
I added cumin, chipotle chili powder, and cayenne pepper to the sharp cheddar cheese sauce, and tossed in black beans, red bell pepper, and cilantro along with the whole wheat pasta. My taste buds were not bored.

I lightened the traditional dish by eliminating the butter and subbing in reduced fat milk and cheese. Whisking the milk into a spiced flour mixture over moderate heat results in a smooth “slurry”, to which shredded cheese is added to make a lusciously creamy sauce.

This Tex Mex version of mac & cheese is a tasty and fun way to enjoy an old favorite, and has inspired me to brainstorm other flavor profiles. Goat cheese and roasted squash mac & cheese, perhaps? Or how about mozzarella and pesto mac & cheese?

Something tells me I’ll be breaking out my whisk again in the very near future…

Tex Mex Mac & Cheese
NameTex Mex Mac & Cheese
CuisineFusion
Prep Time15 minutes
Cooking Time25 minutes
Total Time40 minutes
Servings6

Ingredients

  • 1 cup dry whole wheat penne (or rotini or elbows)
  • 2 Tbsp all-purpose flour
  • 1/4 tsp Kosher salt
  • a few grinds of black pepper
  • 1/2 tsp ground cumin
  • 1/2 tsp ground chipotle chili pepper (or regular chili powder)
  • 1/8 – 1/4 tsp cayenne pepper (depending on heat preference)
  • 1 cup 2% reduced-fat milk
  • 1/2 cup shredded 2% sharp cheddar cheese (or monterey jack or jalapeno cheddar)
  • 1/2 of a 15-oz can black beans, rinsed and drained
  • 1/2 red bell pepper, seeded and chopped
  • 2 Tbsp of your favorite salsa for garnish, optional
  • chopped cilantro for garnish, optional

Estimated Nutrition Per Serving

Calories: 450 kcal

Total Fat: 20g

Saturated Fat: 12-15g

Cholesterol: 60-70mg

Sodium: 500-600mg

Total Carbohydrates: 35-40g

Dietary Fiber: 2-3g

Sugars: 3-4g

Protein: 15-20g

Directions

  1. Cook pasta according to package directions. Drain, add to rinsed & drained beans, and set aside.
  2. In a medium pot, whisk together the flour, salt, pepper, and spices. Heat the pot over medium heat. Gradually whisk in the milk. Cook the milk and flour mixture together, whisking, until the milk comes to a gentle simmer. Continue to cook, whisking constantly, until the mixture thickens considerably, (coats the back of a spoon), about 1-2 minutes.
  3. Remove thick milk mixture from heat and stir in cheese until it melts. Stir in the drained pasta, beans, and chopped bell pepper. Top with salsa and cilantro, if using.

Fat-Free, Naturally Sweetened Date Bread

0

Don’t get me wrong, I neither promote nor follow a fat-free diet. Olive oil, nuts, seeds, avocados, cheese, peanut butter, chocolate, salmon, and 2% greek yogurt are all staples in my eating regime. That being said, in an attempt to eat a bit lighter during the interim between holidays, I am being extra cautious of gobbling down rich baked goods.

I will continue to enjoy a spoonful of peanut butter melting into my morning oatmeal, pecans sprinkled over oil & vinegar-dressed salads, 2% yogurt topped with granola, and the occasional square of dark chocolate, but I’m sticking to my plan of lightening homemade baked goods when possible.

NameFat-Free, Naturally Sweetened Date Bread
CuisineFusion
Prep Time20 minutes
Cooking Time40-45 minutes
Total TimeApproximately 1 hour
Servings10 servings
Yield1 standard-sized loaf
Fat-Free, Naturally Sweetened Date Bread

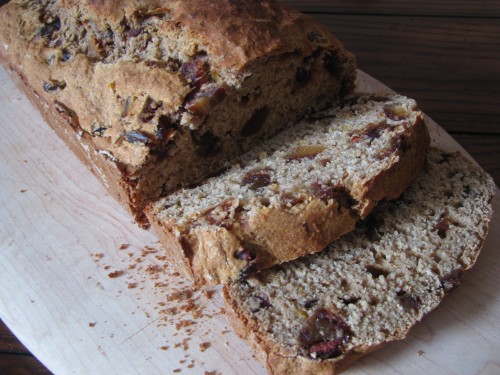
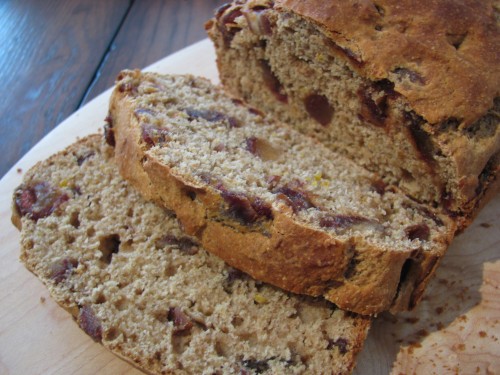
I made many alterations to Ina’s original recipe (linked below). I subbed in 1 cup of whole wheat pastry flour, completely eliminated the refined sugar, swapped mashed banana for the butter, and opted for the addition of pumpkin pie spice. The lack of nuts in my version was simply due to a pantry bereft of pecans, of which I have been eating in abundance (note to self: re-stock pecan stash ASAP!).

The generous amount of chopped dates lent the perfect amount of natural sweetness, and the mashed banana kept the bread tender and moist. The lovely flavor of citrus permeates the bread beautifully, thanks to the triple threat of orange liqueur, orange zest, and orange juice. I’m sure the original recipe yields a sweet and buttery dessert bread, but my version is better suited for breakfast or a mid-afternoon snack. The bread is best when served warm straight out of the oven, (what baked good isn’t?), but a quick re-heat in the toaster oven does the trick for leftover slices.

Fat-Free, Naturally Sweetened Date Bread

Ingredients

  • 2 cups coarsely chopped pitted medjool dates
  • 1/3 cup orange liqueur
  • 1/4 cup mashed overripe banana
  • 1 large egg
  • 1 tsp pure vanilla extract
  • 1 Tbsp grated orange zest
  • 1 cup all-purpose flour
  • 1 cup whole wheat pastry flour
  • 2 tsp baking powder
  • 1/2 tsp baking soda
  • 1 tsp ground cinnamon
  • 1 tsp pumpkin pie spice
  • 1 tsp Kosher salt
  • 3/4 cup freshly squeezed orange juice (3-4 oranges)
  • canola oil cooking spray

Estimated Nutrition Per Serving

Calories: 190 kcal

Total Fat: 0g

Saturated Fat: 0g

Cholesterol: 0mg

Sodium: 220mg

Total Carbohydrates: 46g

Dietary Fiber: 2g

Sugars: 32g

Protein: 2g

Instructions

Prepare the Dates

Start by preheating your oven to 350°F (175°C) and greasing a standard-sized loaf pan. Then, in a medium-sized bowl, combine the chopped dates and baking soda. Pour the boiling water over them, ensuring they’re well-covered. Let this mixture sit for about 15-20 minutes. The baking soda helps soften the dates.

Mix Dry Ingredients

In a separate bowl, whisk together the flour, baking powder, and salt. This step ensures even distribution of leavening agents and salt.

Blend Wet Ingredients

In another bowl, mix together the applesauce, honey (or maple syrup), and vanilla extract. This combination will serve as a natural sweetener and moistener for the bread.

Combine Everything

Once the dates have softened, use a blender or food processor to puree them into a smooth paste. Add the date paste to the wet ingredients and stir until well combined.

Mix Wet and Dry Ingredients

Gradually add the dry ingredients to the wet mixture, stirring until just combined. Be careful not to overmix; a few lumps are okay. If you’re including chopped nuts, fold them in at this stage.

Bake

Pour the batter into the greased loaf pan and spread it evenly. Bake in the preheated oven for approximately 40-45 minutes, or until a toothpick inserted into the center comes out clean.

Cool and Serve

Once baked, allow the date bread to cool in the pan for about 10 minutes. Then, transfer it to a wire rack to cool completely. Slicing the bread is easier when it’s completely cooled.

Apple Crisp for One

0

Maybe you don’t have a date for Valentine’s Day.

Apple Crisp for One

Or perhaps you’re craving a bowl of sweet comfort but don’t want a ton of leftover dessert staring you in the face every time you open the refrigerator.

Apple Crisp for One

Or maybe your significant other just isn’t a big fan of dessert.

Apple Crisp for One

Whatever your specific situation may be, I think you should make this single-serving apple crisp.

Easy to toss together, quick to bake, and delicious to eat, this crisp is the perfect cure-all for the singleton on Valentine’s Day, the comfort food-seeker, and the “my-husband/wife-doesn’t-eat-dessert-but-I’m-a-sweets-freak” individual alike.

Apple Crisp for One

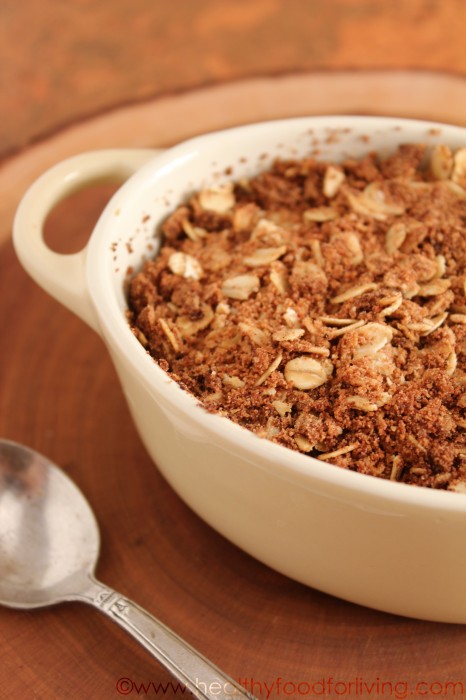
Sweet apple slices are blanketed by a crisp topping of whole wheat pastry flour, rolled oats, unrefined date sugar, cinnamon, and canola oil.

A scoop of vanilla fro yo or ice cream (I used So Delicious Vanilla Bean No Sugar Added Coconut Milk Frozen Dessert) is the perfect finishing touch… especially as it melts into the warm apple crisp.

Apple Crisp for One

What will your reason be for making this tasty treat?

Name:Apple Crisp for One
Cuisine:Fusion
Prep Time:10 minutes
Cooking Time:30 minutes
Total Time:40 minutes
Servings:1
Yield:1 single-serving portion

Keywords: bake dessert vegan vegetarian sugar-free apples oatmeal

Ingredients (1 serving)

  • 1 large sweet apple, preferably organic, peeled, cored, and thinly sliced
  • 1/2 tsp arrowroot powder (or cornstarch)
  • 1 Tbsp whole wheat pastry flour
  • 2 Tbsp old fashioned rolled oats
  • 1 Tbsp date sugar (or other unrefined granulated sweetener)
  • 1/4 tsp ground cinnamon
  • pinch Kosher salt
  • 1/2 Tbsp canola oil

Instructions

Preheat oven to 350°F. Lightly oil/butter a small ovenproof baking dish.

In a small bowl, toss apple slices with arrowroot. Arrange in prepared dish.

In another small bowl, combine the flour, rolled oats, sugar, cinnamon, and salt. Drizzle with the canola oil, and mix with your fingertips until crumbly.

Scatter crisp topping evenly over the apple slices. Bake for 15 minutes minutes; reduce heat to 325°F, and bake for an additional 10-15 minutes or until crisp topping is golden brown.

Let sit for 5 minutes before serving.

Estimated Nutrition Per Serving

  • Calories:300 calories
  • Protein: 2 grams
  • Carbohydrates:50 grams
  • Dietary Fiber: 6 grams
  • Sugars: 35 grams
  • Fat: 10 grams
  • Saturated Fat: 6 grams
  • Cholesterol: 25 milligrams
  • Sodium: 80 milligrams

Please keep in mind that these are rough estimates and can vary depending on factors like the type of apple used and the specific brands of ingredients. If you have specific dietary concerns or requirements, it’s a good idea to use a nutrition calculator or consult with a nutritionist for more precise information. Enjoy your Apple Crisp for One!

Individual Butternut Squash Lasagna with Goat Cheese Sauce

0

So. We’re a mere few days into “resolution week” (a.k.a. the first week of the new year when everyone is attempting to eat lighter) and I’m pushing a triple-cheese lasagna recipe on you.

Before you click away, though, let me assure you that this lasagna is perfectly healthy. Heavy on the butternut squash, light on the pasta, and much lower in fat than traditional lasagna, this is a comforting dinner that you can absolutely feel good about eating.

Individual Butternut Squash Lasagna with Goat Cheese Sauce

I opted for a no-boil lasagna noodle, but by all means, you can use a classic boiled noodle instead. Notice the singular “noodle”… yep, I only used one for the entire dish of lasagna!

Instead of ricotta, I used whipped 1% cottage cheese – which I simply seasoned with salt, pepper, and a bit of ground nutmeg. Cottage cheese is less sweet than ricotta, but the butternut squash contributes enough sweetness to the dish.

Individual Butternut Squash Lasagna with Goat Cheese Sauce

And now we get to the best part of the recipe… which also happens to be the reason for the individual serving size. You see, John does NOT like squash. Therefore, any and all kinds of squash are relegated to meals I make just for myself.

I am okay with this. More for me!

I roasted cubes of the sweet orange winter squash until tender and slightly caramelized before layering it with the noodle pieces, cottage cheese, and…

Individual Butternut Squash Lasagna with Goat Cheese Sauce

… a luscious goat cheese sauce inspired by Kerstin’s lasagna (which, by the way, is awesome – I made it back in the summer, and absolutely loved it). You just cannot go wrong with goat cheese.

Individual Butternut Squash Lasagna with Goat Cheese Sauce

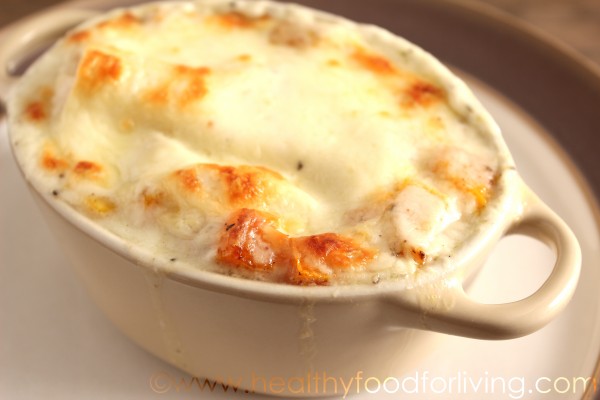
The layered dish is finished off with a sprinkling of shredded part-skim mozzarella before being baked into gooey, golden brown deliciousness.

Individual Butternut Squash Lasagna with Goat Cheese Sauce

I cuddled up on the couch with this delicious lasagna last night; it was a frigid “arctic blast” day here in the Boston area, and all I wanted was something hot, cheesy, and comforting. John was out at a basketball game, so it was the perfect opportunity to make a squash-centric single-serving meal.

Individual Butternut Squash Lasagna with Goat Cheese Sauce

It was everything I had hoped it would be! Chewy pasta, sweet roasted squash, tangy goat cheese sauce, melted mozzarella… this creamy but not overly rich lasagna is the perfect meal to cozy up to on a cold winter night.

Individual Butternut Squash Lasagna with Goat Cheese Sauce
Name:Individual Butternut Squash Lasagna with Goat Cheese Sauce
Cuisine:Italian-American
Prep Time:30 minutes
Cooking Time:45 minutes
Total Time:1 hour 15 minutes
Servings:4 servings

Ingredients

  • 1 cup cubed peeled butternut squash (cut into about 1/2-inch cubes)
  • 1 tsp extra virgin olive oil
  • Kosher salt and freshly ground black pepper, to taste
  • 1 tsp butter
  • 1 tsp flour
  • 1/3 cup 1% milk (preferably organic)
  • 1 oz (about 2 Tbsp) soft goat cheese
  • 1/4 cup 1% whipped cottage cheese
  • 2 pinches ground nutmeg
  • 1 no-boil lasagna noodle, cut into thirds (widthwise)
  • 2 Tbsp shredded part-skim mozzarella cheese

Directions

  1. Preheat oven to 400°F. Toss the cubed butternut squash with olive oil and season to taste with salt and pepper. Lay in an even layer on a baking sheet and cook, turning halfway through, until soft and lightly browned, about 30 minutes.
  2. Reduce oven heat to 350°F.
  3. Lightly grease an individual baking dish.
  4. Heat butter in a small saucepan set over medium heat. Whisk in the flour and cook, whisking, for 30 seconds. Add in the milk and cook, whisking, until slightly thickened, about 2 minutes. Remove from heat and whisk in soft goat cheese until fully melted. Season sauce to taste with salt and pepper. Stir in a pinch of ground nutmeg.
  5. In a small bowl, season cottage cheese to taste with salt and pepper. Stir in a pinch of ground nutmeg.
  6. Spoon about 1 Tbsp of the goat cheese sauce into the bottom of the prepared dish. Top with 1 piece of noodle. Spread half of the cottage cheese over the noodle.
  7. Evenly scatter half of the roasted butternut squash over the cottage cheese and top with about 2 Tbsp of the goat cheese sauce.
  8. Repeat the layers, starting with a second noodle piece followed by the remaining cottage cheese, remaining butternut squash, another 2 Tbsp goat cheese sauce, and ending with the final piece of noodle. Top with the remaining goat cheese sauce and shredded mozzarella.
  9. Bake at 350°F until cheese is bubbly, about 20 minutes.
  10. Let stand at room temperature for at least 15 minutes before eating.

Nutritional Information

Calories: 447.7 calories

Fat: 21.3 grams

Saturated Fat: 10.5 grams

Fiber: 6 grams

Protein: 26.7 grams

Chocolate, Raspberry, & Banana Breakfast Trifle

0

I told you this might happen.

Chocolate, Raspberry, & Banana Breakfast Trifle

Clearly, I didn’t waste any time putting those leftover Chocolate Peanut Butter Banana Muffins to use.

Chocolate, Raspberry, & Banana Breakfast Trifle

I have a confession to make: After luxuriating in the initial muffin or slice of quick bread still warm from the oven, I rarely eat the remaining baked goods plain. I cube ‘em up to make bread pudding, crumble ‘em over yogurt, or sandwich ‘em around peanut butter and other tasty fillings

Chocolate, Raspberry, & Banana Breakfast Trifle

Therefore, it comes as no surprise that as soon as I finished a freshly baked muffin on Monday morning, I began brainstorming uses for the remaining muffins.

This trifle was the first idea to come to fruition.

Chocolate, Raspberry, & Banana Breakfast Trifle

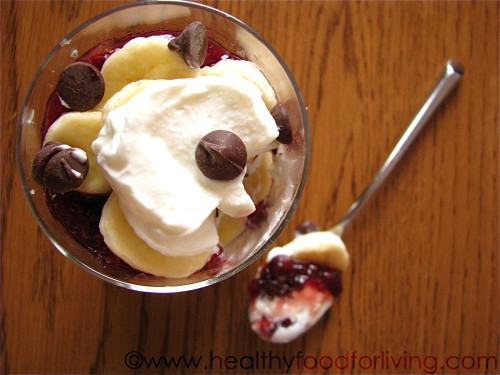
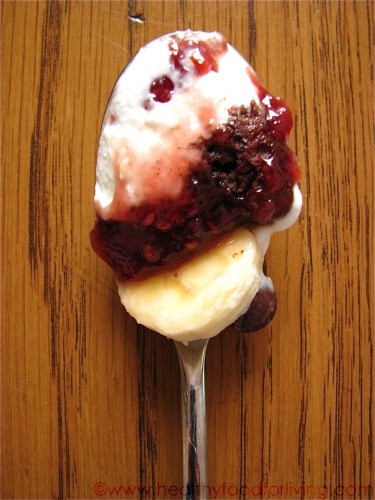
Muffin crumbles are layered with tangy and thick Greek yogurt, all-fruit raspberry preserves, and banana slices in this fancy-pants breakfast trifle.

Chocolate, Raspberry, & Banana Breakfast Trifle

As I was gathering the ingredients together on the counter this morning, John glanced over his shoulder on his way to work and casually commented on the decadent-looking cupcake impostor, “Chocolate for breakfast?”. I responded – in an equally casual manner – “A chocolate muffin for breakfast”, as he kissed me goodbye and headed out the door.

Then I added chocolate chips to the top of the trifle.

Hey, I’m on vacation (spring break!).

Chocolate, Raspberry, & Banana Breakfast Trifle

And this trifle is certainly a vacation-worthy breakfast. Reminiscent of black forest cake, the flavor play of rich chocolate and sweet red raspberry is nicely complimented by tangy yogurt and slightly under-ripe bananas. The grain-sweetened chocolate chips add a bit of texture and whimsy to the trifle, but you can leave them out if you’d prefer.

But let’s be honest… they complete that perfect bite.

Chocolate, Raspberry, & Banana Breakfast Trifle
NameChocolate, Raspberry, & Banana Breakfast Trifle
CuisineFusion
Prep Time10 minutes
Cooking Time0 minutes (No cooking required)
Total Time10 minutes
Servings2 servings
Yield2

Ingredients

  • 1/2 cup + 1 Tbsp plain 0% (or 2%) Greek yogurt
  • 1 Chocolate Peanut Butter Banana Muffin, crumbled
  • 2 Tbsp all-fruit red raspberry preserves, such as St. Dalfour
  • 1/2 large greenish-yellow banana, thinly sliced

Estimated Nutrition Per Serving

Calories: 360 calories

Protein: 13 grams

Carbohydrates: 54 grams

Dietary Fiber: 8 grams

Sugars: 28 grams

Fat: 13 grams

Saturated Fat: 6 grams

Cholesterol: 5 milligrams

Sodium: 30 milligrams

Potassium: 550 milligrams

Vitamin C: 16 milligrams (27% DV)

Calcium: 190 milligrams (19% DV)

Iron: 2 milligrams (11% DV)

Instructions

  1. Prepare the Chocolate Oats

In a saucepan, combine oats, milk, cocoa powder, honey (or maple syrup), and vanilla extract. b. Cook over medium heat, stirring frequently until the mixture thickens (approximately 5-7 minutes). Remove from heat and let it cool.

  1. Create the Raspberry Compote

In a small saucepan, combine fresh raspberries, honey, lemon juice, and a pinch of salt. b. Cook over low heat, mashing the raspberries with a fork as they soften. c. Continue to cook for about 5-7 minutes until the mixture thickens into a compote. Remove from heat and let it cool.

  1. Assemble the Trifle

Start by layering a spoonful of the chocolate oats at the bottom of a glass or jar. b. Add a layer of sliced bananas on top of the oats. c. Follow with a layer of raspberry compote. d. Spoon a layer of Greek yogurt over the raspberries. e. Repeat these layers until the glass is filled, finishing with a dollop of yogurt on top.

  1. Garnish and Serve

For an extra touch of decadence, garnish your trifle with dark chocolate shavings. b. Serve your Chocolate, Raspberry, & Banana Breakfast Trifle immediately and enjoy!

Peanut Butter Strawberry Shortcakes

0

Strawberry shortcake holds a special place in my heart – for many years in a row I requested it for my birthday dessert when my mom offered to make anything I’d like.

Peanut Butter Strawberry Shortcakes

I put a different twist on this one, using leftover defrosted peanut butter biscuits that I froze after making them for the Peanut Butter & Co. All-Star Recipe Blog.

Yep. Peanut butter biscuits. With rich peanut butter “cream” and juicy strawberries.

Peanut Butter Strawberry Shortcakes

The inspiration for peanut butter cream came from the various vegan cashew cream recipes that circulated the blogosphere a few years back.

Peanut Butter Strawberry Shortcakes

I soaked organic unsalted peanuts in water overnight to soften them.

Peanut Butter Strawberry Shortcakes

The peanuts were then pureed with water, vanilla bean paste, agave nectar, and…

Peanut Butter Strawberry Shortcakes

… unsweetened peanut butter.

Peanut Butter Strawberry Shortcakes

I pressed the mixture through a fine mesh strainer to ensure as smooth a finished product as possible.

Peanut Butter Strawberry Shortcakes

I could easily have eaten the whole batch like so:

Peanut Butter Strawberry Shortcakes

But, I restrained myself and reserved most of it for the shortcakes.

Peanut Butter Strawberry Shortcakes

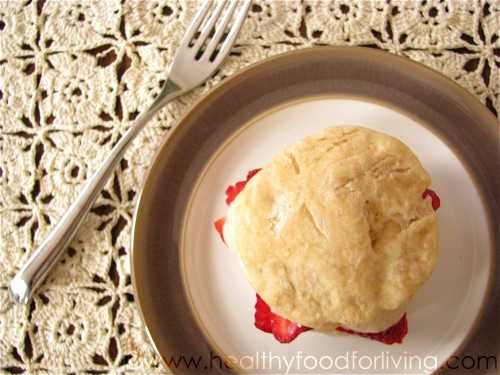
The tender biscuits are the perfect vehicle for the rich and slightly sweet peanut butter cream, and the strawberries add the essential freshness that makes this dessert so lovely.

Peanut Butter Strawberry Shortcakes

The assembled shortcake is less sweet than most desserts, but is delicious nonetheless.

Peanut Butter Strawberry Shortcakes

The best aspect of this recipe is that you can make the individual components to enjoy separately or combine them for a delicious and healthy dessert.

Peanut Butter Strawberry Shortcakes
NamePeanut Butter Strawberry Shortcakes
CuisineFusion
Prep Time20 minutes
Cooking Time15 minutes
Total Time35 minutes
Servings8 servings
Yield8

Ingredients

  • 1 cup all-purpose flour
  • 2 tablespoons granulated sugar
  • 1 1/2 teaspoons baking powder
  • 1/4 teaspoon salt
  • 2 tablespoons cold butter, cubed
  • 1/4 cup creamy peanut butter
  • 1/2 cup milk
  • 2 cups fresh strawberries, hulled and sliced
  • 2 tablespoons powdered sugar
  • 1 cup whipped cream
  • 1 teaspoon vanilla extract

Estimated Nutrition per Serving

Calories: 485 calories

Protein: 10 grams

Carbohydrates: 42 grams

Dietary Fiber: 3 grams

Sugars: 12 grams

Fat: 32 grams

Saturated Fat: 13 grams

Cholesterol: 55 milligrams

Sodium: 559 milligrams

Potassium: 290 milligrams

Vitamin C: 39% of the Daily Value

Calcium: 11% of the Daily Value

Iron: 15% of the Daily Value

Instructions

1. Prepare the Shortcakes

Preheat your oven to 425°F (220°C).

In a mixing bowl, combine the flour, granulated sugar, baking powder, and salt.

Add the cold cubed butter and peanut butter. Use a pastry cutter or your fingertips to work the butter and peanut butter into the dry ingredients until the mixture resembles coarse crumbs.

Gradually pour in the milk and stir until just combined. Do not overmix; the dough should be slightly lumpy.

Drop spoonfuls of the dough onto a baking sheet lined with parchment paper, making 4 equal portions.

Bake for 12-15 minutes or until the shortcakes are golden brown. Remove them from the oven and let them cool.

2. Prepare the Strawberries

While the shortcakes are baking, place the sliced strawberries in a bowl and sprinkle them with powdered sugar. Toss gently to coat the strawberries and set them aside. The sugar will macerate the strawberries, releasing their natural juices and enhancing their flavor.

3. Assemble the Shortcakes

Once the shortcakes have cooled, slice each one in half horizontally.

Spoon a generous amount of whipped cream onto the bottom half of each shortcake.

Add a layer of macerated strawberries on top of the whipped cream.

Place the other half of the shortcake on top, creating a sandwich.

4. Garnish and Serve

Finish off your Peanut Butter Strawberry Shortcakes by drizzling a bit of honey or a sprinkle of crushed peanuts on top for extra flavor and texture.

Serve these delectable treats immediately, and watch as your guests savor every delightful bite.

Loaded Cornbread

0

There are as many variations of basic cornbread recipes as there are of chili. Bread-like or souffle-like. Sweetened with honey, sugar, or even maple syrup. Moistened with oil or butter. Baked in a muffin tin, baking pan, or cast-iron skillet. Made with just cornmeal or in conjunction with flour… etc.

And then there are the recipes that call for additional ingredients. Bacon. Goat cheese. Creamed corn.

Loaded Cornbread

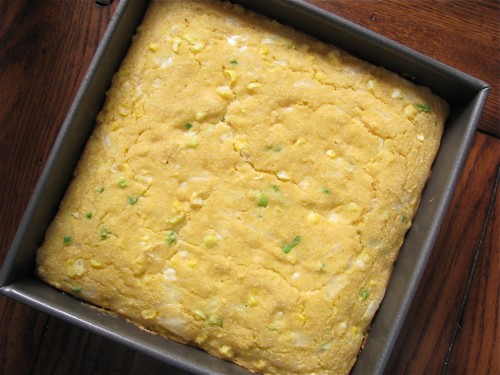
Clearly, I decided to go with the latter category of cornbread. Quite literally “loaded” with tasty flavor elements, this cornbread is delicious solo and even better when smothered with your favorite chili.

Loaded Cornbread

Minced serrano chili peppers and pepper jack cheese serve up a double kick of spice, sliced green onions add a mellow onion-y flavor, and fresh corn kernels contribute a sweet crunch.

The recipe is versatile, so if any of the above ingredients aren’t to your liking, feel free to either omit them or use a substitution.

Loaded Cornbread

Loaded Cornbread

adapted from Mollie Katzen’s The New Moosewood Cookbook

Name:Loaded Cornbread
Cuisine:Fusion
Prep Time:15 minutes
Cooking Time:30 minutes
Total Time:45 minutes
Servings:12 servings
Yield:1 8×8-inch pan

Ingredients

  • cooking spray
  • 1 cup cornmeal
  • 1 cup white whole wheat flour
  • 2 tsp baking powder
  • 1/2 tsp baking soda
  • 1/2 tsp Kosher salt
  • 1 1/4 cups low-fat buttermilk
  • 1 egg, lightly whisked
  • 2 Tbsp evaporated cane juice or granulated sugar
  • 2 Tbsp unsweetened applesauce
  • 1 Tbsp butter or margarine, melted and cooled
  • 1 cup fresh corn kernels (from about 2 ears… or can substitute defrosted frozen corn)
  • 1/2 cup grated 50% reduced fat jalapeno cheddar or pepper jack cheese
  • 1/2 serrano or jalapeno chile pepper, seeded and minced
  • 1/4 cup sliced scallions

Directions

Preheat oven to 350 degrees F. Lightly coat an 8 x 8-inch square baking pan with cooking spray.

In a large bowl, whisk together the cornmeal through salt.

In a medium bowl, whisk together the buttermilk through melted butter until well-mixed.

Stir wet ingredients into the dry just until well-combined.

Fold in fresh corn kernels, grated cheese, minced serrano chile, and sliced scallions.

Pour batter into prepared pan and spread evenly.

Bake for about 25-30 minutes, or until a toothpick inserted into the center of the cornbread comes out clean.

Let sit for about 5 minutes before cutting into squares and serving. Can also be served at room temperature.

Nutrition (per serving)

Calories:260 kcal
Protein:8g
Carbohydrates:20g
Dietary Fiber:1g
Sugars:4g
Fat:16g
Saturated Fat:8g
Cholesterol:70mg
Sodium:520mg

Braciole For My Valentine

0

For the past few years, John and I have opted to stay in for Valentine’s Day dinner. I firmly believe that the best way to express how much you love someone is by preparing a meal that he/she adores. For my wonderful husband, one of those meals is braciole.

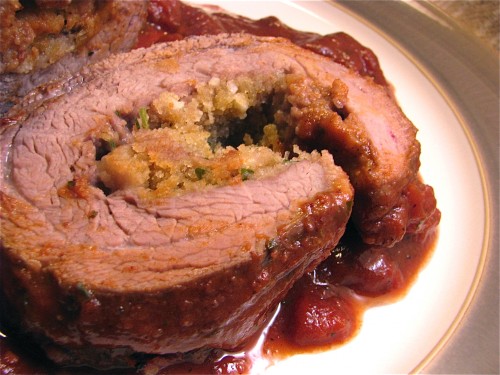
A decidedly Italian blend of breadcrumbs, two cheeses, and herbs is rolled snugly into a lean flank steak, which is then braised in a slow oven embraced by a flavorful wine-infused tomato sauce.

Be sure to leave yourself plenty of time to make this meal, as the cooking time is 1 hour 30 minutes. The preparation is simple and straightforward, and the braciole requires minimal “babysitting” while braising in the oven. As is the case with most slow-cooking meat dishes, the aroma emanating from the kitchen while this braciole cooks is enough to send anyone’s heat aflutter.

Make this dish for your husband, wife, or partner, and I guarantee he/she will be overcome with appreciation and love.

NameBraciole For My Valentine
CuisineItalian
Prep Time25 minutes
Cooking Time2 hours
Total Time2 hours and 25 minutes
Servings4

Happy Valentine’s Day!

Braciole For My Valentine

Ingredients

  • 4 thin slices of beef (about 1/4 inch thick and 6×8 inches each)
  • 1/2 cup grated Pecorino Romano cheese
  • 1/4 cup fresh breadcrumbs
  • 2 cloves garlic, minced
  • 1/4 cup fresh parsley, chopped
  • Salt and freshly ground black pepper, to taste
  • 4 slices of prosciutto
  • 2 tablespoons olive oil
  • 1 can (28 oz) crushed tomatoes
  • 2 cloves garlic, minced
  • 1/4 cup fresh basil, chopped
  • Salt and freshly ground black pepper, to taste.

Directions

  1. Preheat oven to 350 degrees F.
  2. Combine the breadcrumbs, garlic, parsley, cheeses, and 2 Tbsp olive oil in a small bowl.
  3. Spread breadcrumb mixture evenly over the flank steak, pressing lightly to adhere. Starting at one short end, roll the steak up jelly roll-style. Tie pieces of butcher’s twine tightly around the rolled steak at 2-inch intervals; trim twine. Season the filled steak with salt and pepper.
  4. Heat the remaining 1 Tbsp olive oil in a large dutch oven over medium-high heat. Add the rolled steak and sear on all sides, about 5 minutes. Pour in the wine to deglaze the pot, then add in the tomato sauce.
  5. Partially cover the pot with aluminum foil and braise in the oven for 30 minutes. Turn the braciole and baste with the sauce, then return to oven, partially covered, for another 3o minutes. Uncover the pot and cook for 30 additional minutes, or until the steak is tender.
  6. Transfer the braciole to a cutting board, tent with aluminum foil, and let rest for a few minutes. Remove the butcher’s twine and cut the braciole crossways into slices. Serve with whole wheat pasta and sauce.

Estimated Nutrition (per serving)

  • Calories: 450
  • calories Protein: 30g
  • Carbohydrates: 12g
  • Dietary Fiber: 2g
  • Sugars: 4g
  • Fat: 30g
  • Saturated Fat:10g
  • Cholesterol:100mg
  • Sodium: 900mg

Chocolate-Dipped Peanut Butter Banana Cracker Bites

0

I had Lily in mind when I made these fun little treats, even though she’s still too young to experience the deliciousness that is chocolate & peanut butter (baby girl has NO idea what she’s missing!). She LOVES bananas, though, and the petite stature of these cracker bites deems them kid-friendly.

Chocolate-Dipped Peanut Butter Banana Cracker Bites

They’re also perfectly healthy – and not too sweet (we’re making our own chocolate for this recipe!) – for mindful parents to give to their kiddos.

Chocolate-Dipped Peanut Butter Banana Cracker Bites

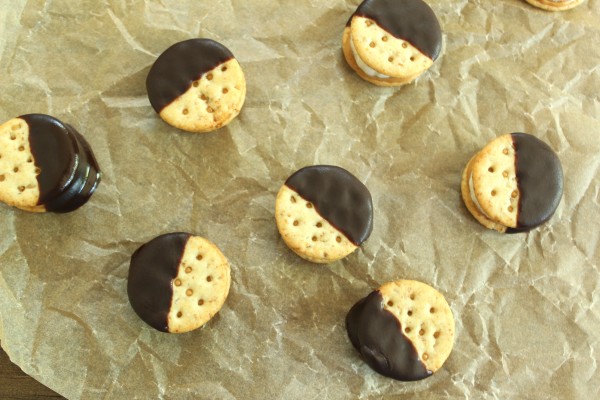
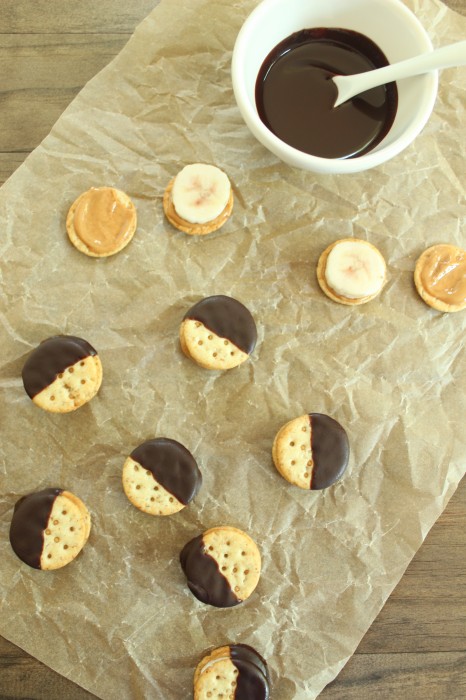
Trader Joe’s carries these mini whole grain crackers – which taste like a popular buttery cracker – that I really like (and can pop like candy if I’m not careful). For this recipe, we’re spreading ‘em with a bit of peanut butter, sandwiching a frozen banana slice in between a pair, and dipping the whole shebang into an easy & healthy homemade chocolate sauce.

Chocolate-Dipped Peanut Butter Banana Cracker Bites

When you combine melted coconut oil, cocoa powder, and maple syrup, you’re rewarded with a delicious refined sugar-free chocolate sauce that hardens when chilled.

Chocolate-Dipped Peanut Butter Banana Cracker Bites

The recipe makes more chocolate sauce then you’ll need for the cracker bites, but please don’t toss it! You can warm up leftovers until liquified and drizzle over ice cream for a homemade chocolate shell, spoon it over oatmeal for a decadent breakfast, or, (as I’ve been doing), eat it by the mini spoonful.

Chocolate-Dipped Peanut Butter Banana Cracker Bites

These little bites would be perfect for a kid’s birthday, but would also go over quite well at an adults-only get-together. Or just make them for yourself!

Chocolate-Dipped Peanut Butter Banana Cracker Bites

I can’t wait to make – and enjoy – these with Lily when she’s older :).

Chocolate-Dipped Peanut Butter Banana Cracker Bites

Chocolate-Dipped Peanut Butter Banana Cracker Bites

by Lauren Zembron (inspired by “Ritz Cracker Chocolate Peanut Butter Ice Cream Sandwiches” by Two Peas and Their Pod)

Name:Chocolate-Dipped Peanut Butter Banana Cracker Bites
Cuisine:Fusion
Prep Time:20 minutes
Cooking Time:(Freezing Time: 45 minutes)
Total Time:1 hour
Servings:24 bites
Yield:24 bites per batch

Keywords: dessert snack peanut butter banana chocolate

Ingredients (10 bites)

  • 20 round whole grain mini crackers, such as Trader Joe’s 12 Grain Mini Snack Crackers
  • 1 small banana, peeled, sliced into 10 “coins”, and frozen in advance
  • ~2 Tbsp natural smooth peanut butter, well-stirred
  • 2 1/2 Tbsp virgin coconut oil, melted and then cooled to room temperature (you want the oil to be liquid, but not warm)
  • 2 1/2 Tbsp unsweetened dark cocoa powder, sifted to remove any lumps
  • 1 Tbsp pure maple syrup, preferably grade B, at room temperature (if you add cold ingredients to melted coconut oil, the oil with solidify)

Instructions

If you haven’t already, peel, slice, and freeze the banana.

Spread a bit of peanut butter onto the bottom of each cracker.

Place a frozen banana slice onto one of the pb-covered crackers. Top with another pb-covered cracker.

Repeat previous step with remaining crackers & bananas.

Place assembled cracker bites back into the freezer.

In a bowl, stir together the melted coconut oil, sifted cocoa powder, and room-temperature maple syrup until very smooth.

Dunk half of each cracker bite into the chocolate sauce. Place chocolate-dipped cracker bites into the freezer for a third time, until the chocolate sauce has hardened into a shell, about 5 minutes.

Store in freezer.

Estimated Nutrition Per Serving

  • Calories: 120 calories
  • Total Fat: 7g
    • Saturated Fat: 3g
    • Trans Fat: 0g
  • Cholesterol: 0mg
  • Sodium: 75mg
  • Total Carbohydrates: 14g
    • Dietary Fiber: 2g
    • Sugars: 8g
  • Protein: 2g
  • Vitamin D: 0%
  • Calcium: 1%
  • Iron: 4%
  • Potassium: 120mg

Roasted Garlic Smashed Potatoes & A New Tradition

0

Thanksgiving is, without a doubt, my favorite day of the year. Sharing a bountiful meal with family and friends as the sun sets on a cool Autumn evening is the perfect occasion to ruminate over what we are thankful for.  My family’s tradition for the last Thursday in November commences with a hearty breakfast followed by “stuffing and trussing” the turkey.  Once the bird is tucked into the oven, we convene for a leisurely hike to stretch our legs, admire the migrating geese and give the dogs a good run-around. Once back home, we shed our fleece jackets, knit hats, and woolen gloves into a pile by the front door, and congregate around a roaring wood fire. Some fold themselves into cozy love seats accompanied by a soft blanket and captivating novel, while others gather around a board game. We all take frequent trips into the kitchen, unable to ignore the incredibly tantalizing aromas wafting throughout the house.  Handfuls of nuts and bites of light hors d’oeuvres whet our appetites for the impressive spread of golden-brown roast turkey, baked stuffing, sweet potato casserole, sauteed green beans with toasted almonds, jeweled cranberry sauce, and waldorf salad. After sharing stories and many laughs, we convince ourselves that there is room in our distended bellies for a sampling of pecan pie, apple crisp, and pumpkin pie.  Then we roll ourselves back into the living room and lounge until we can no longer keep our eyes open.

It is a good day.

Roasted Garlic Smashed Potatoes

This year marks my first Thanksgiving away from my parents and brother, but I will be surrounded by family and friends nonetheless.  My husband and I will be making the short drive down to Connecticut to spend the festive holiday with his family. Although I will miss the traditions that I have enjoyed in years past, I am looking forward to participating in those of my new in-laws.

Roasted Garlic Smashed Potatoes

Speaking writing (?) of new traditions, a friend of ours is hosting a pre-Thanksgiving feast this weekend.  Mike will provide the bird, and his guests will adorn the table with a variety of side dishes and desserts. John and I were asked to bring mashed potatoes, so I set to work on Saturday morning whipping up a Thanksgiving-worthy version of this classic turkey accompaniment. I prefer the chunkier texture of “smashed” to “mashed” potatoes, but you could certainly peel the potatoes prior to cooking and whip them after cooking to achieve a smoother consistency. I lightened this typically heavy dish by subbing in 2% milk for the heavy cream and 2% Greek yogurt for the sour cream, as well as significantly cutting down on the amount of butter. To pump up the flavor factor, I added in a generous amount of roasted garlic. Two whole heads of garlic may sound excessive, but the roasting process does a beautiful job of mellowing out the naturally pungent flavor of the raw vegetable.

Roasted Garlic Smashed Potatoes
NameRoasted Garlic Smashed PotatoesA New Tradition
CuisineAmericanFusion
Prep Time15 minutes20 minutes
Cooking Time45 minutes (includes roasting garlic)30 minutes
Total Time1 hour50 minutes
Servings6 servings4 servings
Yield4 cupsN/A

Ingredients

  • 2 heads fresh garlic
  • extra virgin olive oil
  • Kosher salt to taste
  • freshly ground black pepper to taste
  • 4 lbs red potatoes, scrubbed and cut into 2-inch pieces
  • 1 1/2 cups 2% reduced fat milk
  • 2 Tbsp butter or margarine
  • 1/2 cup 2% plain Greek yogurt

Directions

  1. Preheat oven to 450*F.
  2. Slice each head of garlic in half widthwise, and drizzle with olive oil.
  3. Wrap garlic in foil and roast for 30-40 minutes, until the garlic cloves have softened. Let cool, then squeeze  the garlic pulp out of the papery skin. Mash in a small bowl.
  4. Cover the potatoes with cold water in a large stock pot. Bring water to a boil, reduce heat to a simmer, and cook the potatoes for 10-15 minutes, until easily pierced with a knife.
  5. Drain the water from the pot, and add to the potatoes the mashed roasted garlic, milk, butter, and Greek yogurt. Smash with a potato masher until desired texture is achieved. Season generously with salt and pepper.
Roasted Garlic Smashed Potatoes

Although I would never part with my favorite sweet potato casserole, these smashed potatoes are good enough to earn a place on the Thanksgiving table.

Perhaps I’ve stumbled upon a new tradition.

Estimated Nutrition Per Serving

  • Calories: 239 kcal
  • Carbohydrates: 32g
  • Protein: 3g
  • Fat: 11g
  • Saturated Fat: 5g
  • Cholesterol: 21mg
  • Sodium: 84mg
  • Potassium: 713mg
  • Fiber: 3g
  • Sugar: 2g
  • Vitamin A: 279IU
  • Vitamin C: 31mg
  • Calcium: 39mg
  • Iron: 1mg