Home Blog Page 57

Monday Musings + Super Healthy Oatmeal Raisin Cookies

1. I was able to snag a “virtual ticket” to the Thirty Seconds to Mars live streaming concert from Hammerstein Ballroom in NYC via VyRT  last Wednesday.

For a mere $15.00, us ticket holders were able to watch behind-the-scenes preparations + casual interviews with (from left to right) Tomo Miličević, Jared Leto, & Shannon Leto…

… as well as the full concert, which of course was awesome! I’ve been a big fan of this band for a while now, and jumped at the chance to see them perform live.

Although I would have loved to have been there in person, watching the concert live from my living room was the next best option.

Here’s a clip from one of my favorite 30STM songs, Alibi. In the short video I recorded, you can see the setup – my computer hooked up to our T.V. and stereo. The sound was great! More bands should broadcast concerts like this.

A few other favorite 30STM songs of mine:

  • Hurricane
  • 100 Suns
  • Closer To The Edge
  • The Kill

2. For the life of me, I cannot get my Silpat clean. Warm soapy water helps a little bit, but the silicone baking mat always feels a little sticky after drying. Help!

3. Two of my brown rice pudding recipes are on SHAPE.com:

Included in the slideshow of ”Surprisingly Healthy Holiday Puddings” are recipes by fellow bloggers. Go check them out!

4. There are a few holiday commercials that make me want to bang my head against the wall whenever they come on T.V. (which is approximately once every 10 minutes during the 7:00-8:00 a.m. news hour on channel 7):

  • the crazy Walmart lady
  • the even crazier Target lady
  • the obnoxious T.J. Maxx & Marshalls carolers perusing the mall for over-spenders

You know what I’m talking about. Right?

5. This, my friends, is an addiction in a jar:

If you haven’t yet tried it for yourself, I’m sure you’ve seen it on other blogs… so you’ve probably already been warned about how impossible it is to keep a spoon your fingers out of it.

Dangerous, I tell you.

6. I am d-o-n-e DONE with my holiday shopping. Hallelujah!

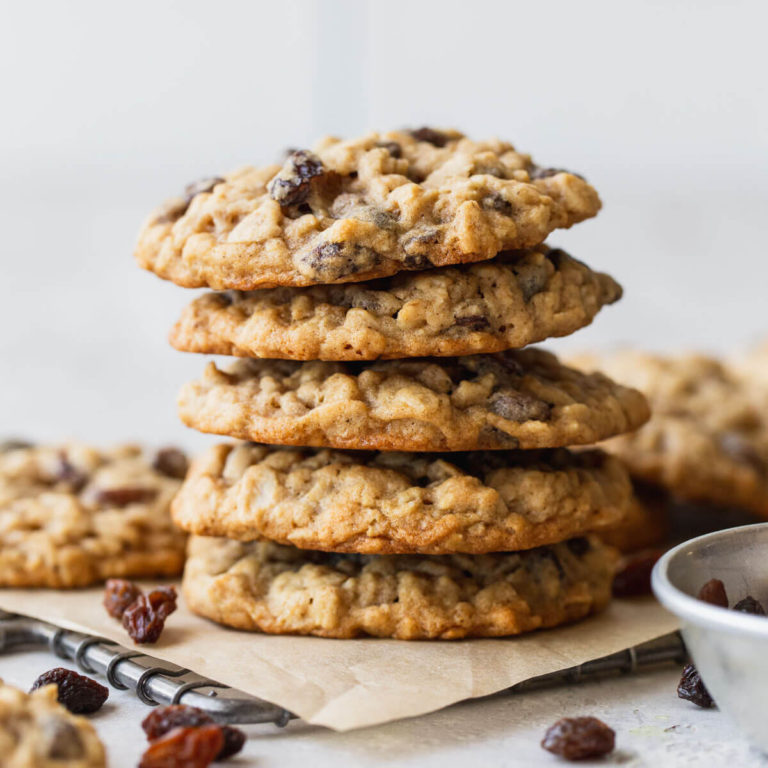
7. That cookie butter would be a tasty compliment to the Super Healthy Oatmeal Raisin Cookies I posted on The Back Burner blog today.

These chewy and hearty cookies are from a family recipe, and I can’t eat one without a flood of memories from my childhood washing over me. They’re incredibly healthy, but also delicious… I think I’ll go nibble on one now ;).

NameSuper Healthy Oatmeal Raisin Cookies
CuisineFusion
Prep Time15 minutes
Cooking Time10-12 minutes
Total Time30 minutes
Servings16 cookies
Yield1 cookie per serving

Ingredients

  • 1 cup old-fashioned oats
  • 1/2 cup whole wheat flour
  • 1/2 cup almond flour
  • 1/4 cup coconut oil, melted
  • 1/4 cup pure maple syrup or honey
  • 1/4 cup unsweetened applesauce
  • 1 egg (or flaxseed egg for a vegan option)
  • 1 tsp vanilla extract
  • 1/2 tsp baking soda
  • 1/2 tsp cinnamon
  • 1/4 tsp salt
  • 1/2 cup raisins (or your choice of dried fruit)

Instructions

Preheat your oven to 350°F (175°C) and line a baking sheet with parchment paper.

In a mixing bowl, combine the oats, whole wheat flour, almond flour, baking soda, cinnamon, and salt.

In a separate bowl, whisk together the melted coconut oil, maple syrup (or honey), applesauce, egg (or flaxseed egg), and vanilla extract until well combined.

Pour the wet ingredients into the dry ingredients and mix until a dough forms.

Gently fold in the raisins (or your choice of dried fruit).

Use a spoon or cookie scoop to drop rounded tablespoons of dough onto the prepared baking sheet, leaving enough space between each cookie.

Flatten each cookie slightly with the back of a spoon.

Bake for 10-12 minutes or until the edges turn golden brown.

Remove from the oven and allow the cookies to cool on the baking sheet for a few minutes before transferring them to a wire rack to cool completely.

Once cooled, enjoy your Super Healthy Oatmeal Raisin Cookies with a glass of almond milk or your favorite hot beverage!

These cookies are not only a delightful treat but also a great source of whole grains, healthy fats, and natural sweetness from the raisins. They’re perfect for a quick breakfast on busy mornings or as a satisfying snack any time of the day.

Estimated Nutrition Per Serving

  • Calories: 120 kcal
  • Total Fat: 6g
  • Saturated Fat: 3g
  • Trans Fat: 0g
  • Cholesterol: 10mg
  • Sodium: 80mg
  • Total Carbohydrates: 15g
  • Dietary Fiber: 2g
  • Sugars: 6g
  • Protein: 2g

Monday Musings + Pomegranate Israeli Couscous

0

1. There are still people without electricity – and some without homes – here on the East coast. This blog post details many ways you can help the victims of Hurricane Sandy.

2. John recently clued me in on an awesome iPad/iPhone app that I’m pretty excited about: iBooks (I wouldn’t know about half of the apps out there if it wasn’t for my husband). Most of the books on my “to-read” list are priced in the $10 – $20 range, but I discovered that many of the classics (think Charles Dickens, Jane Austen, etc.) are free! There are a bunch of classics that I want to either re-read or read for the first time, so this is big news for me =).

Name:Monday Musings: Pomegranate Israeli Couscous
Cuisine:Mediterranean
Prep Time:10 minutes
Cooking Time:15 minutes
Total Time:25 minutes
Servings:4 servings
Yield:About 4 cups

Ingredients:

  • 1 cup Israeli couscous
  • 2 cups vegetable broth
  • 1 cup pomegranate seeds
  • 1/2 cup chopped fresh mint leaves
  • 1/4 cup crumbled feta cheese (optional)
  • 1/4 cup chopped almonds or pine nuts, toasted
  • 2 tablespoons extra-virgin olive oil
  • 1 tablespoon lemon juice
  • Salt and pepper to taste

Instructions:

1. Toast the Couscous:

Begin by toasting the Israeli couscous in a dry skillet over medium heat. Stirring frequently, toast the couscous until it turns a light golden brown color. This will enhance its nutty flavor.

2. Cook the Couscous:

In a separate saucepan, bring 2 cups of vegetable broth to a boil. Add the toasted couscous, reduce the heat to low, cover, and simmer for about 10-12 minutes or until the couscous is tender and has absorbed the liquid. Remove it from heat.

3. Fluff the Couscous:

Use a fork to fluff the cooked couscous, allowing it to cool for a few minutes. This step ensures the grains don’t stick together.

4. Create the Dressing:

In a small bowl, whisk together the olive oil, lemon juice, salt, and pepper to create a zesty dressing.

5. Combine Ingredients:

In a large mixing bowl, combine the cooked couscous, pomegranate seeds, chopped mint leaves, and crumbled feta cheese (if using). Gently toss these ingredients together.

6. Drizzle the Dressing:

Drizzle the prepared dressing over the couscous mixture. Toss everything gently to ensure the flavors meld together beautifully.

7. Toast the Nuts:

In a dry skillet, lightly toast the chopped almonds or pine nuts until they become fragrant and golden brown.

8. Serve:

Serve the Pomegranate Israeli Couscous in bowls or on a platter, garnishing each portion with the toasted nuts.

3. I love that it’s now almost light outside when I wake up, but I am NOT so enthused that it’s dark by 4:30 pm.

4. This is how Shelby and Roxie spend the majority of the day, everyday:

As my baby-filled belly grows & my stamina wanes – and the days get colder – I find myself following suit more and more ;).

5. Will Ferrell wants to remind you: Don’t forget to vote tomorrow!

6. Pomegranates are taking center stage this week on The Back Burner.

Estimated Nutrition Per Serving:

  • Calories: 320
  • Total Fat: 12g
    • Saturated Fat: 2g
    • Trans Fat: 0g
  • Cholesterol: 5mg
  • Sodium: 600mg
  • Total Carbohydrates: 46g
    • Dietary Fiber: 6g
    • Sugars: 7g
  • Protein: 9g
  • Vitamin D: 0%
  • Calcium: 10%
  • Iron: 15%
  • Potassium: 300mg

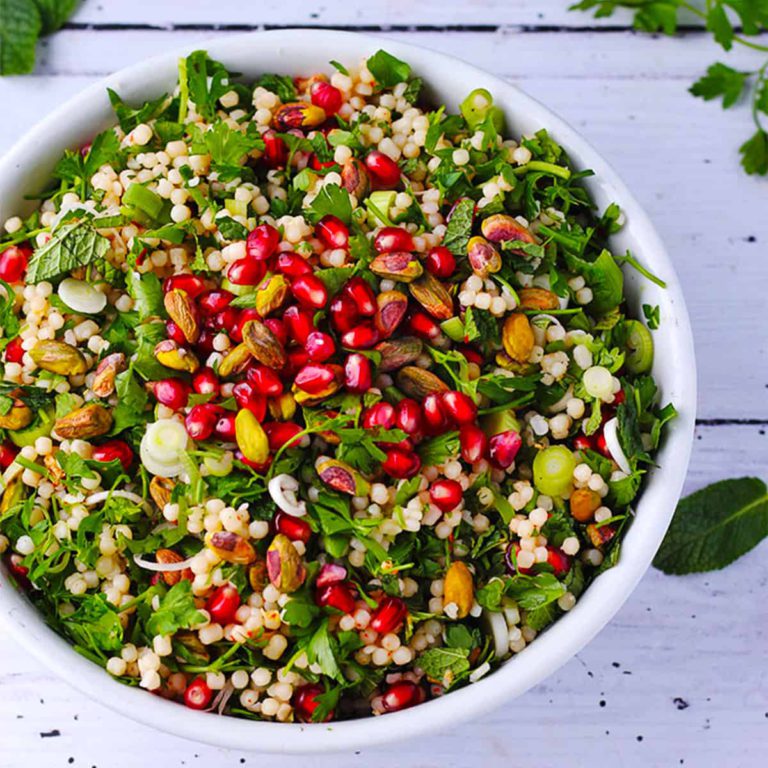
I made this Pomegranate Israeli Couscous, which comes together in less than 15 minutes. The couscous is cooking with pomegranate juice – thus the gorgeous pink hue! – and then tossed with juicy pomegranate arils, crunchy toasted almond slices, and a simple maple vinaigrette.

Blog Bites XII

0

I composed this post before Lily was born, but never got around to publishing it. I deem this the perfect time to share with you some of my recent favorite recipes from around the blogosphere, as I’m not doing much cooking these days (I made a TON of freezer meals prior to Lily’s arrival!).

NameBlog Bites XII
CuisineFusion
Prep Time15 minutes
Cooking Time25 minutes
Total Time40 minutes
Servings4
Yield12 bites

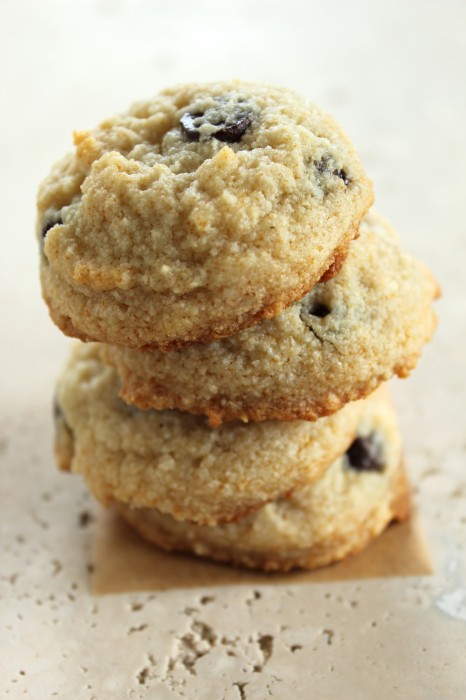
These Chocolate Chunk {Paleo} Cookies are some of the best healthy cookies I’ve ever tasted, and they are the genius creation of Gina from Running to the Kitchen.

I used almond flour instead of almond meal and dark chocolate chips instead of chopped chocolate, and they came out wonderfully chewy and perfectly sweet. The cookies are super soft, (very similar in texture to macaroons), and taste a lot like an Almond Joy candy bar, what with the coconut, almond, and chocolate flavors.

Regardless of whether or not you follow a paleo diet, you will love these cookies!

I also recently made Faith’s Bakery-Style Brownies (minus the frosting), which were delicious!

Other than omitting the frosting, I followed her recipe exactly as written and was rewarded with a pan of deeply chocolaty brownies.

I managed to set aside some of the brownies to freeze in anticipation of Lily’s arrival, knowing that I wouldn’t have time to bake… but would still crave a sweet treat ;).

To round out this installment of Blog Bites, I made these Pumpkin Waffles.

I subbed in arrowroot powder for the cornstarch and whole wheat pastry flour for the all purpose flour; the waffles turned out perfectly light and fluffy. Leftovers crisped up beautifully in the toaster oven!

I should have made another batch (or two) to keep in the freezer for quick breakfasts.

Ingredients

  • 2 cups of creativity
  • 1 cup of engaging storytelling
  • A pinch of humor
  • 3 tablespoons of originality
  • 1 cup of informative content
  • A dash of visual appeal

Estimated Nutrition Per Serving

  • Calories: 150 kcal
  • Protein: 8g
  • Carbohydrates: 20g
  • Fat: 6g
  • Fiber: 3g
  • Sugar: 5g
  • Sodium: 300mg

Instructions

Start with a Base of Creativity

Begin your Blog Bites XII by tapping into your creative reservoir. Imagine the dish as a canvas, ready to be adorned with a myriad of flavors and textures.

Layer on Engaging Storytelling

Every great recipe has a story behind it. Inject your Blog Bites XII with a narrative that captivates your readers. Share the inspiration behind the dish or the journey of its creation.

Sprinkle in a Pinch of Humor

Humor is the spice of life, and Blog Bites XII is no exception. Lighten the mood with a dash of humor. It could be witty anecdotes or playful descriptions that make your readers smile.

Fold in Originality

What sets Blog Bites XII apart from the rest? Inject originality into your content. Whether it’s a unique cooking technique, an unexpected flavor pairing, or a twist in the tale, let your creativity shine.

Stir in Informative Content

Beyond the sensory experience, provide value to your readers. Share tips, tricks, or insights related to the ingredients, cooking process, or the inspiration behind Blog Bites XII. Make it not just a meal but a learning experience.

Add a Dash of Visual Appeal

A feast for the eyes enhances the overall dining experience. Include high-quality images of your culinary creation. Let your readers see the vibrant colors and enticing textures that make Blog Bites XII a visual delight.

In the world of culinary blogging, Blog Bites XII stands tall as a testament to the endless possibilities of creative expression. This recipe is not just a dish; it’s an experience, inviting your readers to savor every word and image you present.

Estimated Nutrition Per Serving

  • Calories: 150 kcal
  • Protein: 8g
  • Carbohydrates: 20g
  • Fat: 6g
  • Fiber: 3g
  • Sugar: 5g
  • Sodium: 300mg

Meatball Pizza

Happy Pizza Friday!

At least, that’s what it is in our house… and has been on a weekly basis for a while now.

Both the concept of “Pizza Friday” and the idea of meatball pizza originated with my husband – I can’t claim any credit for either!

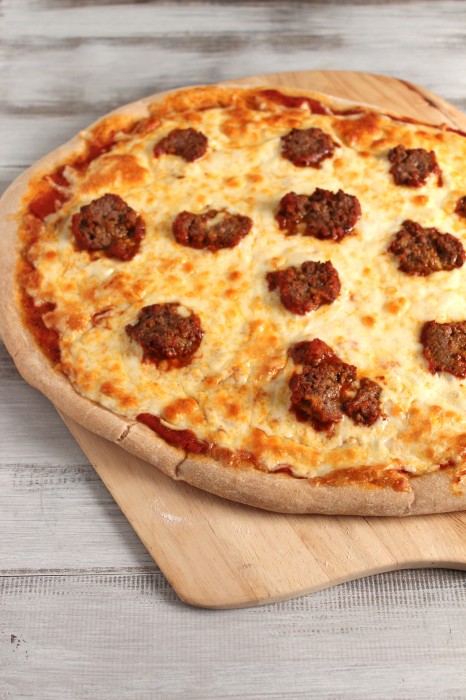
I had no problem adopting the tradition of making homemade pizza every Friday night, but it took me a little while to warm up to the idea of meatballs on pizza; something I had never eaten, or much less heard of. Not to be deterred, John talked me into it, and I’m so glad he did because this pizza was gooooood.

I planned ahead – as I typically do when it comes to weekly menu planning – and made spaghetti & homemade meatballs earlier in the week so we would have leftovers for the pizza.

I honestly don’t really follow an exact recipe when I make meatballs. I simply combined a pound of organic grass-fed beef with some homemade breadcrumbs, (from 1 large slice of whole wheat bread, toasted and pulsed in the food processor), salt and pepper, fresh parsley, dried Italian herbs, and a few tablespoons of homemade marinara sauce. The formed meatballs (a little bit bigger than a golfball) were browned on all sides in some olive oil, and then simmered in marinara sauce until cooked through.

Now onto the pizza!

I’m partial to Whole Foods frozen organic whole wheat pizza dough, and keep a couple of pounds on hand at all times. I know some people swear by homemade dough – and I’m all for that – but pre-made versions are so much more convenient. Just promise me you’ll try dough if you’ve been buying pre-baked crusts… which are nowhere near as good.

The thinly rolled-out dough is topped with marinara sauce, both shredded cheddar and mozzarella cheese (a tip John picked up from a friend whose family owns a pizza place), and of course the sliced leftover meatballs.

The verdict? I shouldn’t second guess my husband when it comes to meal ideas. This was fantastic, and will definitely join our pizza rotation!

Meatball Pizza

by Lauren Zembron

NameMeatball Pizza
CuisineItalian-American
Prep Time20 minutes
Cooking Time30 minutes
Total Time50 minutes
Servings4
Yield1 large pizza (about 12 inches)

Ingredients

For the Meatballs

  • 1 pound ground beef or a meatball blend (beef, pork, and veal)
  • 1/2 cup breadcrumbs
  • 1/4 cup grated Parmesan cheese
  • 1/4 cup milk
  • 1/4 cup finely chopped onion
  • 1/4 cup finely chopped parsley
  • 1 egg
  • 1 teaspoon salt
  • 1/2 teaspoon black pepper
  • 1/2 teaspoon garlic powder

For the Pizza

  • 1 pound pizza dough (store-bought or homemade)
  • 1 cup pizza sauce (homemade or your favorite brand)
  • 2 cups shredded mozzarella cheese
  • Sliced fresh mozzarella (optional)
  • Sliced red bell pepper (optional)
  • Sliced black olives (optional)
  • Fresh basil leaves (optional)

Instructions

1. Prepare the Meatballs

In a large mixing bowl, combine the ground meat, breadcrumbs, grated Parmesan cheese, milk, chopped onion, parsley, egg, salt, black pepper, and garlic powder.

Mix the ingredients together until well combined.

Shape the mixture into 1-inch meatballs and place them on a baking sheet lined with parchment paper.

2. Cook the Meatballs

Preheat your oven to 375°F (190°C).

Bake the meatballs for about 15-20 minutes or until they are cooked through and browned on the outside.

Remove the meatballs from the oven and set them aside.

3. Prepare the Pizza

Preheat your oven to the recommended temperature for your pizza dough (usually around 450°F or 230°C).

Roll out the pizza dough on a floured surface to your desired thickness.

Transfer the dough to a pizza stone or baking sheet.

4. Assemble the Pizza

Spread a layer of pizza sauce evenly over the dough.

Sprinkle a layer of shredded mozzarella cheese over the sauce.

Place the cooked meatballs evenly across the pizza.

Add slices of fresh mozzarella, red bell pepper, black olives, and fresh basil leaves for extra flavor and color.

5. Bake the Pizza

Bake the pizza in the preheated oven for about 12-15 minutes, or until the crust is golden brown and the cheese is bubbly and lightly browned.

6. Serve and Enjoy

Remove the Meatball Pizza from the oven and let it cool for a minute.

Slice it into wedges, serve hot, and savor the delicious combination of flavors.

Homemade Meatball Pizza is a delightful fusion of two beloved comfort foods. With tender, flavorful meatballs nestled in a bed of gooey, melted cheese and a crisp, golden crust, it’s sure to become a family favorite. So, gather your ingredients, put on your apron, and get ready to enjoy a slice of pizza perfection!

Estimated Nutrition Per Serving

  • Calories: 450 kcal
  • Protein: 25g
  • Carbohydrates: 35g
  • Dietary Fiber: 2g
  • Sugars: 4g
  • Fat: 23g
  • Saturated Fat: 10g
  • Cholesterol: 85mg
  • Sodium: 950mg

Gingerbread Cookie Dough Cheesecake Dip Recipe

0

I initially intended for this recipe to turn out as mini gingerbread cheesecakes, but – to be completely honest – I was too lazy to throw together a graham cracker crust. I briefly toyed around with the idea of making crustless cheesecakes, but it just wouldn’t be the same, now would it?

The question became: what to do with the neufchatel cream cheese, molasses, and gingerbread spices previously destined to become cheesecakes?

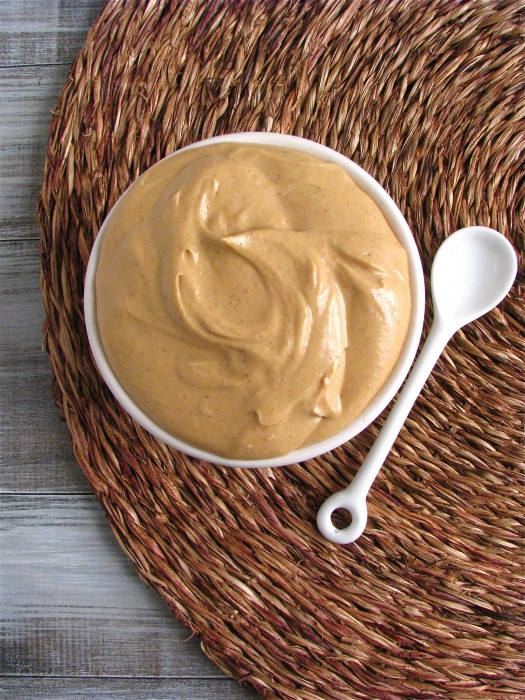
My mind eventually conjured an image of the Peanut Butter & Chocolate Chip Cheesecake Dip I made almost a year ago. The progression of thought then led me to the Trader Joe’s Cookie Butter that stares me in the face every day (it’s a miracle the jar isn’t empty yet).

Thus Gingerbread Cookie Dough Cheesecake Dip was born!

This lusciously creamy dip tastes exactly like what its name implies: a gingerbread cookie dough & cheesecake hybrid.

Molasses lends a robust sweetness that is complemented by the warm spices found in gingerbread; Trader Joe’s Cookie Butter gives an additional level of gingerbread-y flavor, and Greek yogurt lightens everything up while providing a thick creaminess.

If you’re wondering how best to serve devour this delicious dip (other than on a spoon) here are some ideas:

NameGingerbread Cookie Dough Cheesecake Dip Recipe
CuisineDessert
Prep Time15 minutes
Cooking TimeN/A (No baking required)
Total Time15 minutes
Servings10-12 servings
YieldAbout 2 cups of dip

Ingredients

  • 6 oz neufchatel (1/3-less-fat) cream cheese, at room temperature
  • 3 Tbsp Trader Joe’s Cookie Butter
  • 3 Tbsp unsulfured molasses
  • 1/4 tsp pure vanilla extract
  • 1/2 cup 0% plain Greek yogurt
  • pinch of salt
  • 1/2 tsp ground ginger
  • 1/2 tsp ground cinnamon
  • 1/8 tsp ground nutmeg
  • 1/16 tsp (pinch) ground cloves

Directions

In the bowl of a stand mixer fitted with the paddle attachment, (or large bowl, using an electric hand-held mixer), cream the neufchatel, cookie butter, and molasses until smooth. Add in vanilla extract and yogurt; blend until smooth. Beat in the salt and spices until the mixture is well-combined and smooth, scraping down sides of bowl as needed.

Serve at room temperature. Store leftovers (if there are any) in the fridge.

Estimated Nutrition Per Serving

  • Calories: 220 kcal
  • Total Fat: 14g
    • Saturated Fat: 8g
    • Trans Fat: 0g
  • Cholesterol: 35mg
  • Sodium: 100mg
  • Total Carbohydrates: 23g
    • Dietary Fiber: 0g
    • Sugars: 17g
  • Protein: 2g

Blueberry Brown Rice Pudding

0

I made a rookie mistake with the first batch of this rice pudding.

I guesstimated the appropriate flame strength on our gas stove, only to find that it wasn’t quite low enough to keep the milk from curdling. The milk solids separated from the liquid, resulting in an unsightly gloppy mess.

Not good.

Pudding-making 101: do not let the milk curdle! Stoves can be temperamental and can certainly differ from one to the other, so be sure to watch the pudding carefully while it is cooking.

You can learn from my mistakes ;).

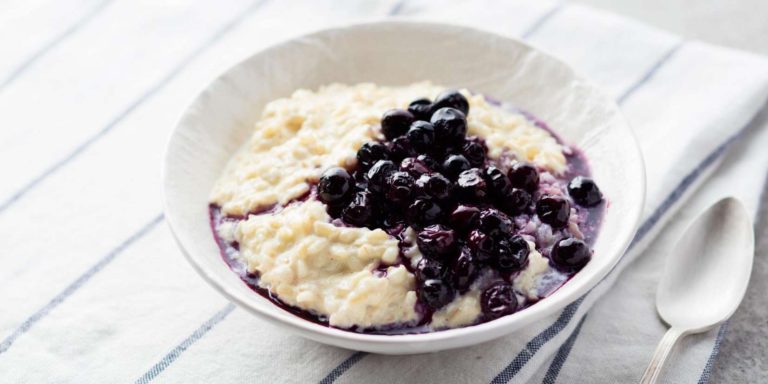
Not to be deterred, I gave the pudding another go… and succeeded the second time around. The pudding cooked over a very low flame until the milk reduced to a thick and creamy consistency, the rice became pleasantly chewy, and the fresh juicy blueberries began to burst.

I stirred in a generous dollop of all-fruit (no added sugar) blueberry preserves for additional berry sweetness as well as a squirt of freshly squeezed lemon juice for a touch of bright acidity.

I had envisioned the color of the finished pudding to be a more vibrant hue, but the muted lavender is probably more appetizing than a bright blue would be anyway. After all, we do eat with our eyes first!

I really love rice pudding. Regardless of the time of year, I find the chewy creaminess to be incredibly satisfying and comforting. I prefer this particular rice pudding cold, straight from the fridge.

If you’re looking for a crunchy textural addition, toss on some toasted sliced almond – they go superbly well with blueberries!

As with my other brown rice puddings, I’ve been enjoying this blueberry version both as dessert and for breakfast. I bet it would be awesome topped with a drizzle of warmed peanut or almond butter… namely Vanilla Bean Coconut Peanut Butter!

Blueberry Brown Rice Pudding

Printer-Friendly Recipe

Yield: 8 servings

Ingredients:

  • 2 cups water
  • 1 cup short-grain brown rice, such as Lundberg Organic Brown Sweet Rice
  • pinch of salt
  • 3 cups organic 2% milk (can sub in non-dairy)
  • 2 Tbsp brown rice syrup
  • 2 Tbsp pure maple syrup
  • 2 Tbsp organic cane sugar
  • 2 tsp pure vanilla extract
  • 1 tsp ground cinnamon
  • 2 cups fresh blueberries, (about 1 pint) preferably organic
  • 1 Tbsp freshly squeezed lemon juice
  • 2 Tbsp all-fruit blueberry preserves, such as St. Dalfour

Directions:

  1. Combine water, rice, and salt in a medium-sized, heavy-bottomed pot. Bring to a boil, stir once, and cover. Reduce heat to low and simmer for about 30-35 minutes, or until most of the water is absorbed (rice will continue to cook in the milk mixture, so you want the rice slightly undercooked at this point).
  2. Place rice in a bowl, and set aside.
  3. Add milk, brown rice syrup, maple syrup, sugar, vanilla extract, and cinnamon to the pot. Bring to a simmer over medium heat, whisking often to prevent the milk from scorching. Once bubbles start forming on the top (but not to the point of bursting), reduce heat back down to low.
  4. Stir in the cooked rice and blueberries. Cook over low heat, stirring frequently. Watch to make sure milk doesn’t curdle; the mixture should be steaming, but not bubbling. If a “skin” forms, just stir it back into the pudding. Simmer until the milk cooks down, the rice is creamy, and the blueberries have begun to burst, about 35-40 minutes. NOTE: It is especially important to tend to the pudding towards the end of the cooking time. Do not walk away from the stove, or your pudding will burn.
  5. Transfer rice pudding to a large bowl, stir in the lemon juice and blueberry preserves, and let cool to room temperature. Pudding will continue to thicken as it cools. For best thickening results, refrigerate pudding until well-chilled.

Nutritional Information per Serving:

214.1 calories, 2.6 grams fat, 1.2 grams saturated fat, 2.5 grams fiber, 20 grams sugar, 4.8 grams protein

New England Clam & Corn Chowder

0

Boston is known for a handful of delicious foods, many of which also happen to be rich and highly caloric:

Lobster Rolls. Boston Cream Pie. Boston Baked Beans.

New England Clam Chowder… served in a giant bread bowl, of course.

Here is my attempt to lighten the last in this list.

NameNew England Clam & Corn Chowder
CuisineAmerican
Prep Time20 minutes
Cooking Time35 minutes
Total Time55 minutes
Servings6 servings
Yield6 cups

Before I write anything else, let me write this: Please, PLEASE start with fresh clams if you are making chowder from scratch! We are lucky enough to have a plethora of seafood markets full of fresh offerings from the Atlantic here in Boston, but Whole Foods also sells fresh clams at a reasonable rate.

All you need to do is scrub ‘em to clean off any lingering grit, and steam ‘em until they open up to reveal their juicy, sweet, briny, and tender meat.

Ok, now that we’re on track with fresh clams, let’s get to the remaining ingredients.

Instead of heavy cream and whole milk, we’re using 1% milk and pureed corn for this chowder. Yep, pureed corn. Corn does not traditionally make an appearance in New England Clam Chowder, but it is vital to this lightened version of the classic soup; thus my addition of corn in the recipe title.

With the added benefit of a touch of sweetness, the pureed corn thickens the soup right up, whereas you’d be left with a sadly thin soup if you were to use only low fat milk.

Two other necessary ingredients are bacon and potatoes; preferably thickly cut applewood smoked and baby yukon gold, respectively.

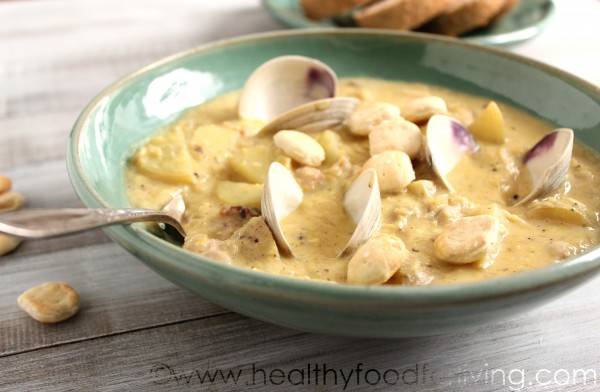
It’s not mandatory, but oyster cracker are the perfect accompaniment to a steaming bowl of “chowda” (the classic Bostonian pronunciation).

I also like the aesthetic appeal of a few clam shells adorning the soup, but again, it’s not absolutely necessary.

Now that it actually feels like a New England winter, it’s time to load up on warm & comforting soup. With this recipe, you can do just that without consuming loads of calories and fat!

Ingredients (4 servings)

  • 4 dozen little neck or cherry stone clams, scrubbed
  • 4 thick slices applewood smoked bacon, cut into lardons (stack the bacon strips, cut width-wise into little rectangular pieces)
  • 1 large white or yellow onion, finely diced
  • Kosher salt and freshly ground black pepper
  • 2 cups 1/2-inch diced baby yukon gold potatoes
  • 3 Tbsp flour
  • 2 cups frozen corn, thawed
  • 2 cups cups 1% low fat milk, preferably organic, divided
  • 4-5 sprigs fresh thyme
  • 2 bay leaves
  • hot sauce for serving, optional
  • oyster crackers for serving, optional
  • thickly cut hearty whole wheat bread for serving, optional

Estimated Nutrition Per Serving:

  • Calories: 350 kcal
  • Total Fat: 20g
  • Saturated Fat: 10g
  • Trans Fat: 0g
  • Cholesterol: 85mg
  • Sodium: 700mg
  • Total Carbohydrates: 30g
  • Dietary Fiber: 4g
  • Sugars: 4g
  • Protein: 14g
  • Vitamin D: 10%
  • Calcium: 15%
  • Iron: 10%
  • Potassium: 600mg

Please note that these nutritional values are approximate and can vary based on the specific ingredients and brands used.

Instructions

Place clams and 1 cup of water in a large saucepan set over high heat. Cover and cook for 6 minutes. Remove clams that have opened with a slotted spoon; reserve in a bowl. Cover saucepan and cook remaining clams until they have opened, about 2 minutes. Discard any unopened clams. Reserve liquid in saucepan.

Set a fine mesh sieve over a medium bowl. Pour the liquid from the saucepan through the sieve and reserve the collected clam juice. Discard any debris left in sieve. Wipe out the saucepan.

Remove the clam meat from their shells and coarsely chop. Keep shells for presentation or discard. Reserve chopped clams.

Set the wiped-out saucepan over medium heat and add in the bacon lardons. Cook until brown and crispy, then add in the diced onion. Season lightly with salt, and cook until soft and translucent, stirring often, about 5 minutes. Add in the chopped potatoes and cook, stirring often, for an additional 5 minutes.

While the potatoes cook, place the thawed corn plus 1/2 cup milk in a food processor or high-speed blender and puree until relatively smooth, scraping down the sides with a rubber spatula as necessary.

Sprinkle flour over the onions and potatoes and stir for 30 seconds. Gradually stir in the reserved clam juice until no flour lumps remain. This will also serve to de-glaze the pan.

Stir in the pureed corn and remaining 1 1/2 cups milk, and toss in the bay leaves and thyme. Bring to a boil then reduce heat to low and simmer until potatoes are cooked through and the soup has thickened, about 10-15 minutes, stirring often.

Remove the bay leaves and thyme. Stir in the reserved chopped clams. Season to taste with salt and pepper.

Nutritional Information Per Serving (without oyster crackers & bread):332.4 calories, 5.4 grams fat, 2 grams saturated fat, 4.6 grams fiber, 24.2 grams protein

Cranberry Apple Butter Recipe

0

I love the concentrated flavor and smooth consistency of apple butter, but I don’t love the ludicrous amount of sugar called for in most recipes. There is an unsweetened commercial brand (available at Whole Foods) that has become a staple in my kitchen, but I was determined to make a no-sugar-added homemade version – with the added tart bite of fresh cranberries.

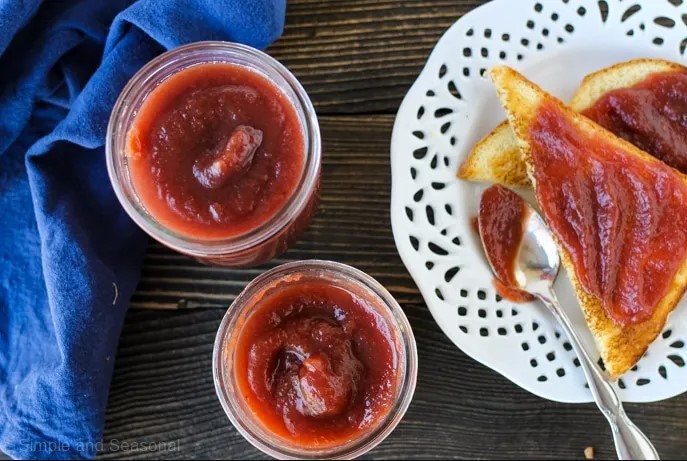
The consistency of my homemade version is spot-on; which is to say thick, smooth, and luscious. I love the added tang from the cranberries, not to mention the gorgeous color imparted by the seasonal and locally-grown red berries.

With plenty of warm spices, extra apple flavor from cider, a hint of maple, and both a reddish hue and tart bite from the cranberries, this season-appropriate Cranberry Apple Butter is utterly delicious. I’ve been enjoying it spread on toast & peanut butter sandwiches, stirred into yogurt, spooned atop oatmeal, and drizzled over pancakes & waffles… but you could also add this fruit butter to savory foods. A dollop on top of baked sweet potatoes or roasted pork tenderloin would make for a great flavor pairing; I’ve also been thinking of serving it with cheese and crackers for a holiday gathering.

NameCranberry Apple Butter Recipe
CuisineAmerican
Prep Time20 minutes
Cooking Time4-6 hours (slow cooking)
Total Time4-6 hours
ServingsMakes about 4 cups of butter
YieldVaries depending on jar size

Ingredients

  • 4 cups peeled, cored, and diced baking apples, about 4 small, 3 medium, or 2 large (I used Granny Smith)
  • 1 cup fresh cranberries
  • 1 cup apple cider
  • 1 tsp ground cinnamon
  • 1/4 tsp ground cloves
  • 1/4 tsp ground allspice
  • 1/4 tsp ground ginger
  • 1/8 tsp ground nutmeg
  • 1/2 tsp pure maple extract (or pure vanilla extract)

Directions

Combine the diced apples, cranberries, and cider in a medium-sized dutch oven or saucepan. Bring to a boil, then reduce to low, cover, and simmer for 40 minutes, or until the apples and cranberries break down, stirring occasionally.

Puree mixture using either an immersion blender, regular blender, or food processor.

Return apple puree to dutch oven or saucepan, and add the remaining ingredients. Simmer for 20 minutes, stirring frequently, until the apple cranberry butter has thickened and smells absolutely divine.

Puree mixture again, and let cool to room temperature before storing in an air-tight container in the refrigerator.

Estimated Nutrition Per Serving

  • Calories: 35-40 calories
  • Total Fat: Negligible
  • Saturated Fat: Negligible
  • Cholesterol: 0mg
  • Sodium: Less than 1mg
  • Total Carbohydrates: 9-10g
  • Dietary Fiber: 1g
  • Sugars: 8-9g
  • Protein: Negligible

Crispy Roasted Cauliflower

0

This is one of my go-to veggie side dishes for those nights I don’t feel like putting much energy into preparing an elaborate accompaniment to the main course.

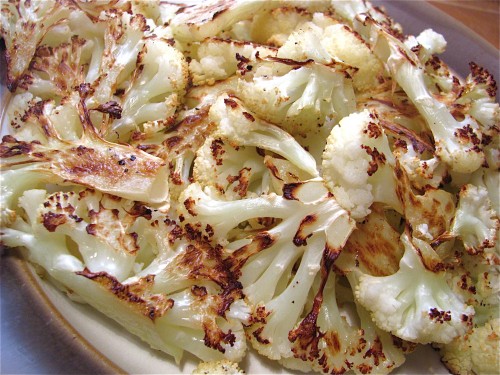
A cinch to prepare, this cauliflower emerges from the oven tender with a crisp exterior. The key to achieving the caramelization is cutting the cauliflower into thick slices – rather than florets – in order to expand the surface area that makes contact with the hot baking sheet. Any type of accoutrement (a grating of fresh parmesan cheese perhaps) would be a welcomed addition to the roasted cauliflower, but it is quite delicious unadorned.

If you think you don’t like cauliflower, I would bet money that this cooking technique will change your mind!

Crispy Roasted Cauliflower

NameCrispy Roasted Cauliflower
CuisineAmerican
Prep Time10 minutes
Cooking Time30 minutes
Total Time40 minutes
Servings4 servings
Yield4 cups of cauliflower

Ingredients

  • 1 head cauliflower
  • olive oil cooking spray
  • Kosher salt
  • freshly ground black pepper

Directions

Preheat oven to 400 degrees F.

Cut the cauliflower crossways into 1-inch-thick slices. Set aside.

Coat a baking sheet with cooking spray. Place the cauliflower slices onto the prepared baking sheet in a single layer and coat with cooking spray. Season with salt and pepper.

Roast in preheated oven for about 30 minutes, or until browned and crisp.

Estimated Nutrition Per Serving

  • Calories: 120 kcal
  • Fat: 9g
    • Saturated Fat: 1.5g
  • Cholesterol: 0mg
  • Sodium: 320mg
  • Carbohydrates: 9g
    • Fiber: 4g
    • Sugars: 4g
  • Protein: 4g

Please note that these are estimated values and can vary based on factors such as the size of the cauliflower head and specific brands of ingredients used.

Pumpkin Chocolate Chip Cookie Dough Bites

0

tried to wait until it was officially fall to start posting pumpkin recipes, but it feels like autumn here in Massachusetts and I found myself breaking open a can of pumpkin last week. I made a batch of mini pumpkin muffins and a delicious Pumpkin Pie Yogurt Brûlée (a recipe that will be in my e-cookbook), and I also succumbed to the enticing allure of one of my favorite seasonal beers. I think I’ll put up our fall decorations & wreaths this week, and apple picking is in our near future. Yes, fall is in the air here.

If it’s still hot where you live, fret not; these cookie dough bites require no baking, so there’s no need to turn on your oven. They are the perfect little bite to satisfy a sweet craving, and they are a delicious way to ring in the change of the seasons.

So whether you’re layering up with sweaters and scarves or sweating it out in shorts and tee shirts, now is the perfect time to make these cooking dough bites.

Pumpkin Chocolate Chip Cookie Dough Bites

NamePumpkin Chocolate Chip Cookie Dough Bites
CuisineFusion
Prep Time15 minutes
Cooking TimeNo baking required
Total Time15 minutes
Servings15 bites
Yield15 bites

Ingredients

  • 1/4 cup melted coconut oil (make sure to measure after melting)
  • 3-4 Tbsp (depending on how sweet you want them) coconut sugar, or other unrefined granulated sugar
  • 1/4 cup pure pumpkin puree
  • 1 tsp pure vanilla extract
  • 1/4 cup unbleached all purpose flour
  • 1/4 cup whole wheat pastry flour (or an additional 1/4 cup unbleached all purpose flour; see NOTE below)
  • 1/8 tsp Kosher salt
  • 1/2 tsp ground cinnamon
  • 1/4 cup dark chocolate chips

Instructions

In a small mixing bowl, whisk together the melted coconut oil, coconut sugar, pumpkin puree, and vanilla extract until smooth.

Add both flours, salt, and cinnamon right on top and stir to combine.

Fold in chocolate chips.

Chill in the refrigerator for 5 minutes, or until the dough has firmed up a bit.

Using a mini ice cream scoop or a small spoon, scoop dough out onto a parchment paper-lined plate.

Chill in the refrigerator for another 5 minutes, or until the dough bites have firmed up.

Store in the refrigerator.

NOTE: As the cookie dough bites sit in the fridge, the whole wheat pastry flour flavor becomes more prominent. If you do not like the taste of whole wheat pastry flour, omit it and use a total of 1/2 cup unbleached all purpose flour.

Nutrition Facts (Per Serving)

  • Calories: 150 kcal
  • Total Fat: 8g
    • Saturated Fat: 4g
    • Trans Fat: 0g
  • Cholesterol: 0mg
  • Sodium: 80mg
  • Total Carbohydrates: 15g
    • Dietary Fiber: 2g
    • Sugars: 10g
  • Protein: 2g