Home Blog Page 127

Baked Mini Sugared Gingerbread Doughnuts [and Doughnut Muffins]

0

The recipe for these doughnuts has been brewing in the back of my mind ever since I posted the Baked Mini Apple Cider Doughnuts. I wanted to wait until December to make this version, as gingerbread is a ubiquitous winter holiday treat.

Baked Mini Sugared Gingerbread Doughnuts [and Doughnut Muffins

In order to achieve the traditional gingerbread flavor, I included the typical spices as well as the robust sweetener duo of brown sugar and molasses. The aroma of these doughnuts baking alone is enough to put anyone in the holiday spirit!

Baked Mini Sugared Gingerbread Doughnuts [and Doughnut Muffins

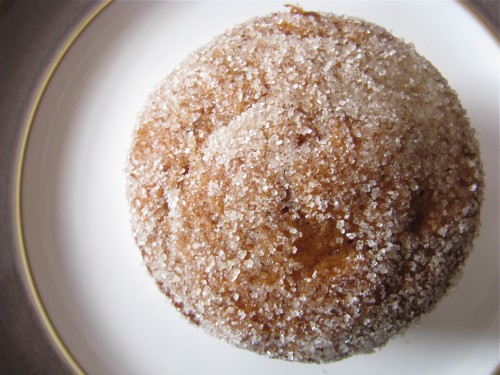
As a finishing touch, I lighty coated the baked doughnuts with cooking spray and dipped them into evaporated cane juice. The sugared tops are reminiscent of a fresh blanket of powdery snow, making these doughnuts all the more winter-appropriate. You can certainly leave the sugar off, but it lends a nice crunch as well as – of course – additional sweetness to the tender doughnuts.

Baked Mini Sugared Gingerbread Doughnuts [and Doughnut Muffins

As with the Baked Mini Apple Cider Doughnuts, these Baked Mini Sugared Gingerbread Doughnuts are light, fluffy, and redolent of the holiday season.

Baked Mini Sugared Gingerbread Doughnuts [and Doughnut Muffins

If you do not have a doughnut pan, there’s no need to go and purchase one. Simply use a mini or standard muffin pan and enjoy a batch of gingerbread doughnut muffins.

Baked Mini Sugared Gingerbread Doughnuts [and Doughnut Muffins

These doughnuts and doughnut muffins are at their best when still warm from the oven, freshly crusted with sugar.

Baked Mini Sugared Gingerbread Doughnuts [and Doughnut Muffins

These Baked Mini Sugared Gingerbread Doughnuts would make a festive – as well as delicious – addition to any holiday breakfast or brunch spread. If you’re feeding a crowd I highly recommend making a double batch, as it is alarmingly easy to pop one after another until the whole lot of them are gone ;).

Baked Mini Sugared Gingerbread Doughnuts [and Doughnut Muffins
Name:Baked Mini Sugared Gingerbread Doughnuts [and Doughnut Muffins]
Cuisine:Fusion
Prep Time:15 minutes
Cooking Time:15 minutes for muffins
Total Time:30 minutes
Servings:24
Yield:About 24 mini doughnuts or 24 mini muffins

Ingredients

  • canola oil cooking spray
  • 1 cup unbleached all-purpose flour
  • 3/4 tsp baking powder
  • 3/4 tsp baking soda
  • 1/4 teaspoon salt
  • 1/2 tsp ground cinnamon
  • 1/2 tsp ground ginger
  • 1/4 tsp nutmeg
  • 1/4 tsp ground cloves
  • 1/8 tsp allspice
  • 1 egg, lightly beaten
  • 1/4 cup packed brown sugar
  • 1/4 cup unsweetened applesauce
  • 2 Tbsp unsulfured molasses
  • 3 Tbsp milk
  • 3 Tbsp nonfat or low-fat plain yogurt
  • 1 1/2 tablespoons canola oil
  • evaporated cane juice or granulated sugar

Instructions

  • Preheat oven to 350°F.
  • Lightly coat molds of a mini doughnut pan with cooking spray.
  • In a medium bowl, whisk together flour through allspice; set aside.
  • In a large bowl, whisk together egg, brown sugar, applesauce, molasses, milk, yogurt and oil.
  • Add dry ingredients to wet, and stir just until moistened. Divide batter among the prepared molds, filling each 1/2 – 3/4 full. [You may also spoon batter into cooking spray-coated muffin tins].
  • Bake until the tops spring back when touched lightly, about 5-7 minutes. Carefully remove doughnuts from pan and let cool for a few minutes on a wire rack. [If using a standard muffin tin, extend baking time to about 10-12 minutes; for mini muffins, bake for approximately 7-9 minutes].
  • Lightly coat doughnuts with canola oil cooking spray. Sprinkle with or dunk into sugar; shake off excess.
  • Best if eaten immediately. Store leftover doughnuts in refrigerator. Gently re-heat in toaster oven.
Baked Mini Sugared Gingerbread Doughnuts [and Doughnut Muffins
Estimated Nutrition Per Serving:
Calories:120 calories per doughnut/muffin
Total Fat:4 grams per doughnut/muffin
Saturated Fat:2 grams per doughnut/muffin
Cholesterol:20 mg per doughnut/muffin
Sodium:200 mg per doughnut/muffin
Total Carbohydrates:20 grams per doughnut/muffin
Dietary Fiber:1 gram per doughnut/muffin
Sugars:12 grams per doughnut/muffin
Protein:2 grams per doughnut/muffin

Healthy Eggnog Brown Rice Pudding: A Cozy Twist on Classic Holiday Dessert

0

After polishing off my Sweet Potato Brown Rice Pudding, I found myself fighting off a lingering craving for another batch of the creamy, comforting, and deeply satisfying dessert/breakfast hybrid.

I decided to embrace this hankering, but to create a different flavor focus – specifically a flavor that is representative of the holiday season. It didn’t take long to be inspired by the numerous varieties of eggnog popping up in grocery stores.

Eggnog Brown Rice Pudding

What are your thoughts on eggnog? Do you see it as a holiday indulgence that should only be imbibed this time of year?

Or perhaps you love it so much you wish it were available year-round? Maybe you’re one of the camp people who absolutely detest it and don’t understand what the bug fuss is about?

Well, I can’t help you if you fall into the latter category, but if you’re a fan of the thick and creamy spiced beverage, then this recipe is for you!

Eggnog Brown Rice Pudding

Although I do like the flavor of eggnog, I rarely drink a mugful of the incredibly rich concoction. I’ll take random swigs – yes, straight from the carton; don’t judge, the carton is all mine 😉 – but I find a whole big glass of ‘nog is akin to drinking a small meal and dessert all in one.

Eggnog Brown Rice Pudding

In an effort to balance out the sweetness & heaviness of the eggnog, I added an equal amount of milk to the rice pudding. The unmistakable nutmeg-y flavor of the eggnog is apparent without being overwhelming.

You’ll also notice that there is no added sugar in the recipe… considering the eggnog is already heavily sweetened, I opted against adding more sugar.

If you’d like a sweeter rice pudding, go ahead and add 2-4 Tbsp of any sweetener (i.e., brown rice syrup, brown sugar, evaporated cane juice, honey, maple syrup, agave nectar, etc.).

Eggnog Brown Rice Pudding

The inherent coziness of tucking into a bowl of rice pudding is further intensified with the festive flavors of eggnog.

Heated or chilled, this Eggnog Brown Rice Pudding is a comforting dessert on a cold night. I’ve also been enjoying it re-heated in the morning for a decadent – but hearty – breakfast.

Eggnog Brown Rice Pudding
Name:Eggnog Brown Rice Pudding
Cuisine:Fusion
Prep Time:10 minutes
Cooking Time:35 minutes
Total Time:45 minutes
Servings:6 servings
Yield:6 cups

Ingredients

*for a sweeter rice pudding, go ahead and add 2-4 Tbsp of any sweetener (i.e. brown rice syrup, brown sugar, evaporated cane juice, honey, maple syrup, agave nectar, etc.)

Directions

  1. Combine water, rice, and salt in a large, heavy-bottomed pot (such as a Dutch oven). Bring to a boil, stir once, and cover with a tight-fitting lid. Reduce the heat to low and simmer for about 40 minutes, or until most of the water is absorbed.
  2. Remove rice from the heat, place it in a bowl, and set aside.
  3. Add eggnog & milk, vanilla, cinnamon, and nutmeg to the pot. Bring to a very low boil over medium heat, stirring often so the milk doesn’t burn. Lower the heat to medium/medium-low.
  4. Add in the cooked rice, and cook over medium/medium-low heat, stirring frequently. If a “skin” forms, just stir it back into the pudding. Simmer until the milk cooks down, and the rice is creamy, about 30 minutes. NOTE: It is especially important to tend to the pudding towards the end of the cooking time. Do not walk away from the stove, or your pudding will burn.
  5. Transfer rice pudding to a large bowl, and let cool.
  6. For best consistency, chill – covered – overnight (the pudding will thicken as it sits and cools).
  7. Serve warm or cold.
Eggnog Brown Rice Pudding

Estimated Nutrition Per Serving

  • Calories: 350
  • Total Fat: 10g
  • Saturated Fat: 5g
  • Trans Fat: 0g
  • Cholesterol: 100mg
  • Sodium: 110mg
  • Total Carbohydrates: 57g
  • Dietary Fiber: 0g
  • Sugars: 35g
  • Protein: 8g

The nutrition values provided are estimates and can vary depending on factors such as the brand of ingredients used and portion sizes.

It’s always a good practice to consult specific ingredient packaging or a nutrition calculator for precise nutritional information.

Individual Mint Chocolate Cheesecakes

0

The incentive for creating these mini minty-chocolate treats was threefold:

  1. My Individual Peanut Butter Cheesecakes and Individual Ginger Pumpkin Cheesecakes seemed to be a big hit.
  2. I received a package full of goodies from Back to Nature to sample, including a box of Fudge Mint Cookies (thank you, Genevieve!).
  3. I received a bunch of Chobani Greek yogurt – an ingredient I always include as a replacement for sour cream in my cheesecake recipes – to enjoy (thanks, Emily!).
Individual Mint Chocolate Cheesecakes

I immediately thought of using the Fudge Mint Cookies as a crust for a new individual cheesecake recipe.

Individual Mint Chocolate Cheesecakes

Whoever initially brainstormed the idea of combining rich chocolate with fresh peppermint must have been a culinary genius. Just think about how many renowned favorites feature this divine flavor combination: Peppermint Patties, Andes chocolate mints, peppermint hot chocolate, Thin Mints, mint chocolate chip ice cream, etc. Classic.

Individual Mint Chocolate Cheesecakes

Having never before created a homemade mint-chocolate treat, I was a bit unsure of how much peppermint extract to add to the cheesecake filling mixture. The amount listed in the ingredient list (1 tsp) suited my taste buds perfectly, but you may adjust the measurement accordingly.

Individual Mint Chocolate Cheesecakes

If you follow Healthy Food For Living regularly, you are well aware that I tend to use less sugar than is typical in desserts. I especially employ this method when making cheesecakes, as I love the tang of the cream cheese and Greek yogurt and prefer not to mask it with copious amounts of sugar. That being said, I know that most people prefer their desserts to be very sweet, so of course you may add more sugar if you’d like.

Individual Mint Chocolate Cheesecakes

The consistency of the cheesecake filling is tough to describe, as I was simultaneously reminded of dense fudge and airy mousse as I sunk my teeth into my first bite. Neither the chocolate nor the peppermint flavor dominates, but rather they beautifully compliment each other. The crisp mint chocolate cookie “crust” provides the perfect textural contrast to the soft cheesecake filling, and also serves to heighten the rich yet refreshing mint-chocolate flavor combination.

Individual Mint Chocolate Cheesecakes

These Individual Mint Chocolate Cheesecakes are an easy-to-make, delicious, and not overly-indulgent dessert that are perfect for the holiday season. A light dusting of powdered sugar would be a nice finishing touch, as would an accompanying mug of peppermint hot chocolate.

Individual Mint Chocolate Cheesecakes
Name:Individual Mint Chocolate Cheesecakes
Cuisine:Fusion
Prep Time:20 minutes
Cooking Time:25 minutes
Total Time:2 hours and 45 minutes
Servings:12
Yield:12 servings

Ingredients

  • 18 chocolate mint cookies (such as Back to Nature)
  • 16 oz neufchatel (1/3-less-fat) cream cheese, at room temperature
  • 1 cup good-quality chocolate chips, (I used semi-sweet), melted and slightly cooled (you can melt the chocolate over a double boiler or in the microwave, stirring after each 30 second intervals for about 1 1/2 minutes)
  • 2 Tbsp evaporated cane juice or granulated sugar (or up to 1/4 cup)
  • 1/2 – 1 tsp pure peppermint extract (start with 1/2 tsp, taste batter, and add more if you’d like… I used the full 1 tsp)
  • 2 large eggs, at room temperature
  • 1/2 cup 2% plain Greek yogurt (such as Chobani)
  • pinch of salt

Directions

  1. Preheat oven to 275°F. Line standard muffin tins with paper or foil liners. Place 1 cookie in the bottom of each of 18 lined cups.
  2. In the bowl of an electric mixer, (or in large bowl with a handheld mixer), beat the neufchatel and melted chocolate at medium speed until smooth, scraping down sides of bowl as needed. Add in evaporated cane juice and beat until combined. Beat in peppermint extract. Taste batter and add more sugar and/or peppermint extract if desired.
  3. Beat in one egg at a time, scraping down the sides of the bowl as needed. Beat in yogurt and salt.
  4. Spoon batter evenly among the 18 lined cups, filling each almost to the top (I like to use an ice cream scoop to keep each cheesecake a uniform size). With the back of a spoon, smooth out the top of each filled cup.
  5. Bake, rotating pans halfway through, until filling is set, 22-24 minutes. Let cool on a wire rack. Chill in the refrigerator for at least 2 hours, or up to overnight, before serving.

*Note: as is common in cheesecakes not baked in a water bath, some of mine cracked during baking. The cracks became less apparent as the cheesecakes cooled and deflated, which is also perfectly normal.

Individual Mint Chocolate Cheesecakes

Estimated Nutrition per Serving

  • Calories:360 calories
  • Total Fat: 24g
  • Saturated Fat: About 13g
  • Trans Fat: 0g
  • Cholesterol: Around 80mg
  • Sodium: 190mg
  • Total Carbohydrates: About 31g
  • Dietary Fiber: Around 1g
  • Sugars: 24g
  • Protein: About 5g

Spicy Pulled Chicken

0

Do you like spicy food? I’m talking lip-tingling, sinus-clearing runny nose-inducing spicy fare.

Like this pulled chicken.

Name:Spicy Pulled Chicken
CuisineAmerican
Prep Time15 minutes
Cooking Time8 hours
Total Time8 hours
Servings8
Yield8
Spicy Pulled Chicken

Thanks to the trifecta of a whole jalapeno pepper, chipotle chile powder, and cayenne pepper, this Spicy Pulled Chicken definitely lives up to its name. Juicy chicken thighs are slow-simmered in a thick tomato-based sauce (that can be equated to a hot sauce-barbeque sauce hybrid) until they become tender enough to shred.

Spicy Pulled Chicken

I made this spicy pulled chicken on a cold, rainy afternoon, (where’s the snow, Boston?!), and it was the perfect antidote to the gloomy weather. Although I was tempted to attack this bowlful with a fork, I piled the shredded chicken onto lightly toasted whole wheat burger buns and served the pulled chicken sandwiches with a mouth-cooling broccoli slaw.

Plans for leftovers include pulled chicken quesadillas with an avocado & Greek yogurt sauce for dipping. Trust me, you’ll want an accompaniment to lessen the burn of this Spicy Pulled Chicken!

Spicy Pulled Chicken

Spicy Pulled Chicken

serves 4-6

Ingredients

  • olive or canola oil
  • 1 small onion, finely chopped
  • 1 large clove garlic, minced
  • 1 minced jalapeno pepper, seeded or not depending on heat preference
  • 1 (8 oz) can tomato sauce
  • 3 Tbsp apple cider vinegar
  • 2 Tbsp molasses
  • 1 Tbsp paprika
  • 1 Tbsp tomato paste
  • 1 Tbsp Worcestershire sauce
  • 1 tsp ground dry mustard
  • 2 tsp ground chipotle chile powder
  • 1/4 – 1/2 tsp ground cayenne pepper, depending on heat preference
  • Kosher salt and freshly ground black pepper, to taste
  • 1 1/2 pounds boneless & skinless chicken thighs

Directions:

  1. Heat a drizzle of oil in a large dutch oven (or other heavy-bottomed pot) over medium heat. Add in the onion and jalapeno and cook until softened about 3-5 minutes, stirring often. Add in the garlic and cook, stirring, about 30 seconds or until fragrant.
  2. Stir in the tomato sauce through salt and pepper. Add chicken and stir to coat.
  3. Reduce stove heat to low and cook until chicken is fork-tender and easily pulls apart, about 1 hour.
  4. Using two forks, shred the chicken right in the sauce.
  5. *Allow the shredded chicken to sit in the sauce over low heat for 20 minutes, or until it has warmed through and has absorbed more of the sauce.

*I like to make the pulled chicken early in the afternoon, let it sit at room temperature (off of the heat) for a few hours, and then warm it through right before serving. The extra few hours of sitting allows the chicken to absorb even more of the sauce flavors.

What is the best spicy meal you’ve ever had?

Instructions

Prep the Chicken

Start by seasoning the chicken breasts with salt black pepper and garlic powder. This will give your pulled chicken a flavorful base.

Slow Cooker Magic

Place the seasoned chicken breasts in your slow cooker.

In a separate bowl, whisk together the chicken broth, barbecue sauce, hot sauce, brown sugar, apple cider vinegar, chili powder, and paprika.

Pour this delicious sauce mixture over the chicken breasts in the slow cooker.

Set and Forget

Cook on low heat for 6-8 hours or on high for 3-4 hours. The longer it cooks the more tender and flavorful the chicken will become.

Shred and Spice

Once the chicken is fully cooked and fork-tender remove it from the slow cooker.

Use two forks to shred the chicken into bite-sized pieces.

Return the shredded chicken to the slow cooker and let it soak in the spicy sauce for an additional 15-30 minutes.

Serve with Style

Toast your hamburger buns or slider rolls to add a delicious crunch to your sandwiches.

Spoon the spicy pulled chicken onto the buns.

If you like a bit of crunch and creaminess, top your sandwiches with coleslaw.

Spicy pulled chicken is a flavorful twist on a classic comfort food favorite. With just the right amount of heat and a burst of barbecue sweetness, it’s a crowd-pleaser for gatherings or a satisfying meal for your family. Serve it up with some coleslaw for a perfect balance of flavors and textures. Give this recipe a try, and you’ll have a new go-to dish for any occasion. Enjoy your spicy pulled chicken sandwiches!

Nutrition Per Serving

Calories:350 calories per serving

Protein:35 grams per serving

Carbohydrates:35 grams per serving

Dietary Fiber:2 grams per serving

Sugars:25 grams per serving

Fat:10 grams per serving

Saturated Fat:3 grams per serving

Cholesterol:80 milligrams per serving

Sodium:900 milligrams per serving

These nutrition values are based on a standard serving size of the spicy pulled chicken mixture on a bun without coleslaw or additional toppings. The actual values may vary depending on the specific ingredients used and the size of the servings. If you have specific dietary requirements or need more precise nutrition information, it’s a good idea to use a nutrition calculator or consult a registered dietitian for personalized guidance.

Cinnamon & Sugar Roasted Mixed Nuts

0

These are dangerous to have in the house.

Cinnamon & Sugar Roasted Mixed Nuts

Crunchy, crispy, sweet, warmly spiced and lightly salted… in other words: insanely addictive.

The egg white combined with both brown sugar and evaporated cane juice creates a wonderfully crunchy crisp coating to the roasted nuts. The flavor and aroma of these roasted mixed nuts is reminiscent of the classic cinnamon and sugar toast I was so fond of as a kid. A touch of salt balances out the sugar, creating the perfect antidote to a sweet/salty craving.

Cinnamon & Sugar Roasted Mixed Nuts

I’ve brought these Cinnamon & Sugar Roasted Mixed Nuts to a few holiday parties so far this season, but am planning on making a big batch for us to snack on at home.

I would like to experiment with different spice variations. A few that come to mind:

  • cayenne pepper & cumin
  • chili powder (either ancho or chipotle) & maple syrup
  • garam masala
  • nutmeg, cinnamon, & cloves
  • vanilla
  • peanut butter & honey <– I’m especially excited about this one!

You can also play around with the types of nuts used in the mix. Macadamia nuts, hazelnuts, peanuts, and walnuts would all be delicious substitutions. I might even toss some seeds (pepitas, sunflower seeds etc.) in with the nuts next time!

Cinnamon & Sugar Roasted Mixed Nuts
Name:Cinnamon & Sugar Roasted Mixed Nuts
CuisineFusion
Prep Time10 minutes
Cooking Time35 minutes
Total Time45 minutes
Servings8 servings (approximately)
YieldAbout 2 cups of mixed nuts

Ingredients

  • 3/4 cup raw pecans
  • 3/4 cup raw almonds
  • 3/4 cup raw cashews
  • 1 egg white
  • 2 Tbsp brown sugar (I used golden, but light or dark would work just as well)
  • 2 Tbsp evaporated cane juice or granulated sugar
  • 1/2 tsp ground cinnamon
  • 1/4 tsp Kosher salt

Directions

Preheat oven to 250°F.

Line a baking sheet with parchment paper or a silicone baking mat.

In a medium bowl, whisk the egg white until foamy and thick, about 1 minute. Add the nuts and stir until they are evenly coated.

In a small bowl, stir together remaining ingredients (brown sugar through salt) until well-mixed.

Pour the cinnamon & sugar mixture into the bowl with the nuts, and stir until the nuts are evenly coated.

Spread the coated nuts in an even layer on the prepared baking sheet.

Bake the nuts at 250°F for 60 minutes, stirring about every 20 minutes.

Let nuts cool completely before storing in an air-tight container. If they make it that far ;).

Cinnamon & Sugar Roasted Mixed Nuts

Estimated Nutrition Per Serving (1/4 cup)

  • Calories: 180
  • Total Fat: 14g
  • Saturated Fat: 1.5g
  • Cholesterol: 0mg
  • Sodium: 35mg
  • Total Carbohydrates: 11g
  • Dietary Fiber: 2g
  • Sugars: 7g
  • Protein: 4g

Please note that these nutritional values are approximate and may vary depending on the specific types and brands of nuts used in the recipe. It’s always a good idea to refer to the packaging of your specific ingredients for more accurate nutritional information. Enjoy your Cinnamon & Sugar Roasted Mixed Nuts!

Mocha Brownies

0

I was thrilled to see a post on Jen’s blog a while back for King Arthur Flour double fudge brownies made with wholesome whole wheat flour. Talk about a recipe that strike a balance between “living to eat” and “eating to live”. I immediately bookmarked the recipe, and just got around to making my own version.

Mocha Brownies

My first change was to halve the recipe. It would be dangerous for me to make a giant pan of brownies, considering John rarely eats dessert (although as he ate his first bite, he gave me that brow furrowed, head slightly tilted “these are gooood!” look). I baked the brownies in a 9 x 5 inch loaf pan to ensure they came out nice and thick, (if you use an 8 x 8 inch brownie pan, they will come out rather thin), which is just the way I like ‘em.

Mocha Brownies

Other adaptions I made were to swap the butter for an equal amount of unsweetened applesauce and canola oil, cut down slightly on the brown sugar, and use white whole wheat flour (what I had on hand).

Mocha Brownies

Finally, I doubled the amount of espresso powder in order to heighten the coffee flavor – hence the addition of “mocha” in the title.

Mocha Brownies

So, how did they come out? If the photos aren’t evidence enough, I will try to put into words how amazingly delicious these brownies are.

Mocha Brownies

Thick, rich, and perfectly balanced between cakey and fudgy, these Mocha Brownies are definitely a treat to sink your teeth into. The dense brownie batter is packed with chocolate chips, and the sides are slightly crisp. The coffee flavor is subtle, yet it adds a complexity to the chocolate. Due to a bit less sugar and the use of semi-sweet chocolate chips, the brownies aren’t cloyingly sweet like many baked goods are. That being said, they are mighty rich, so I suggest having a tall glass of ice-cold milk on hand ;).

Mocha Brownies

As John and I were each contentedly savouring devouring one of these colossal brownies, I realized that it has been quite some time since I last made brownies. With this recipe under my belt, it’s pretty safe to say that we will have brownies on hand much more often!

Mocha Brownies

Mocha Brownies

adapted from Beantown Baker, originally from King Arthur

yields 8 large brownies

Name:Mocha Brownies
Cuisine:Dessert
Prep Time:15 minutes
Cooking Time:30 minutes
Total Time:45 minutes
Servings:16
Yield:1 9×9-inch (23×23 cm) pan

Ingredients

  • canola oil cooking spray
  • 1/4 cup unsweetened applesauce
  • 1/4 cup canola oil
  • 3/4 cup Sucanat or lightly packed brown sugar
  • 1/4 cup + 2 Tbsp unsweetened dutch-process cocoa
  • 1/2 tsp salt
  • 1/2 tsp baking powder
  • 2 tsp instant espresso granules/powder
  • 1 1/2 tsp pure vanilla extract
  • 2 large eggs
  • 3/4 cup white whole wheat flour
  • 1 cup semisweet or grain-sweetened chocolate chips

Directions

  1. Preheat oven to 350°F.
  2. Lightly coat a 9 x 5 inch loaf pan with canola oil cooking spray. Line pan with parchment paper, leaving ends hanging over the edge of the pan. Parchment paper should stick to the oil-coated pan. Lightly coat parchment with cooking spray.
  3. In a large bowl, briskly whisk together the applesauce, oil, and sugar until well-mixed and the sugar is mostly dissolved.
  4. Whisk in the cocoa through vanilla. Whisk in eggs until mixture is smooth.
  5. Using a rubber spatula, stir in the flour until moistened. Fold in the chocolate chips.
  6. Pour brownie batter into prepared pan and smooth the top with a rubber spatula or spoon.
  7. Bake for about 25 minutes, or until a toothpick inserted into the center of the brownies comes out mostly clean. It’s okay if a few bits of brownie are clinging to the toothpick.
  8. Let rest on a wire rack until completely cooled. Refrigerate for at least two hours for easiest cutting.
Mocha Brownies
Mocha Brownies

Do you prefer cakey or fudgy brownies?

Estimated Nutrition Per Serving

  • Calories: 280 calories
  • Total Fat: 18g
  • Saturated Fat: 11g
  • Trans Fat: 0g
  • Cholesterol: 85mg
  • Sodium: 110mg
  • Total Carbohydrates: 30g
  • Dietary Fiber: 2g
  • Sugars: 20g
  • Protein: 3g

Taco Calzones with Avocado Cream

0

I’d be hard pressed to choose a favorite between Mexican and Italian cuisines. I like preparing and love eating foods from both regions. It is for this reason that I was excited to find a recipe in the March 2009 issue of Cooking Light for Tex-Mex Calzones – an Italian concept with Mexican ingredients and flavors. I set out to make my own version of this yummy-sounding meal, and came up with this recipe.

Name:Taco Calzones with Avocado Cream
CuisineFusion
Prep Time20 minutes
Cooking Time20 minutes
Total Time40 minutes
Servings4
Yield4 calzones
Taco Calzones with Avocado Cream

Lean ground turkey flavored with a homemade taco seasoning mix is first sauteed with fragrant onions, garlic, and green bell peppers; then topped with reduced-fat shredded Mexican blend cheese; and finally tucked into pizza dough pockets…

Taco Calzones with Avocado Cream

… which are baked into crisp golden brown calzones.

Taco Calzones with Avocado Cream

The Taco Calzones are served with a cool and creamy mash of rich avocado and thick Greek yogurt, which beautifully balances out the piping hot, slightly spicy, and cheesy filling.

Taco Calzones with Avocado Cream

Taco Calzones with Avocado Cream

inspired by Tex-Mex Calzones from Cooking Light

yields 4 calzones

Ingredients

  • homemade or store-bought pizza dough – enough for 4 servings
  • 1/2 lb lean ground turkey (7% fat)
  • homemade taco seasoning blend, recipe follows*
  • 2 tsp extra virgin olive oil
  • 1/4 cup diced white onion
  • 2 garlic cloves, minced
  • 1/2 large green bell pepper, diced (about 1/2 cup)
  • 1/4 cup salsa of choice
  • 1/2 cup shredded light Mexican-style cheese
  • 1/2 large avocado, peeled and pitted
  • 1/4 cup 2% plain Greek yogurt
  • 1/4 tsp Kosher salt
  • freshly ground black pepper, to taste

Directions

Preheat oven to 450 degrees F.

Divide pizza dough into 4 equal portions. On a clean, lightly floured surface, roll each piece of dough into a 1/4 inch thick circle of about 7 inches in diameter. Place all dough circles onto a non-stick (or lined) baking sheet.

Heat olive oil in a non-stick skillet over medium-high heat. Add the onions and cook for 2-3 minutes, or until the onions have begun to soften. Add in the garlic, and saute for 30 seconds or until fragrant.

Add in the ground turkey, and cook for about 3 minutes, stirring to crumble.

Stir in the green pepper and taco seasoning mix and cook for an additional 3 minutes.

Remove skillet from heat and stir in the salsa.

Divide the cooked meat and vegetables into 4 equal servings and spoon each onto 1/2 of a pizza dough circle, leaving a 1/2-inch border around the edges. Top the filling evenly with the shredded cheese.

Fold the other half of the pizza dough over the filling and pinch edges closed. Using the tines of a fork, pierce the top of each calzone a few times to let the steam out while cooking.

Place calzones into the oven, and cook for 15-20 minutes, or until the calzones are golden brown. (If planning on freezing all or some of the calzones, par-bake for 10 minutes, let cool completely at room temperature, refrigerate until well-chilled, wrap well in plastic wrap, then place in freezer in heavy-duty zip-top plastic bag).

Meanwhile, prepare the avocado cream by mashing together the avocado flesh, yogurt, salt and pepper in a small bowl.

Once cooked, let the calzones sit at room temperature for a few minutes. Slice each calzone in half, and serve with the avocado cream.

Instructions

1. Prepare the Taco Filling

a. In a skillet cook the ground beef over medium heat until it’s no longer pink breaking it into crumbles as it cooks.

b. Add the chopped onion and minced garlic to the skillet and cook until the onion is translucent.

c. Stir in the taco seasoning mix and black beans. Cook for an additional 2-3 minutes until the mixture is well combined and heated through. Remove from heat.

2. Make the Avocado Cream

a. In a food processor combine the ripe avocados sour cream lime juice and cilantro leaves.

b. Blend until the mixture is smooth and creamy. Season with salt and pepper to taste. Transfer the avocado cream to a bowl and set aside.

3. Assemble the Calzones

a. Preheat your oven to 375°F (190°C).

b. Divide the pizza dough into equal portions, depending on how many calzones you want to make. Roll each portion into a circle, about 6-8 inches in diameter.

c. Spoon the taco filling onto one half of each dough circle, leaving a border around the edge.

d. Sprinkle shredded cheddar cheese and diced tomatoes over the taco filling, and add a pinch of fresh cilantro.

e. Fold the other half of the dough over the filling to create a half-moon shape. Press the edges to seal the calzones.

4. Bake the Calzones

a. Place the assembled calzones on a baking sheet lined with parchment paper.

b. Brush the tops of the calzones with the beaten egg wash for a golden finish.

c. Bake in the preheated oven for 15-20 minutes or until the calzones are golden brown and crisp.

5. Serve and Enjoy

a. Once out of the oven let the calzones cool for a few minutes.

b. Serve the taco calzones warm with a generous dollop of creamy avocado sauce.

These Taco Calzones with Creamy Avocado Sauce are a delightful culinary fusion that will have your taste buds dancing with joy. The savory taco filling wrapped in golden, flaky dough and paired with the rich avocado cream creates a harmonious blend of flavors. Whether it’s a family dinner or a special gathering with friends, these calzones are sure to be a hit. Enjoy this creative twist on classic favorites and savor the deliciousness of this mouthwatering dish!

*Homemade Taco Seasoning Blend (good for 1/2 lb of ground meat)

  • 1 1/2 tsp chili powder
  • 3/4 tsp ground cumin
  • 1/2 tsp Kosher salt
  • 1/4 tsp freshly ground black pepper
  • 1/4 tsp paprika
  • 1/8 tsp garlic powder
  • 1/8 tsp onion powder
  • 1/8 tsp crushed red pepper flakes
  • 1/8 tsp oregano
Taco Calzones with Avocado Cream

Estimated Nutrition Per Serving

Calories:550 kcal

Protein:25g

Carbohydrates:40g

Dietary Fiber:8g

Sugars:3g

Fat:35g

Saturated Fat:12g

Cholesterol:75mg

Sodium:1200mg

Vitamin C:15% of the Daily Value (DV)

Calcium:20% of the DV

Iron:20% of the DV

Please keep in mind that these values are approximate and can vary based on the specific brands and quantities of ingredients used. It’s also important to consider individual dietary needs and preferences when planning your meals.

Carrot Cake Pancakes with Maple Cream Cheese

0

These carrot cake pancakes with maple cream cheese are a delightful way to start your morning. Full of warm spices like cinnamon and nutmeg and topped with a sweet maple-cream cheese drizzle, they taste like dessert for breakfast. Whether for a special weekend brunch or a cozy weekday breakfast, they’re sure to impress friends and family.

Carrot cake. These are words that instantly put a smile on my face when I hear or see them paired together. This is rather ironic, considering I used to harbor a strong distaste for carrot cake. My family can attest to the fact that I much preferred the cream cheese icing, which I would carefully scrape off the cake and lick from my fingers.

My, how times have changed.

Carrot cake is now one of my very favorite desserts; whether it’s studded with walnuts, pecans, raisins, pineapple, coconut, or just grated carrots, I find this moist and sweet cake hard to resist.

Carrot Cake Pancakes with Maple Cream Cheese

Thus, you can imagine my delight when I stumbled upon a recipe for carrot cake pancakes. I don’t typically choose pancakes as my morning meal, mainly because they rarely hold me over until lunch. My version of carrot cake pancakes, however, is hearty enough to satiate hunger while remaining light enough to satisfy a craving for fluffy pancakes.

Whole wheat pastry flour and a generous amount of grated carrots contribute hunger-squashing fiber; a bit of Neufchâtel cream cheese adds just the right amount of fat to keep your stomach feeling full; and a touch of maple syrup in place of refined sugar maintains your blood sugar so your energy doesn’t crash an hour after eating the pancakes.

I decided to keep my first batch rather basic by omitting the traditional ingredient additions. The pancakes are delicious as is, but I am excited to experiment with various add-ins: Raisins soaked in vanilla extract until plump, juicy pineapple chunks, crunchy toasted nuts, and rich unsweetened coconut flakes are all variations I’d like to try.

Perhaps I’ll even make a batch of carrot cake pancakes with “the works” – a.k.a. all of the above. Now THAT would put a smile on anyone’s face.

Name:Carrot Cake Pancakes with Maple Cream Cheese
Cuisine:Fusion
Prep Time:15 minutes
Cooking Time:20 minutes
Total Time:35 minutes
Servings:4
Yield:12 pancakes

Ingredients for the carrot cake pancakes:

  • 1 1/4 cups whole wheat pastry flour
  • 2 tsp baking powder
  • 1 tsp ground cinnamon
  • 1/4 tsp salt
  • 1/4 tsp ground ginger
  • 1/8 tsp ground nutmeg
  • 1 egg, lightly beaten
  • 2 Tbsp pure maple syrup
  • 1 cup milk (I used 1% – what I had on hand)
  • 1 tsp pure vanilla extract
  • 2 cups finely grated carrots (preferably using a microplane grater)
  • canola oil cooking spray

Ingredients for the maple cream cheese:

  • 4 ounces Neufchâtel (1/3-less-fat) cream cheese, at room temperature
  • 2 Tbsp pure maple syrup
  • 2 Tbsp milk
  • 1/2 tsp vanilla extract
  • 1/4 tsp ground cinnamon

Directions:

  1. Start by making the maple cream cheese: place room-temperature Neufchatel in a large bowl. Using an electric mixer, beat the cream cheese until smooth. Beat in the maple syrup, milk, vanilla, and cinnamon. Set aside.
  2. In a large bowl, whisk together the flour, baking powder, cinnamon, salt, ginger, and nutmeg.
  3. In a separate bowl, combine egg, maple syrup, milk, and vanilla; mix well.
  4. Stir wet mixture into dry ingredients until moistened. Fold in grated carrots.
  5. Heat a non-stick skillet (or griddle) coated with cooking spray over medium/medium-high heat. Pour pancake batter by 1/4 cupful onto the griddle.
  6. When bubbles form on the top of the pancakes, and the edges look dry, (after about 2 minutes of cooking), flip and cook until golden brown (about 1 minute)*.
  7. Serve with a dollop or smear of the maple cream cheese.

*If you’re planning on enjoying leftovers, I suggest slightly undercooking the pancakes and then reheating them in the toaster oven for a quick weekday breakfast.

Estimated Nutrition per Serving:

  • Calories: 355 kcal
  • Total Fat: 15g
  • Saturated Fat: 7g
  • Trans Fat: 0g
  • Cholesterol: 120mg
  • Sodium: 531mg
  • Total Carbohydrates: 48g
  • Dietary Fiber: 2g
  • Sugars: 23g
  • Protein: 8g

Apple Cinnamon Granola

0

Clearly I absolutely love granola. I have my favorite brands, sure, but with homemade batches you can control the amount of fat and sugar… both of which are notoriously high in most commercial granolas.

Apple Cinnamon Granola

For this Apple Cinnamon Granola, nuts contribute a modest dose of healthy fat and pure maple syrup lends a small amount of unrefined sugar.

Apple Cinnamon Granola

In anticipation of the impending fall season – which is finally discernible in the Boston air – I used autumnal flavors for this granola recipe. Dried apples pay homage to the season of orchards, cider, and pie; a generous amount of cinnamon contributes a fragrant aroma and spicy-sweet flavor. The applesauce-coated clumps of granola turn crunchy in the oven, and are nicely complimented by the chewy dried apples.

Apple Cinnamon Granola

Healthier and less expensive than grocery store granolas, this homemade version tastes every bit as good. Whether you stir it into creamy yogurt, scatter it over hot oatmeal, serve it with ice-cold milk, or eat it by the handful, you are sure to enjoy this Apple Cinnamon Granola.

Apple Cinnamon Granola

Apple Cinnamon Granola

Name:Apple Cinnamon Granola
Cuisine:Fusion
Prep Time:10 minutes
Cooking Time:35 minutes
Total Time:45 minutes
Servings:10 servings
Yield:6 cups

Ingredients

  • 1 1/2 cups rolled oats
  • 1 1/2 cups puffed brown rice cereal
  • 6 Tbsp unsweetened applesauce
  • 1/4 cup pure maple syrup
  • 1/2 tsp pure vanilla extract
  • 1 Tbsp ground cinnamon (yes, it’s a lot of cinnamon, but you want this to be the predominant flavor!)
  • 1/4 tsp salt
  • 1/2 cup chopped nuts, such as walnuts, pecans, or almonds (I used walnuts)
  • 1 cup chopped dried apple rings, preferably unsweetened & unsulfured

Directions

  1. Preheat oven to 325 degrees F. Line a cookie sheet with parchment paper.
  2. Measure the oats and rice cereal into a large bowl, set aside.
  3. In a medium bowl, whisk together the applesauce, maple syrup, vanilla extract, cinnamon, and salt. Whisk until very smooth.
  4. Pour wet ingredients over cereal and stir until evenly coated. Spread mixture on the prepared cookie sheet in an even layer.
  5. Bake for 15 minutes. Remove sheet from the oven, stir the nuts into the granola, and bake for an additional 10-15 minutes, or until the granola is golden brown and crisp.
  6. Remove granola from the oven, toss with the dried apples, and cool completely. Store in an airtight container.

Estimated Nutrition Per Serving

  • Calories: 240
  • Total Fat: 12g
  • Saturated Fat: 6g
  • Trans Fat: 0g
  • Cholesterol: 0mg
  • Sodium: 120mg
  • Total Carbohydrates: 31g
  • Dietary Fiber: 4g
  • Sugars: 15g
  • Protein: 4g

Autumn Spiced Ice Cream

0

Seeing as we’re about to kick off the last official weekend of summer before the Autumnal Equinox, I thought I’d share with you a recipe that can seamlessly transition from the season of cold ice cream churned on hot days to the season of aromatic spiced treats baked on cool mornings.

Autumn Spiced Ice Cream

I borrowed Wheeler Del Toro’s technique of thickening the ice cream base with arrowroot powder instead of eggs, and used reduced fat milk & half-and-half instead of heavy cream to keep the ice cream on the lighter side. I combined evaporated cane juice, brown sugar, and maple syrup for a complex sweetness, and my favorite warm spices rounded out the autumnal flavor.

Autumn Spiced Ice Cream

This ice cream can be enjoyed sitting in the sun on a warm afternoon or cuddled under a blanket on a cool evening… in other words, it is more than acceptable to indulge in two servings per day ;).

Autumn Spiced Ice Cream
Name:Autumn Spiced Ice Cream
Cuisine:Fusion
Prep Time:15 minutes
Cooking Time:0 minutes (churning time)
Total Time:6 hours (including chilling and freezing time)
Servings:8 servings
Yield:1 quart (4 cups)

Ingredients

  • 2 cups 2% reduced fat milk, divided
  • 2 Tbsp arrowroot powder or cornstarch
  • 1 cup half-and-half
  • 2 Tbsp evaporated cane juice or granulated sugar
  • 1/4 cup packed brown sugar
  • 2 Tbsp pure maple syrup
  • 2 tsp pure vanilla extract
  • 1 tsp pure maple extract
  • 2 tsp ground cinnamon
  • 1/4 tsp ground ginger
  • 1/4 tsp ground nutmeg
  • 1/8 tsp ground cloves

Directions

  1. In a small bowl, whisk together 1/4 cup milk with the arrowroot. Set aside.
  2. In a medium saucepan over medium heat, combine the remaining 1 3/4 cup milk, half-and-half, evaporated cane juice, brown sugar, and maple syrup. Cook over medium heat, gently whisking occasionally, until the mixture just begins to boil, about 10 minutes. When the mixture reaches the soft boiling point (bubbles are just starting to break the surface), remove from heat, and whisk in the milk & arrowroot mixture. Whisk until the mixture noticeably thickens, about 30 seconds. Whisk in the vanilla extract, maple extract, and spices. Transfer ice cream base to a medium bowl. Chill completely in the refrigerator, about 2-3 hours.
  3. Freeze according to ice cream manufacturer’s instructions. Transfer to an air-tight freezable container and freeze until “ripened” (hardened).

~because I had so much fun photographing this ice cream, here are a few additional shots for you to enjoy~

Autumn Spiced Ice Cream

Estimated Nutrition Per Serving

  • Calories: 240
  • Total Fat: 18g
  • Saturated Fat: 10g
  • Trans Fat: 0g
  • Cholesterol: 60mg
  • Sodium: 40mg
  • Total Carbohydrates: 19g
  • Dietary Fiber: 1g
  • Sugars: 15g
  • Protein: 2g