I promise the alliteration in the title was wholly unintended! I was inspired by the recipe for Pepper Jack, Chicken, and Peach Quesadillas in this month’s issue of Cooking Light, but was in the mood for a vegetarian sandwich version.
Make that a pressed sandwich version. Every time I make a panini (or, I guess the singular is panino?), I am reminded of just how much I love the crisp exterior and gooey, melty interior that results from heating a sandwich in a panini press.
Name:
Pepper Jack & Peach Panino
Cuisine:
Fusion (American and Italian)
Prep Time:
15 minutes
Cooking Time:
8 minutes
Total Time:
23 minutes
Servings:
4 servings
Yield:
4 panini sandwiches
This particular panino was no exception. This panino was, in fact, absolutely divine. Let’s start with the sweet & spicy flavor combination, shall we? As you take a bite, you simultaneously experience the heat from the jalapeno-studded cheese hitting the back of your throat and the sweetness of the peach slices filling the rest of your mouth with its juicy nectar. Then there’s the textural appeal of the panino, which is pretty darn close to perfection. Your teeth first crunch through the crispy bread before sinking into the soft peaches and creamy melted cheese. Heaven, I tell you.
Have I successfully whetted your appetite with that description? If not, take a few moments to meditate on the photo above and I guarantee you won’t be able to get this panino off your mind!
Pepper Jack & Peach Panino
Ingredients
2 slices rustic whole wheat bread, baguette, or ciabatta (I used Trader Joe’s Whole Wheat Tuscan Pane)
2 slices reduced fat pepper jack cheese, such as Sargento
1 ripe but firm peach, preferably organic, pitted (peeled if desired) and thinly sliced
non-hydrogenated margarine or butter, at room temperature
Directions:
Preheat panini press or skillet over medium heat.
Layer the cheese and peaches between the slices of bread. Spread a thin layer or margarine or butter on outer sides of each slice of bread.
Place assembled sandwich into the panini press or hot skillet. Cook for 3-5 minutes, or until cheese is melted and bread is crisp, turning halfway through if using a skillet.
Calories: Approximately 350-400 calories, depending on ingredients and portion size.
and strawberries!
I fell so deeply in love with my Pepper Jack & Peach Panino that I was lured right back into the kitchen with visions of other fruit-filled cheesy sandwiches.
Although this grilled sandwich doesn’t have the spicy kick of the pepper jack panino, what it does have is creamy richness from the avocado, juicy sweetness from the ripe strawberries, and of course tons of melted deliciousness from the sharp cheddar cheese.
In case you’re wondering, there is in fact a reason why I refrained from using my much-beloved panini press to prepare this sandwich. I was concerned that given the volume of ingredients between the slices of bread, the filling would ooze out all over the appliance. Silly, I know, but I didn’t want to lose any of those great flavors – and I also didn’t want a huge mess on my hands. In retrospect, I probably should have utilized the panini press; although the sandwich was delicious, the cheese didn’t quite melt all the way through. Next time I follow this recipe, I will morph it into a panino!
Avocado & Strawberry Grilled Cheese
Ingredients
rustic whole wheat bread (in other words, steer clear of too-soft sandwich bread and stick with a heartier variety – I love Trader Joe’s Whole Wheat Pane)
sliced cheese (I opted for reduced-fat sharp cheddar)
thinly sliced avocado
thinly sliced strawberries
cooking spray, non-hydrogenated margarine, or butter
Directions
Heat a panini press or skillet over medium heat.
Layer the cheese, avocado, and strawberry slices in between two pieces of bread.
Either coat the outside of the sandwich with cooking spray or spread with a bit of margarine or butter.
Place sandwich into panini press or skillet. Cook for 3-5 minutes, or until the cheese is melted and the bread is golden and crisp, turning halfway through if using a skillet.
The trend of giving homemade goodies as gifts seems to have become less popular over the years, though I have only myself to blame for not sending culinary treats to loved ones more frequently. Who doesn’t love ripping into a package to unveil a tin of chewy chocolate chip cookies or a loaf of tender and fragrant banana bread? I know I do, and I’ll bet that you do too.
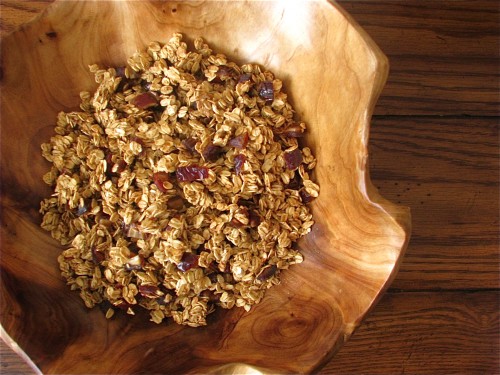
Well, consider this cranberry pecan granola my jumping-off point for bringing back the trend. After being safely encased in packaging fit for travel, this sweet and crunchy granola will be shipped off to my brother, sister-in-law, and nephew in Austin as a thank-you for hosting John and me on a recent trip.
Not much says “I love you”, “thank you”, or “I’m thinking of you” like homemade baked goods. The next time you find yourself thinking about a family member or friend, dedicate an hour or so in the kitchen to making something delicious for that special person. I promise you it will brighten their day!
Ingredients
Name
Gluten-Free Strawberry Shortcake Recipe
Cuisine
Fusion
Prep Time
20 minutes
Cooking Time
20 minutes
Total Time
40 minutes
Servings
8
Yield
8
These estimated nutrition values are based on a typical serving of gluten-free strawberry shortcake. Actual values may vary depending on the specific brands and types of ingredients used. Always consult with a nutritionist or use a nutrition calculator for precise dietary information if needed. Enjoy your gluten-free strawberry shortcake!
In a medium bowl, whisk together the applesauce, maple syrup, vanilla extract, cinnamon, and salt. Whisk until very smooth.
Pour wet ingredients over cereal and stir until evenly coated. Spread mixture on the prepared cookie sheet in an even layer.
Bake for 30 minutes. Remove sheet from the oven, stir the pecans into the granola, and bake for an additional 10-15 minutes, or until the granola is golden brown and crisp.
Remove granola from the oven, toss with the dried cranberries, and cool completely. Store in an airtight container.
Imagine waking up to the aroma of toasted coconut and the sweet scent of dried tropical fruits wafting through your kitchen. That’s the magic of Tropical Granola! This delightful homemade granola recipe combines the tropical flavors of coconut, pineapple, and mango with the wholesome goodness of oats, nuts, and honey. Whether you enjoy it with yogurt, milk, or simply as a snack, this Tropical Granola will transport your taste buds to a sunny paradise
ohn’s uncle made a few batches of his delicious granola for the family to enjoy while vacationing at the Outer Banks this past week, and it reminded me just how fantastic homemade granola can be. I ate more than my fair share of the sweet, buttery granola, and savored every single crunchy bite. Once we arrived back home in Boston, I found myself craving a light & healthy homemade granola with bright, beachy flavors.
Name
Tropical Granola Recipe
Cuisine
Tropical
Prep Time
10 minutes
Cooking Time
20 minutes
Total Time
35 minutes
Servings
8
Yield
4
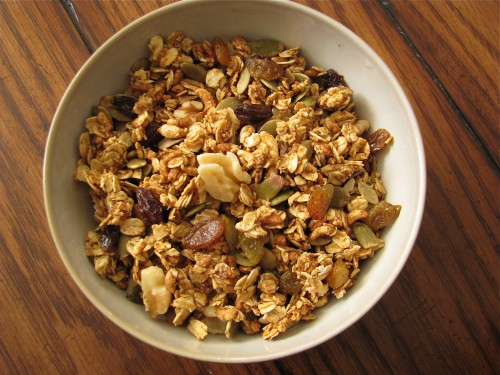
I started with the base of rolled oats, puffed brown rice cereal, and applesauce that I used for my Cranberry Pecan Granola, and tailored the recipe to fulfill my desire for a tropical flavor profile. I subbed in agave nectar for the maple syrup and coconut extract for the vanilla, added a bit of ground ginger, and finished the granola off with cashews, a trio of dried tropical fruits, and unsweetened coconut flakes.
The aroma of the baking granola was one I wish I could bottle and open in the middle of winter when a desire for the tropics strikes. The ground ginger and coconut extract perfumed the air so richly that I could easily conjure an image of a hammock swinging lazily in the ocean breeze under two palm trees, a fruity drink with an umbrella perched on top sweating in the sunshine.
If not, allow me to tempt you further. The oil-less granola miraculously crisps up into crunchy clusters, which are pleasantly complimented by the chewy dried fruit and coconut flakes. The no-sugar-added dried bananas, mango, and pineapple are surprisingly sweet all on their own, and contribute the perfect trifecta of tropical fruit flavor. The lack of butter is unapparent thanks to the natural richness of the cashews and unsweetened coconut flakes.
This low-sugar and moderately low-fat granola is so tasty that I am fairly certain I will be making another batch in the very near future, and I hope that you do as well!
Ingredients
1 1/2 cups rolled oats
1 1/2 cups puffed brown rice cereal
6 Tbsp unsweetened applesauce
1/4 cup agave nectar
1/2 tsp pure coconut extract
1/4 tsp ground cinnamon
1/4 tsp ground ginger
1/4 tsp salt
1/2 cup chopped cashews or macadamia nuts
1/2 cup diced dried mixed tropical fruit, such as mango, banana, and pineapple, preferably unsweetened & unsulfured
1/4 cup unsweetened coconut flakes
Instructions
1. Preheat the Oven
Preheat your oven to 325°F (160°C) and line a large baking sheet with parchment paper or a silicone baking mat.
2. Combine Dry Ingredients
In a large mixing bowl, combine the rolled oats, shredded coconut, and chopped mixed nuts. Stir well to distribute the ingredients evenly.
3. Prepare the Wet Ingredients
In a separate microwave-safe bowl, melt the coconut oil and honey together until they become a liquid, about 30 seconds in the microwave. Stir in the vanilla extract and a pinch of salt.
4. Mix Everything Together
Pour the liquid mixture over the dry ingredients and toss until everything is well coated.
5. Spread on Baking Sheet
Spread the granola mixture evenly onto the prepared baking sheet. Press it down slightly with a spatula to help form clusters.
6. Bake and Stir
Bake in the preheated oven for 25-30 minutes, or until the granola is golden brown, stirring once or twice during baking to ensure even cooking.
7. Add Dried Fruits
Remove the granola from the oven and let it cool slightly. Once it’s cooled a bit, stir in the chopped dried pineapple, dried mango, and banana chips.
8. Let It Cool Completely
Allow the granola to cool completely on the baking sheet. It will become crisp as it cools.
9. Store and Enjoy
Once the granola is completely cool, transfer it to an airtight container. Your Tropical Granola is now ready to enjoy! Serve it with yogurt, milk, or as a snack on its own.
This Tropical Granola recipe brings the flavors of the tropics right to your breakfast table. With the sweetness of dried fruits, the crunch of nuts, and the earthy goodness of oats, it’s a delicious and nutritious way to start your day. Plus, it’s incredibly versatile – feel free to customize it with your favorite tropical fruits and nuts to make it your own tropical paradise in a bowl.
*The bowl pictured in the first four photographs was a gift that my parents picked out during a recent trip to Maine. Susan Horowitz of Ash Cove Pottery has been hand-making pottery since the 1970s. Her pottery is oven, microwave, and dishwasher safe, and each piece is distinctive. I love how she describes the inspiration for her artwork: ”My inscribed and brushwork decorations are based on the patterns left in the sand by the receding tide.” How very apropos then, to use this gorgeous vessel for photographing my Tropical Granola!
Estimated Nutrition Per Serving
Calories
220 calories
Total Fat
13g
Saturated Fat
5g
Cholesterol
0mg
Sodium
30mg
Total Carbohydrates
24g
Dietary Fiber
3g
Sugars
10g
Servings
5
Protein
3g
Please note that these nutrition values are estimated and may vary based on the specific brands and quantities of ingredients you use. It’s always a good practice to check the nutrition information on the product labels for the most accurate data, especially if you have specific dietary requirements or restrictions. Enjoy your Tropical Granola!
Pork-wrapped pork? On a health-conscious food blog?! You bet. Although certain pork cuts (ahem, bacon) rarely make an appearance on my plate, others (pork chops, pork tenderloin) grace our dinner table about once per week. Boneless pork chops contain only a touch more calories and fat than boneless, skinless chicken breasts, and when cooked successfully, are wonderfully juicy and tender.
My husband can attest to the fact that I’ve overcooked pork a few a number of times in the past, but I’ve recently adopted the simple yet effective technique utilized by the pros: cook the pork until almost done, (still quite pink in the center), then place it on a plate and cover with foil to rest for a few minutes. The resting allows the juices to be re-absorbed and the foil “tent” allows the pork to finish cooking. This tactic yields succulent pork that is just barely pink in the center – just the way we like it.
In this recipe, lean pork chops are enrobed with super thin slices of salty prosciutto and accompanied by a light salad comprised of warm pear slices and a homemade oil-free salad dressing.
The pork chops remain tender and juicy while the prosciutto becomes delightfully crispy. The sweet pears and tangy cheese are the perfect flavor pairing for the savory pork, so make sure to get at least a few bites with all of the complementary flavors in one mouthful!
Name:
Prosciutto-Wrapped Pork Chops with Caramelized Pear Salad
Cuisine:
Italian
Prep Time:
15 minutes
Cooking Time:
25 minutes
Total Time:
40 minutes
Servings:
4
Yield:
4 pork chops
Prosciutto Wrapped Pork
Prosciutto-Wrapped Pork Chops with Caramelized Pear Salad
serves 2
Ingredients:
Extra Virgin Olive Oil
2 boneless 4-6 oz pork chops, trimmed of any excess fat
4 slices paper-thin prosciutto
Kosher salt and freshly cracked black pepper
1 ripe Anjou pear, cored and sliced thin
4 cups mixed greens, such as baby romaine and spinach
1 tsp Dijon mustard
4 tsp pure maple syrup, divided
2 Tbsp apple cider vinegar
2 Tbsp crumbled goat cheese or blue cheese
Directions:
Lay two slices of prosciutto, slightly overlapping lengthwise, on a cutting board. Place one of the pork chops at one short end of the prosciutto, and roll it up so that the chop is fully wrapped. Repeat with the other slices of prosciutto and pork chop.
Heat a drizzle of olive oil in a skillet oven medium-high heat. Add the prosciutto-wrapped pork chops to the skillet and cook 4-5 minutes per side, or until almost done. Remove to a plate and cover with foil (pork will continue to cook).
Reduce stove heat to low. Add the pear slices to the skillet along with 2 tsp maple syrup, and saute until pears are caramelized and slightly soft, about 3-4 minutes.
Meanwhile, whisk together the mustard, remaining 2 tsp maple syrup, cider vinegar, and a generous pinch each of salt and pepper. Toss dressing with the greens and top with the pear slices and cheese.
Therefore, it goes without saying that the recipe for Carrot Cake Ice Cream in Wheeler Del Toro’s The Vegan Scoop caught my eye.
Like many home cooks and food bloggers, I rarely follow another’s recipe to a “t”, and this ice cream was no exception.
So, how does this recipe differ from the original? In a few ways, actually. For one, I cut the amount of overall sugar by about half. I’ve made and enjoyed many of Wheeler’s vegan ice creams, but have found that they are quite sweet. I typically use less sugar than his recipes call for, and I honestly don’t think this practice compromises the final product. I used 1/2 cup of evaporated cane juice instead of 3/4 cup of sugar, and replaced the 1 cup of brown sugar with 1/4 cup of brown sugar + 2 Tbsp of pure maple syrup. Other changes I made included using half the amount of margarine (which worked because I also cut down on the brown sugar), adding in a bit of ground ginger and nutmeg, finely grating the carrots, and omitting the raisins (although I love raisins as much as the next person, I don’t like ‘em in my ice cream).
The alternations I made suited my tastes perfectly! The orange-hued and spice-flecked ice cream was definitely sweet enough for my palate, and the addition of ground ginger and nutmeg rounded out the traditional carrot cake flavor. It is an intoxicating sensation to eat a spoonful of something that is both refreshingly cold and warmly spiced. In this sense, the ice cream truly lives up to its name because you feel like you are eating ice cream and carrot cake simultaneously.
This ice cream recipe is going straight into my cooking binder, which I fill only with recipes I know I will make over and over again. I can see myself enjoying this season-less vegan ice cream not only on a hot summer day, but also in the dead of winter, curled up in a warm blanket. Just imagine how amazing this would be slowly melting over a piece of fresh-from-the-oven carrot bread. With a maple cream cheese drizzle. And some toasted walnuts.
1 cup finely grated carrots, preferably organic (a microplane grater works best)
1 cup plain soymilk, divided
2 Tbsp arrowroot powder or cornstarch
2 cups plain soy creamer
1/2 cup evaporated cane juice or granulated sugar
1 Tbsp pure vanilla extract
1 Tbsp ground cinnamon
1/2 tsp ground ginger
1/4 tsp ground nutmeg
Directions
Combine brown sugar, maple syrup, and margarine in a small saucepan over medium heat; stir until melted. Reduce stove heat to low, add carrots to mixture, and continue to cook over low heat for about 5 minutes. Set aside.
In a small bowl, whisk together 1/4 cup soymilk with the arrowroot. Set aside.
In a medium saucepan over medium heat, combine the remaining 3/4 cup soymilk, soy creamer, and evaporated cane juice. Cook over medium heat, whisking occasionally, until the mixture just begins to boil, about 10 minutes. When the mixture reaches the soft boiling point (bubbles are just starting to break the surface), remove from heat, and whisk in the soymilk & arrowroot mixture. Whisk until the mixture thickens, about 30 seconds. Whisk in the vanilla extract and spices. Transfer ice cream base to a medium bowl.
Stir the carrots into the ice cream base, and allow to sit at room temperature for about 10 minutes. Chill in the refrigerator until cold, about 3 hours. Freeze according to ice cream manufacturer’s instructions.
Estimated Nutrition
Calories: 398 kcal
Total Fat: 27g
Saturated Fat: 13g
Trans Fat: 0g
Cholesterol: 147mg
Sodium: 89mg
Total Carbohydrates: 34g
Dietary Fiber: 2g
Sugars: 26g
Protein: 6g
Indulge in the delightful fusion of two classics with our Carrot Cake Ice Cream. Creamy, spiced, and speckled with grated carrots, this frozen treat captures the essence of carrot cake. Swirled with cream cheese frosting and adorned with crushed graham crackers, it’s a sweet symphony that’ll have your taste buds singing. Perfect for dessert lovers seeking a unique twist on tradition.
Looking for a new way to use up the plethora of zucchini squash sitting in your fridge? Not a fan of the quintessential cabbage that traditional coleslaw recipes call for? This recipe for Zucchini Coleslaw will solve both quandaries.
Ridiculously simple, but surprisingly delicious, this unique coleslaw is a great side dish for a variety of summer fare. The carrots deliver the crunch desired in a coleslaw, and the zucchini offers both delicate texture and flavor. Greek yogurt contributes a creaminess without all of the fat of mayonnaise, and just a touch of canola oil mayo adds the perfect tangy note.
Another appealing aspect of this coleslaw is the multitude of ways you can tailor the basic recipe to fit your specific tastes. You might try adding in a handful of dried cranberries, a scattering of toasted sunflower seeds or walnuts, a sprinkling of blue cheese crumbles, or some shredded apple. You could also play around with the type of vinegar for a different flavor. I might even try this coleslaw as a sandwich filling along with a few slices of avocado and peppered turkey breast.
For another fun coleslaw recipe, head on over to my friend Shannon’s site to check out her Pineapple Slaw. How good does that sound?!
Name:
Zucchini Coleslaw
Cuisine:
American
Prep Time:
15 minutes
Cooking Time:
0 minutes (No cooking)
Total Time:
45 minutes (Includes chilling time)
Servings:
6 servings
Yield:
Approximately 6 cups
Please note that the total time includes the 30 minutes of chilling time in the refrigerator to allow the flavors to meld.
Ingredients
2 medium-sized zucchinis
2 carrots, grated
1/2 cup mayonnaise
1/4 cup sour cream
2 tablespoons apple cider vinegar
1 tablespoon honey
1 tablespoon Dijon mustard
Salt and pepper to taste
Fresh parsley or cilantro for garnish (optional)
Estimated Nutrition Per Serving (Approximate values)
Calories: 120-150 kcal
Total Fat: 10-12g
Saturated Fat: 1-2g
Cholesterol: 10-15mg
Sodium: 150-200mg
Total Carbohydrates: 8-10g
Dietary Fiber: 1-2g
Total Sugars: 6-8g
Protein: 1-2g
Please note that these are approximate values and can vary based on the specific brands and quantities of ingredients used. For accurate nutritional information, it’s best to use a reliable nutritional calculator or consult a registered dietitian.
Instructions
Combine the Dressing In a medium-sized bowl, mix mayonnaise, sour cream, apple cider vinegar, honey, Dijon mustard, salt, and pepper. Stir the ingredients until well combined and the dressing is smooth.
Prepare the Zucchini and Carrots Start by washing the zucchinis thoroughly. Trim the ends and cut them into matchstick-sized pieces. Grate the carrots using a box grater or a food processor.
Toss the Vegetables Add the prepared zucchini and grated carrots to a large mixing bowl. Pour the dressing over the vegetables and toss until they are evenly coated with the dressing.
Chill the Coleslaw Cover the bowl and refrigerate the coleslaw for at least 30 minutes to allow the flavors to meld and the coleslaw to chill.
Garnish and Serve Before serving, garnish the zucchini coleslaw with fresh parsley or cilantro for an extra burst of flavor and a vibrant touch. Serve it cold as a refreshing side dish alongside your favorite grilled meats or sandwiches.
Tips and Variations
Add Crunch with Nuts and Seeds Enhance the crunchiness of the coleslaw by incorporating chopped nuts like almonds or walnuts, or seeds such as sunflower seeds.
Experiment with Herbs and Spices Customize the flavors by adding a pinch of your favorite herbs or spices like garlic powder, onion powder, or a dash of paprika for a subtle kick.
Make it Vegan Substitute the mayonnaise and sour cream with vegan alternatives to make this coleslaw suitable for a vegan diet.
Enhance Nutritional Value Increase the nutritional value by adding other colorful vegetables like red cabbage, bell peppers, or shredded spinach.
Enjoy this zucchini coleslaw as a side dish at your next gathering or a quick and healthy addition to your weekday meals. The crispiness of zucchini and the creaminess of the dressing make this coleslaw a delightful and nutritious choice.
Zucchini Coleslaw
serves 2, although this slaw is so tasty and healthy that I won’t judge you if you devour it all yourself
1 large organic zucchini squash, scrubbed and roughly grated on a box grater (should yield about 1 1/2 cups)
1 large organic carrot, scrubbed and roughly grated on a box grater (should yield about 3/4 cup)
1/4 cup 2% plain Greek yogurt
1 Tbsp canola oil mayonnaise
1 tsp white white vinegar
Kosher salt and freshly ground black pepper, to taste
Directions:
Roll the shredded zucchini in a few heavy-duty paper towels or a clean dish cloth and squeeze to remove excess water.
Combine the zucchini with the shredded carrot and remaining ingredients. Stir until well-mixed.
Earlier this summer, John and I were invited to spend the weekend at one of our friend’s houses on Cape Cod. Of course, we eagerly hopped in the car and set out to Eastham, surprisingly without having to battle the typical summer weekend mass exodus from Boston to the Cape. Although weather reports called for overcast skies and occasional showers, we were fortunate enough to enjoy a mostly sunny and dry couple of days. We rode bikes, spent a day on Mike’s boat during which we spotted a bunch of seals lounging on a sand bar…
…and of course partook in the favorite beach pastime of mini golf followed by ice cream. Amongst all of the drool-worthy ice cream flavors, the one that stood out to me the most was Purple Cow Frozen Yogurt – a gorgeous purple-hued berry fro yo packed with both dark and white chocolate pieces. Although I was tempted by some of the chocolate brownie cookie concoctions, I couldn’t not choose the Purple Cow – after all, it contained some of my very favorite ingredients: yogurt, berries, and both dark and white chocolate.
While thoroughly enjoying my newfound favorite fro yo flavor, I made a mental note to research homemade versions of the Purple Cow Frozen Yogurt once we returned home. My search led me to Erin’s blog, and her recipe (linked below) sounded like a great one to start with for my adaptation. I used my Tart Vanilla Frozen Yogurt as the base, and added a combination puree of plump blackberries and sweet raspberries. I stuck to my typical brand choice for chocolate, and added Sunspire Grain Sweetened Chocolate Chips and Sunspire White Chocolate Chips to the churning fro yo.
Oh my… this was GOOD! The berries lent not only a gorgeous pinkish-purple color to the frozen yogurt, but also a lovely flavor. Decidedly summery, nicely balanced between sweet and tart, and creamy but light, I could have left the frozen yogurt base as is and enjoyed every last bite. However, the finishing touch of dark and white chocolate chips really made this fro yo sing. If you have the willpower and patience to let each mouthful of frozen yogurt melt around the chips, you are left with a few morsels of chocolaty deliciousness.
This treat is the best of both dessert worlds: fruity and chocolaty. Although I do love chocolate, I typically choose fruit-based desserts during the warmer months. This Purple Cow Frozen Yogurt satisfies my craving for something cold, creamy, and fruity, while simultaneously fulfilling my deep-rooted yearning for rich chocolate. What could be better?!
Name:
Purple Cow Frozen Yogurt
Cuisine:
Dessert
Prep Time:
15 minutes
Cooking Time:
0 minutes (No cooking required)
Total Time:
4-6 hours (Freezing time included)
Servings:
6 servings
Yield:
1.5 quarts
Ingredients
2 cups plain 0% fat Greek yogurt, such as Fage
1 cup plain 2% fat Greek yogurt, such as Fage
1/2 cup + 1 Tbsp evaporated cane juice (or granulated sugar), divided
In a large bowl, combine yogurts, evaporated cane juice, and vanilla extract. Stir until the evaporated cane juice is completely dissolved. Place in refrigerator and chill for about 1 hour.
Place all of the berries into a food processor or high-speed blender and process/blend until pureed.
Set a fine mesh sieve over a large bowl and pour the berry puree into the sieve. Using a rubber spatula, stir and gently press down on the puree to separate the puree from the seeds. Be patient, as this might take a little while. You want to extract as much of the thick liquid as possible – don’t forget to scrape the sides and bottom of the sieve with a clean spoon and add any collected puree to that in the bowl. Unless you really hate seeds, you can reserve whatever is left over in the sieve, add a bit of sweetener, and enjoy as no-cook berry preserves. Stir in the remaining 1 Tbsp of evaporated cane juice into the seedless berry puree & place in the refrigerator to chill for about 1 hour.
Serve immediately as soft serve, or spoon into a freezer-safe container and place in freezer until “ripened” (hardened).
Estimated Nutrition Per Serving:
Calories: 220 calories per serving
Protein:10 grams per serving
Carbohydrates: Around 35-40 grams per serving
Dietary Fiber: Roughly 2-3 grams per serving
Sugars: About 28-32 grams per serving
Fat: 5 grams per serving
Saturated Fat: About 2-3 grams per serving
Cholesterol: Roughly 10-15 milligrams per serving
Sodium: Around 30-40 milligrams per serving
Please keep in mind that these nutritional values are estimates and can vary depending on the specific brands and quantities of ingredients used. If you have specific dietary concerns or requirements, it’s a good idea to calculate the exact nutrition for your recipe using a nutrition calculator or consulting a registered dietitian.
If pumpkin screams Halloween and sweet potatoes exude Thansgiving spirit, then cranberries evoke Christmas cheer. I keep a near constant stash of dried cranberries in my pantry throughout the year, but cranberries in their fresh form are only readily available around the winter holidays. Their vibrant hue makes fresh cranberries a festive touch to a wide array of baked goods, side dishes, and desserts.
When cooked, these red jewels break down and release their pleasantly tart juices. In this pear crisp, an unassuming sweetness compliments, rather than masks, the sourness of the cranberries. If you prefer a sweeter dessert, go ahead and add a few more tablespoons of sugar to the topping and/or maple syrup to the fruit filling.
Also feel free to enjoy any leftovers reheated the next morning. Topped with a few generous spoonfuls of Greek yogurt, this heathy crisp doubles as a delicious breakfast.
Preheat oven to 350*F. Coat an 8×8 inch square baking pan with cooking spray.
Combine first 5 ingredients (through salt) in a medium bowl. Stir in applesauce until slightly crumbly. Set aside.
Combine remaining ingredients (pear through arrowroot powder) in a large bowl; toss well to combine. Spoon pear mixture into prepared baking pan and sprinkle oat mixture evenly over the top.
Bake at 350*F for about 1 hour, or until the top is golden-brown and crisp. Cool for 10 minutes on a wire rack before serving.
I’m just going to throw this out there: I love pizza… but I might love calzones even more. Basically pizza in pocket form, calzones can be stuffed with just about anything your little heart desires. On this particular occasion, my heart was pitter-pattering over vibrant homemade pesto, creamy ricotta cheese (part-skim, of course), tender zucchini, and fresh spinach.
Name:
Calzones with Pesto, Zucchini, and Spinach
Cuisine:
Italian
Prep Time:
20 minutes
Cooking Time:
15 minutes
Total Time:
1 hour 35 minutes (including dough rising)
Servings:
4
Yield:
4 calzones
One might even call these “green” calzones, what with the trifecta of verdant vegetables.
A bit of fresh mozzarella probably would have put these calzones over the top, but alas we had none on hand. That being said, the rich ricotta did a splendid job of satisfying my craving for something cheesy.
For some reason I find it immensely gratifying to eat an entire meal with my hands. The pockets of crisp pizza dough encapsulating the piping hot cheese-and-veggie filling negate the need for any utensils, and the hands-only eating experience is only heightened when you have a bowl of steaming marinara sauce on the side for dipping.
If you’re a fan of pizza (and really, who isn’t?) then you will love these calzones!
Calzones with Pesto, Zucchini, and Spinach
yields 4 calzones
Ingredients
homemade or store-bought dough for 1 pizza, at room temperature
flour, for rolling out pizza dough
1 batch homemade oil-less vegan pesto* (commercial pesto tends to be super oily, which makes for a soggy calzone)
1 cup coarsely grated zucchini squash, preferably organic
1 cup tightly packed baby spinach, preferably organic
1 cup part-skim ricotta cheese
Kosher salt and freshly ground black pepper, to taste
homemade or store-bought marinara sauce, warmed, for dipping
Directions
Preheat oven to 450 degrees F.
Divide pizza dough into 4 equal pieces. On a clean, lightly floured surface, roll each piece of dough into a 1/4 inch thick circle of about 7 inches in diameter. Place all dough circles onto a non-stick (or lined) baking sheet.
Evenly divide the pesto amongst the 4 dough circles, spreading it across half of each and leaving a 1/2 inch border. Set aside.
Heat a drizzle of olive oil in a large skillet over medium-high heat. Add shredded zucchini to skillet and cook for 3 minutes, stirring often. Add spinach to skillet and toss until wilted. Let cool for 5 minutes.
In a medium bowl, stir together the ricotta and the zucchini/spinach mixture. Season to taste with salt and pepper.
Evenly divide the ricotta and vegetable mixture between the 4 dough circles, spreading it on top of the pesto. Each dough circle should still have a clean half.
Fold the clean half of each dough circle up and over the filled half. Pinch/crimp dough edges together to form half circles. Gently pierce the top of each calzone a few times with a fork.
Place baking sheet into the preheated oven and cook for 15-20 minutes, until the calzones are golden brown.
Let calzones rest at room temperature for about 5 minutes before serving with the warmed marinara sauce.
Oil-less Vegan Pesto
adapted from Ashley of The Edible Perspective
Ingredients
1/2 cup raw walnut pieces
2 cups tightly packed fresh basil leaves
2 small garlic cloves
1/4 cup water (or more, depending on desired consistency)
Kosher salt & freshly ground black pepper, to taste
Direction
Combine walnuts, basil, and garlic in a food processor or high speed blender and process/blend until well-mixed.
With the motor running, stream water through feed tube until pesto comes together in a smooth and thick sauce, adding more water if desired.