I’ve recently teamed up with Buck Books to offer you my book, Healthy Decadence for One, for one day only at the deeply discounted price of $0.99. On April 14th, (TODAY!) for 24 hours only, Buck Books will be hosting a behemoth Baking Event featuring 13 of the best baking Kindle books, including mine, for just $0.99 – $1.99 each!
Titles normally priced up to $15 will be just $1.99 – $0.99 each (dependent on file size). You can buy the entire batch for the retail price of just one book! Get them by clicking here (or on the banner above).
Make sure to click on the link and subscribe to Buck Books to pick up my book, Healthy Decadence for One, and other $.0.99 books daily!
*Remember, you don’t need a Kindle to enjoy Kindle books. You can download the Kindle app to any smartphone or tablet.
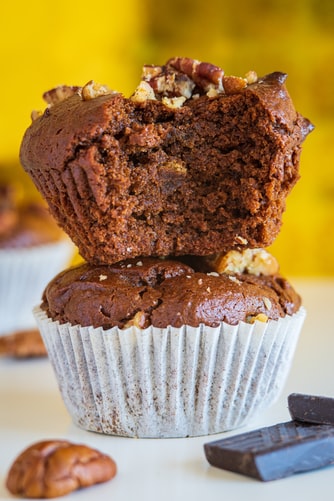
I made a batch of my friend Erin’s 100% Whole Grain Cinnamon Apple Muffins – for, oh maybe the fifth or sixth time (they’re THAT good) – and while John was enjoying one he asked if I could make a coffee cake version. I nonchalantly said “sure”, but couldn’t get the idea of the coffee cake muffins out of my head; so voila!
Name
Mini Coffee Cake Muffins
Cuisine
Fusion
Prep Time
15 minutes
Cooking Time
20 minutes
Total Time
35 minutes
Servings
12
Yield
24 mini muffins
These muffins are incredibly tender – despite the fact that there is no white flour in them – and the crumb topping is beyond addictive. Their petite size makes it easy to inhale two or three muffins without even batting an eye, but they’re healthy enough that you can do just that.
These muffins would make an excellent addition to your Mother’s Day brunch, but don’t wait until a special occasion…
2 Tbsp unrefined granulated sugar, such as evaporated cane juice
2 Tbsp light brown sugar
1/2 tsp ground cinnamon
1/8 tsp Kosher salt
1/2 cup whole wheat pastry flour
Nutrition Facts (Per Serving)
Calories: 150
Total Fat: 8g
Saturated Fat: 4g
Trans Fat: 0g
Cholesterol: 25mg
Sodium: 120mg
Total Carbohydrates: 18g
Dietary Fiber: 1g
Sugars: 10g
Protein: 3g
Instructions
Preheat oven to 350°F. Lightly grease 2 mini muffin tins with neutral-flavored oil, such as safflower.
In a large mixing bowl, combine 1 cup flour, baking powder, baking soda, cinnamon, and salt; whisk until well-combined.
In a medium mixing bowl, combine egg, maple syrup, oil, yogurt, and vanilla extract; whisk until smooth.
Pour wet ingredients into dry and stir just until combined (no flour should be visible).
Using a mini ice cream scoop or spoon, spoon batter into the prepared muffin cups, filling each about 3/4 of the way full (you’ll use about 16 cups total).
In a small bowl, combine the melted butter, sugar, brown sugar, cinnamon, and salt; stir until well- combined. Stir in flour until well-combined. Evenly divide the crumb topping amongst the filled muffin cups, gently pressing the crumbs into the muffin batter.
Bake for 10-14 minutes, or until a toothpick inserted into the center of one of the muffins comes out clean.
Allow muffins to cool in the pan for 10 minutes before removing to a wire rack to cool complete.
I love me some cookie butter. Ya know, that insanely addictive stuff from Trader Joe’s that disappears from the jar in no time. The caveat is that the ingredients are less than stellar; actually, the ingredients are such a departure from the food that I typically consume, that I haven’t bought TJ’s cookie butter in years. I’m pretty sure I pick up a jar every time I go to the store, but end up putting it back on the shelf when I take a glance at the ingredient list (when will I learn?).
I have no idea why it took me this long to finally attempt a homemade version, but the fact is I did, and I’m so excited to share the recipe with you! Now I feel like I have to let you know that this cookie butter doesn’t taste exactly like the source of its inspiration, but that’s to be expected because the ingredients are completely different. It IS super delicious, however!
This version uses graham crackers in place of speculoos cookies, and adds in almonds to bump up the protein & healthy factor. I wrote the ingredient list to yield a cookie butter with a milder flavor, but if you love warm spices, feel free to add as much as you’d like.
The sweetness comes from white chocolate chips; I chose this particular sweetener for a decadent dessert-like result, but if you’re not a fan you can’t certainly sub in 1/4 cup or so of honey or pure maple syrup.
As the name suggests, this cookie butter really is more of a dessert or treat than a breakfast spread; but you can rest assured that it’s much healthier than the prepackaged stuff!
Name
Homemade Cookie Butter
Cuisine
Fusion
Prep Time
15 minutes
Cooking Time
10 minutes
Total Time
25 minutes
Servings
16
Yield
2 cups
Ingredients
2 cups unsalted dry toasted blanched sliced almonds (the blanching process removes the skin; if you can only find regular sliced almonds, that is fine)
6 full graham crackers sheets, broken up into small pieces (I used honey, but cinnamon would also be good)
2 Tbsp neutral-flavored oil, such as safflower
1/2 cup all-natural white chocolate chips (or 1/4 cup honey or pure maple syrup)
3/4 tsp ground cinnamon, or more to taste
1/16 tsp ground nutmeg, or more to taste
1/16 tsp ground cloves, or more to taste
1/2 tsp pure vanilla extract
Nutrition Facts (Per Serving)
Calories: 120 kcal
Total Fat: 8g
Saturated Fat: 3g
Trans Fat: 0g
Cholesterol: 10mg
Sodium: 50mg
Total Carbohydrates: 12g
Dietary Fiber: 1g
Sugars: 8g
Protein: 1g
Instructions
Place sliced almonds into a food processor fitted with the steel blade and process until the nuts break down into a smooth paste, about 5 minutes, scraping down the sides of the bowl as necessary.
Add in the broke up graham crackers sheets, and turn on the processor. With the motor running, stream in the oil and process until a smooth butter forms, again scraping down the sides of the bowl as necessary.
Add in the white chocolate chips and process until melted and fully incorporated. The heat from the food processor will melt the chips. Alternately, add in the liquid sweetened of your choice.
Add in the spices and vanilla extract; process to combine.
Taste and adjust seasonings if desired. The consistency will be rather thin and drippy while it’s still warm, but the cookie butter will firm up as it cools.
Pour into an airtight container or jar and store at room temperature.
Summer berries are so juicy, sweet, and delicious right now, it’s hard not to inhale an entire pint – straight out of the container – in one sitting. In fact, Lily and I have been known to accomplish that precise feat as soon as we get back from the grocery store.
Although summer-ripe blueberries are pretty much perfect all on their own, they also make for a fantastic base for light desserts; such as these individual crisps.
The filling is sweetened only with pure blueberry juice that is reduced down on the stovetop until thick and syrupy, and the topping is sweetened with coconut nectar… an all-natural, low-glycemic, nutrient-rich syrup that looks like molasses but has a much milder flavor.
These crisps welcome a scoop of vanilla ice cream, (especially when eaten warm from the oven), but I actually prefer them paired with tangy plain Greek yogurt… that way, you can enjoy a serving for breakfast!
Individual Blueberry Coconut Crisps
Recipe Information
Name
Individual Blueberry Coconut Crisps
Cuisine
Fusion
Prep Time
15 minutes
Cooking Time
25 minutes
Total Time
40 minutes
Servings
4 servings
Yield
4 individual crisps
Ingredients
1 cup fresh blueberries
1 tablespoon lemon juice
1/4 cup granulated sugar
1 tablespoon cornstarch
1/2 teaspoon vanilla extract
1/2 cup old-fashioned rolled oats
1/4 cup all-purpose flour
1/4 cup shredded coconut
1/4 cup brown sugar
1/4 cup unsalted butter, cold and cubed
Pinch of salt
Instructions
1. Preheat the Oven
Preheat your oven to 375°F (190°C). Place individual ramekins or oven-safe dishes on a baking sheet.
2. Prepare the Blueberry Filling
In a medium-sized mixing bowl, gently combine the blueberries, lemon juice, granulated sugar, cornstarch, and vanilla extract. Ensure the blueberries are well coated with the mixture.
3. Divide the Blueberry Mixture
Divide the blueberry mixture evenly into the individual ramekins.
4. Prepare the Crisp Topping
In a separate bowl, combine the rolled oats, all-purpose flour, shredded coconut, brown sugar, and a pinch of salt. Mix well. Add the cold, cubed butter and use your fingers to incorporate the butter into the dry ingredients until the mixture forms coarse crumbs.
5. Top the Blueberries
Evenly distribute the crisp topping over the blueberry mixture in each ramekin, covering the blueberries completely.
6. Bake
Place the baking sheet with the filled ramekins into the preheated oven and bake for about 20-25 minutes or until the tops are golden brown, and the blueberry filling is bubbling.
7. Serve
Remove the ramekins from the oven and allow them to cool slightly. Serve the Individual Blueberry Coconut Crisps warm, optionally topped with a scoop of vanilla ice cream or a dollop of whipped cream.
Estimated Nutrition Per Serving
Calories
250 kcal
Total Fat
11g
Saturated Fat
7g
Cholesterol
20mg
Sodium
50mg
Total Carbohydrates
38g
Dietary Fiber
3g
Sugars
21g
Protein
2g
Please note that nutrition information is an estimate and may vary based on specific ingredients and portion sizes used. It’s advisable to calculate nutrition based on the exact products you use for accuracy.
As a mother of a 2 1/2 year old, nutrition and health is constantly on my mind. Ensuring that you yourself are eating a balanced diet and getting all of your essential vitamins & minerals can be challenging enough, but add in a little human being who is entirely reliant on you for providing 3 healthy meals (and numerous snacks) every day can be downright daunting. Fortunately for me, our daughter is an adventurous and enthusiastic eater (at least for the time being; I know these things can change on a whim with kiddos!).
That being said, I did start giving her a kid’s multivitamin around her second birthday so that I might fill in any nutritional gaps in her diet. I found L’il Critters™ Gummy Vites Complete at our local Whole Foods, and Lily immediately loved them!
Therefore, when I was asked to write a sponsored post featuring L’il Critters™ Gummy Vites Complete, I jumped at the chance to spread the word about this great kid’s multivitamin.
These great-tasting gummies quickly became a daily routine that Lily looked forward to. Pretty much the first thing she asks for every single morning is her “gummy”. Forget tough-to-administer liquid or chalky chewables, these gummy vitamins actually taste good enough for kids to request them.
L’il Critters™ Gummy Vites Complete are tailored to meet the nutritional needs of children, they have no high fructose corn syrup or synthetic dyes, and they are gluten free.
These statements have not been evaluated by the Food and Drug administration. This product is not intended to diagnose, treat, cure, or prevent any disease.
If you’re looking for a multivitamin that will help to give your kiddos the nutrients that their growing bodies need AND that they will love to eat, then look no further than L’il Critters™ Gummy Vites Complete. They are available for purchase at club, mass, drug, and grocery stores nationwide including: Costco, Walmart, Target, and Walgreens.
I received free product and payment for this sponsored post. All opinions are 100% mine.
Name
Gummy Vites Complete
Cuisine
Fusion
Prep Time
30 minutes
Cooking Time
15 minutes
Total Time
45 minutes
Servings
24
Yield
24 gummy vitamins
Ingredients
2 cups fruit juice (e.g., orange or mixed berries)
1/4 cup gelatin powder
2 tablespoons honey or maple syrup
1 teaspoon vitamin C powder
1/2 teaspoon multivitamin powder
Gummy molds
Nutrition Facts
Calories per Serving: 50
Total Fat: 0g
Saturated Fat: 0g
Cholesterol: 0mg
Sodium: 5mg
Total Carbohydrates: 10g
Dietary Fiber: 0g
Sugars: 8g
Protein: 2g
Vitamin C: 30mg
Multivitamin Blend: 100% Daily Value
Instructions
In a small saucepan, heat the fruit juice over low heat until warm but not boiling.
Gradually whisk in the gelatin powder, ensuring there are no lumps.
Add honey or maple syrup, vitamin C powder, and multivitamin powder. Continue to whisk until the mixture is well combined.
Remove the saucepan from heat and let it cool for a few minutes.
Pour the mixture into gummy molds. You can use silicone molds in fun shapes.
Place the molds in the refrigerator and let them set for at least 2 hours, or until the gummies are firm.
Once set, carefully remove the gummies from the molds.
We are currently immersed in an oppressive heat wave here in New England. I know some of you are probably rolling your eyes at my inability to handle a humid 95°, but I am just not cut out for the heat… especially humid heat.
All I want to eat is cold, frosty, fruity, frozen goodness such as this No-Churn Strawberry Ice Cream:
Comprised solely of raw cashews, fresh strawberries, maple syrup, and vanilla extract, this vegan ice “cream” is super easy to make if you have a high-speed blender such as a Vitamix. Just soak raw cashews in water for a couple of hours to soften them up, then blend with the rest of the ingredients and freeze.
I can guarantee that this is not going to last long in our freezer!
No-Churn Strawberry Ice Cream {vegan}
Name
No-Churn Strawberry Ice Cream
Cuisine
Fusion
Prep Time
15 minutes
Cooking Time
0 minutes (no cooking required)
Total Time
6 hours (including freezing time)
Servings
8 servings
Yield
1 quart
Ingredients
2 cups raw cashews, soaked at least 2 hours
4 cups hulled fresh ripe strawberries (pack the strawberries in lightly)
1/4 cup + 2 Tbsp pure maple syrup (or more, to taste)
1 tsp pure vanilla extract
just enough cold filtered water to achieve a creamy consistency (I used about 1/2 cup total)
Estimated Nutrition Per Serving
Calories: 200
Total Fat: 12g
Saturated Fat: 8g
Cholesterol: 40mg
Sodium: 20mg
Total Carbohydrates: 20g
Dietary Fiber: 2g
Sugars: 16g
Protein: 3g
Instructions
Drain the cashews and add to a high speed blender. Add in hulled strawberries, maple syrup, and vanilla extract and blend on medium-high speed.
With the motor running, add in water, 1 Tbsp at a time, until the mixture is perfectly smooth but still quite thick. Be advised that the more water you add, the icier the end result will be.
Taste, and add more maple syrup if desired.
Pour/spoon mixture into a container, cover with plastic wrap, and freeze until scoop able but still fairly soft.
NOTE: Best when enjoyed at soft-serve consistency the same day you make it.
Thanks to a generous birthday gift from a sweet friend, I recently attended a cooking class at Sur la Table. The theme of the class was superfoods, and everything we made was delicious. Not surprisingly, dessert was one of the stand-out courses, so I was pleased when the instructor handed each attendant a packet with the recipes from the course; I would definitely be making the Chocolate-Coconut Crinkle Cookies at home.
A week went by, and instead of making the cookies exactly as we had in class, I decided to alter the recipe a bit and make the dough into a completely different cookie.
My adapted version yields a softer cookie due to additional coconut oil, as well as a richer chocolate flavor thanks to a bit more chocolate; I omitted the powdered sugar called for in the original crinkle cookie recipe and instead made a peanut butter-filled thumbprint indentation on top of each cookie.
These cookies are to be enjoyed both by those who do and those who do not follow a gluten-free diet. If you can’t (or choose not to) eat wheat, then let me introduce you to your new favorite gluten-free dessert! If wheat is part of your diet, you’ll still love these cookies because seriously… chocolate & peanut butter. Enough said.
Chocolate & Peanut Butter Thumbprint Cookies {gluten-free}
1/2 cup melted virgin coconut oil (measure after melting)
2 1/2 cups blanched almond flour (NOT almond meal, which is coarser and includes the almond skins), sifted to get rid of any lumps
2 Tbsp coconut flour
3 Tbsp unsweetened cocoa powder
1/2 cup coconut palm sugar
1/2 tsp baking soda
1/2 tsp Kosher salt
2 large eggs, preferably organic
1/2 tsp pure vanilla extract
natural salted peanut butter, preferably organic, well-stirred (look for one that lists only peanuts and salt in the ingredient list)
Nutrition Facts
Calories: 120
Total Fat: 7g
Saturated Fat: 4g
Trans Fat: 0g
Cholesterol: 20mg
Sodium: 50mg
Total Carbohydrates: 13g
Dietary Fiber: 2g
Sugars: 6g
Protein: 2.5g
Instructions
Combine the chocolate chips and liquid coconut oil in a microwave-safe bowl. Heat on high for 30 seconds, stir, then heat for another 30 seconds; stir again (chocolate should be fully melted at this point) and set aside to cool.
In a large mixing bowl, whisk together the sifted almond flour, coconut flour, cocoa powder, coconut palm sugar, baking soda, and salt.
In a medium mixing bowl, whisk together the eggs, vanilla extract, and cooled melted chocolate/coconut oil mixture.
Pour wet ingredients into dry ingredients and stir until well-combined. Cover bowl with plastic wrap and refrigerate for about 15-20 minutes, or until dough is firm.
Preheat oven to 350°F.
Line two large baking sheets with unbleached parchment paper or silicone baking mats. Using a cookie scoop, mini ice cream scoop, or a spoon, scoop dough out onto prepared baking sheets. Cookies will not spread, so no need to leave much room between them.
Bake at 350°F for 10 minutes.
While cookies are still very soft, carefully press thumb into the center of each to form a shallow indentation.
Let cookies cool completely on the baking sheets.
When cookies are completely cool, fill each indentation with about 1/2-1 tsp of peanut butter.
Store cookies in an airtight container in the refrigerator.
Every parent has to make their own decision on when to first introduce sugar to their baby. We’ve decided to wait as long as possible, and opt instead to give Lily plenty of fresh fruit with a bit of dried fruit tossed into the mix every now and then.
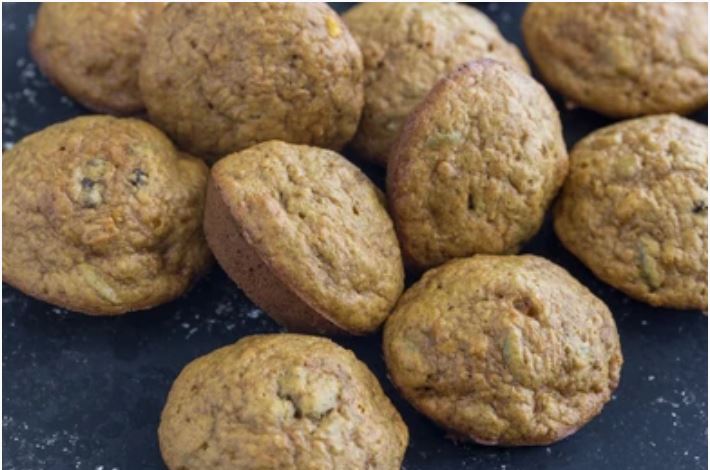
Sugar-free baking might seem like an oxymoron, but fruit does a wonderful job of naturally sweetening baked goods. These muffins, for instance, are sweetened with dates: my absolute favorite dried fruit. Medjool dates are plump and soft, which renders them perfect for puréeing into the muffin batter.
Buttermilk keeps the muffins moist, a hint of cinnamon adds a slight warm sweetness, and finely grated carrots add nutrients.
I thought it would be cute to “frost” the muffins with Lily’s favorite whole milk yogurt, but you can certainly serve these petite bites to your little one sans yogurt.
I was just able to snap the above photo before Lily dove in…
She ate the yogurt first, and then went to town on the muffin.
Healthy, yummy, portable (without the yogurt frosting), and easy to pick up with small hands, these mini carrot muffins have already become a staple in our house!
Name
Mini Carrot Muffins
Cuisine
Fusion
Prep Time
15 minutes
Cooking Time
20 minutes
Total Time
35 minutes
Servings
12 muffins
Yield
1 dozen
Ingredients
4 large soft Medjool dates, pitted
1 large egg, preferably organic
1 cup buttermilk
1 Tbsp vegetable oil
1 cup whole wheat pastry flour
1 tsp baking powder
1/2 tsp baking soda
1/2 tsp ground cinnamon
1/4 tsp salt
1 cup finely grated carrot (I like to use a microplane grater)
whole milk yogurt for frosting, optional
Estimated Nutrition Per Serving (1 mini muffin)
Calories: 120
Total Fat: 5g
Saturated Fat: 1g
Cholesterol: 20mg
Sodium: 160mg
Total Carbohydrates: 16g
Dietary Fiber: 1g
Sugars: 6g
Protein: 3g
Vitamin A: 30%
Vitamin C: 2%
Calcium: 4%
Iron: 4%
Instructions
Preheat oven to 350°F. Lightly grease 2 (12 cup) mini muffin tins.
In a food processor or blender, combine the dates, egg, buttermilk, and oil. Puree until well-blended (some tiny bits of date are okay). Set aside.
In a large mixing bowl, whisk together the flour, baking powder, baking soda, cinnamon, and salt.
Pour the wet ingredients into the dry, stirring until almost all of the dry ingredients are moistened. Fold in the grated carrots.
Using a tablespoon or mini ice cream scoop, spoon the batter evenly amongst the 24 prepared muffin cups.
Bake in preheated oven for 12-14 minutes, or until the top of a muffin springs back when lightly pressed.
Allow muffins to cool in pan for 10 minutes. Run a butter knife around each muffin to remove and let cool on a wire rack.
Spread a little bit of yogurt on a muffin right before serving, if desired.
Introducing solid foods to your baby is an exciting milestone, and making homemade, nutritious meals is a great way to ensure they get the best start in their culinary journey.
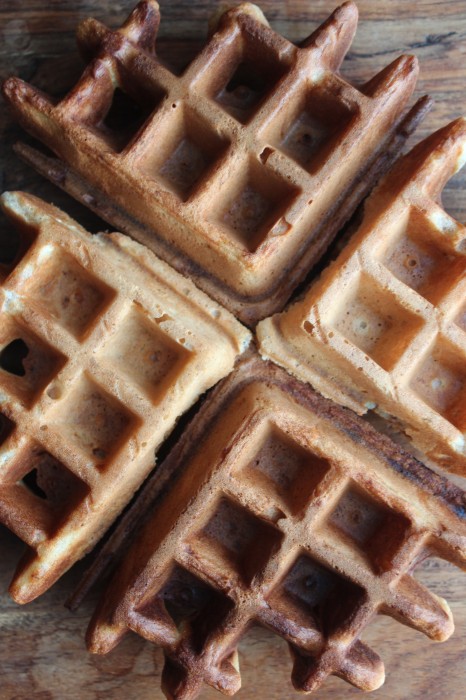
When it comes to breakfast, these No Sugar Added Banana Waffles are a delightful choice that your little one is sure to love.
Packed with wholesome ingredients and bursting with banana flavor, these waffles are perfect for tiny taste buds.
Ingredients
2 ripe bananas
1 cup whole wheat flour
1/2 cup unsweetened applesauce
2 eggs
1/2 cup breast milk or formula (you can also use cow’s milk if your baby is over 12 months)
1/2 teaspoon baking powder
1/4 teaspoon cinnamon (optional)
Cooking spray or a small amount of butter for greasing the waffle iron
Instructions
1. Gather Your Ingredients
Before you begin, make sure you have all the necessary ingredients on hand. Double-check that your bananas are ripe; they should have brown spots on the peel, which indicates they are sweet and perfect for this recipe.
2. Preheat Your Waffle Iron
Preheat your waffle iron according to the manufacturer’s instructions. This will ensure your waffles cook evenly.
3. Mash the Bananas
Peel the ripe bananas and place them in a mixing bowl. Use a fork or potato masher to thoroughly mash the bananas until they have a smooth, creamy consistency. This will provide natural sweetness to your waffles.
4. Combine Dry Ingredients
In a separate bowl, whisk together the whole wheat flour and baking powder. If you want to add a touch of spice, you can also include the optional cinnamon at this stage.
5. Mix Wet Ingredients
To the mashed bananas, add the unsweetened applesauce, eggs, and breast milk or formula. Mix everything together until well combined. This will form the wet mixture for your waffles.
Name
No Sugar Added Banana Waffles for Baby
Cuisine
Fusion
Prep Time
10 minutes
Cooking Time
10 minutes
Total Time
20 minutes
Servings
4 servings
Yield
8 small waffles
Estimated Nutrition Per Serving
Please note that the nutritional values can vary based on the specific ingredients and portion sizes, but here’s an approximate breakdown per serving (1 baby-sized waffle):
Calories: 60-70 kcal
Protein: 2-3g
Carbohydrates: 11-12g
Dietary Fiber: 2g
Sugars: 3-4g (from natural sugars in bananas and applesauce)
Fat: 1-2g
Saturated Fat: 0.3g
Cholesterol: 40-50mg (from eggs)
Sodium: 20-30mg
Potassium: 80-100mg (from bananas)
Calcium: 20-30mg
Iron: 0.6-0.8mg
All of my recipes for “baby” can be enjoyed by the entire family, but these waffles in particular are sure to appeal to kids & adults alike.
Sweetened only with ripe banana, these waffles are a breakfast choice you can feel good about giving your kiddos… but they’re so delicious that you’ll want to make enough for yourself as well.
Leftovers freeze & toast beautifully, so make a big batch to last the week. I like to slightly undercook the waffles I intend to freeze so that when I toast them they’re perfectly soft inside and crisp outside.
Lily LOVES these waffles; it’s one of the foods (along with cheese & pear) that I know she will eat whenever I offer it to her. They’re easy for her to grasp and eat herself, soft enough for her to break off small pieces and chew, and they are also portable with little mess.
As we draw closer to the notoriously picky toddler eating stage, I hope she continues to eat these waffles. They’re a cinch to make and so much healthier than store-bought frozen waffles.
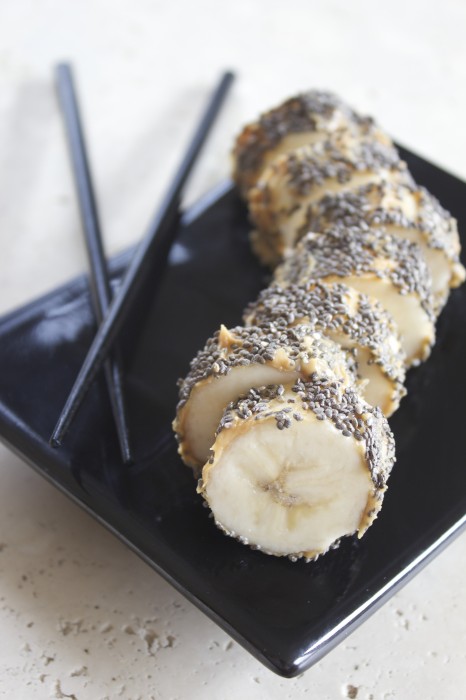
I’m sharing my recipe for Banana Sushi Chia “Tempura” Roll on the Essential Living Foods blog. It’s a great way to get kids to eat omega-3 fatty acids!
Looking for a unique and healthy twist on sushi? Try these Banana Sushi Chia “Tempura” Rolls! This creative recipe combines the sweetness of ripe bananas with the crunch of chia seed “tempura” and the creaminess of avocado to create a delightful sushi roll that’s perfect for breakfast, dessert, or a fun snack. It’s not only delicious but also incredibly simple to make. Let’s roll!
Name
Banana Sushi Chia “Tempura” Roll
Cuisine
Fusion
Prep Time
15 minutes
Cooking Time
10 minutes
Total Time
25 minutes
Servings
2 rolls
Yield
20 pieces
Ingredients For the Banana Sushi Rolls
2 ripe bananas
2 sheets of nori (seaweed)
1 avocado, thinly sliced
2 tablespoons honey
2 tablespoons chia seeds
1 tablespoon sesame seeds (black or white), toasted
1/4 cup coconut flakes
Sliced strawberries (optional, for garnish)
Ingredients For the Chia “Tempura” Coating
3 tablespoons chia seeds
2 tablespoons water
1 tablespoon honey
A pinch of salt
Nutrition Facts per Serving:
Calories: 210 calories
Total Fat: 9g
Saturated Fat: 2g
Trans Fat: 0g
Cholesterol: 0mg
Sodium: 80mg
Total Carbohydrates: 35g
Dietary Fiber: 8g
Sugars: 16g
Protein: 4g
Please note that these nutrition facts are approximate and can vary based on the specific brands and quantities of ingredients used. These values are for general reference and may not account for variations in ingredient choices or preparation methods. Enjoy your Banana Sushi Chia “Tempura” Rolls while keeping these nutritional considerations in mind!
Instructions
Making the Chia “Tempura” Coating:
In a small bowl, combine the chia seeds, water, honey, and a pinch of salt. Mix well and let it sit for 10-15 minutes until it thickens. This will be your chia “tempura” coating.
Preparing the Banana Sushi Rolls:
Lay a sheet of plastic wrap on a clean, flat surface. Place a sheet of nori on top, shiny side down.
Peel the ripe bananas and slice them in half lengthwise.
Lay the banana halves side by side on the nori sheet, leaving a small gap between them. Make sure they are positioned closer to one edge of the nori sheet.
Spread a thin layer of chia “tempura” mixture over the banana halves.
Add a layer of thinly sliced avocado on top of the chia “tempura.”
Drizzle honey over the avocado slices.
Sprinkle toasted sesame seeds and coconut flakes evenly over the avocado.
Carefully lift the edge of the nori sheet closest to the bananas and start rolling it away from you, using the plastic wrap to help shape the roll.
When you reach the end, wet the edge of the nori sheet with a bit of water to seal the roll.
Repeat the process to make another roll.
*There were a few emails in my inbox that I was planning to respond that have mysteriously gone missing (not in my Trash or spam folders). If you recently emailed me at, please resend your message so I can get back to you! Thanks.


")


")